<?xml version="1.0" encoding="utf-8"?>
<feed xmlns="http://www.w3.org/2005/Atom">
            <title type="text">沙罗双树园</title>
    <updated>2022-05-12T09:53:45+08:00</updated>
        <id>https://starlin.top</id>
        <link rel="alternate" type="text/html" href="https://starlin.top" />
        <link rel="self" type="application/atom+xml" href="https://starlin.top/atom.xml" />
    <rights>Copyright © 2026, 沙罗双树园</rights>
    <generator uri="https://halo.run/" version="1.6.0">Halo</generator>
            <entry>
                <title><![CDATA[使用springboot集成mqtt的坑]]></title>
                <link rel="alternate" type="text/html" href="https://starlin.top/archives/shi-yong-springboot-ji-cheng-mqtt-de-keng" />
                <id>tag:https://starlin.top,2022-05-09:shi-yong-springboot-ji-cheng-mqtt-de-keng</id>
                <published>2022-05-09T23:03:37+08:00</published>
                <updated>2022-05-12T09:53:45+08:00</updated>
                <author>
                    <name>starlin</name>
                    <uri>https://starlin.top</uri>
                </author>
                <content type="html">
                        <![CDATA[<p>最近在项目中使用到了mqtt，引入springboot的相关依赖后，发现怎么都无法注入对应的service，相应的代码如下：</p><h2 id="%E5%BC%95%E5%85%A5%E7%9B%B8%E5%85%B3starter" tabindex="-1">引入相关starter</h2><pre><code class="language-xml">&lt;dependency&gt;    &lt;groupId&gt;org.springframework.integration&lt;/groupId&gt;    &lt;artifactId&gt;spring-integration-core&lt;/artifactId&gt;&lt;/dependency&gt;&lt;dependency&gt;    &lt;groupId&gt;org.springframework.integration&lt;/groupId&gt;    &lt;artifactId&gt;spring-integration-mqtt&lt;/artifactId&gt;&lt;/dependency&gt;</code></pre><h2 id="%E5%AE%9A%E4%B9%89%E6%8E%A5%E5%8F%A3" tabindex="-1">定义接口</h2><pre><code class="language-java">@Component@MessagingGateway(defaultRequestChannel = &quot;mqttOutChannel&quot;)public interface MqttPushService {    @MqttLog    void pushMessage(String data, @Header(MqttHeaders.TOPIC) String topic);}</code></pre><h2 id="%E5%9C%A8%E9%9C%80%E8%A6%81%E7%9A%84%E5%9C%B0%E6%96%B9%E6%B3%A8%E5%85%A5%E6%8E%A5%E5%8F%A3" tabindex="-1">在需要的地方注入接口</h2><pre><code class="language-java">@SpringBootTest@RunWith(SpringRunner.class)public class TestFeginConsumer {    @Autowired    private MqttPushService mqttPushServer;    @Test    public void test() {        mqttPushServer.pushMessage(null,null);    }}</code></pre><p>运行的上述代码提示，如下错误信息：</p><pre><code class="language-">Action:Consider defining a bean of type &#39;com.xxxx.xxxx&#39; in your configuration</code></pre><p>反正就是提示该bean未注入，实在是想不明白，怎么就未注入了，后面的翻看@MessagingGateway注解的文档，发现问题了</p><h2 id="%E8%A7%A3%E5%86%B3%E6%96%B9%E6%A1%88" tabindex="-1">解决方案</h2><p>关于@MessagingGateway注解，相关文档<a href="https://docs.spring.io/spring-integration/api/org/springframework/integration/annotation/MessagingGateway.html" target="_blank">请点击</a></p><p>其中有这么一句话标注为important，如下图所示：<br /><img src="https://raw.githubusercontent.com/smartlin/pic/main/_posts/spring/%E4%BD%BF%E7%94%A8springboot%E9%9B%86%E6%88%90mqtt%E7%9A%84%E5%9D%91.md/68405804826303.png" alt="" /></p><p>大概的意思就是，使用普通的注解@CompontenScan是无法扫描@MessagingGateway注解，需要使用@IntegrationComponentScan注解和@Configuration注解</p><p>至此完美解决了，真不明白网上的那些文章，吵来吵去的，都没测试过了么</p><p>the end ，感谢阅读！！！</p>]]>
                </content>
            </entry>
            <entry>
                <title><![CDATA[ OpenFegin无注册中心的使用]]></title>
                <link rel="alternate" type="text/html" href="https://starlin.top/archives/openfegin-wu-zhu-ce-zhong-xin-de-shi-yong" />
                <id>tag:https://starlin.top,2022-05-04:openfegin-wu-zhu-ce-zhong-xin-de-shi-yong</id>
                <published>2022-05-04T19:26:09+08:00</published>
                <updated>2022-05-04T19:26:54+08:00</updated>
                <author>
                    <name>starlin</name>
                    <uri>https://starlin.top</uri>
                </author>
                <content type="html">
                        <![CDATA[<p>本篇记录了本人使用OpenFegin作为http客户端的简单使用，虽然比直接使用http调用方式会有点开销，但是还是值得试试。<br />这里使用springboot的方式来搭建相关的环境</p><h2 id="定义fegin接口">定义fegin接口</h2><p>接口定义如下：</p><pre><code class="language-java">@FeignClient(url=&quot;http://localhost:8080&quot;, name = &quot;pServer&quot;，path=&quot;/p1Server&quot;)public interface P1Service {    @GetMapping(value = &quot;/getName&quot;)    String getName(@RequestParam String name);}</code></pre><p>@FeignClient ：该注解是启用fegin必须的，其中的url是服务请求地址，name是服务名（全局唯一），path是服务路径前缀(不能使用requestMapping)</p><h2 id="定义对应的controller接口">定义对应的controller接口</h2><p>该Controller接口定义和SpringMvc的定义没有什么区别，不过要值得注意的是：需要与上面接口地址中的路径保持一致，如下：</p><pre><code class="language-java">@RestController@RequestMapping(value = &quot;/p1Server&quot;)public class ProviderController {    @RequestMapping(value = &quot;/getName&quot;)    public String getName1(String name) {        return &quot;hello:   &quot; + name;    }}</code></pre><h2 id="在启动类增加enablefeignclients注解">在启动类增加@EnableFeignClients注解</h2><p><strong>需启动服务</strong></p><pre><code class="language-java">@EnableFeignClients@SpringBootApplicationpublic class OpenFeginP2Application {    public static void main(String[] args) {        SpringApplication.run(OpenFeginP2Application.class, args);    }}</code></pre><h2 id="编写测试方法">编写测试方法</h2><p>将之前定义的P1Service接口注入即可</p><pre><code class="language-java">@SpringBootTest@RunWith(SpringRunner.class)public class TestFegin {    @Autowired    private P1Service p1Service;    @Test    public void test() {        System.out.println(p1Service.getName(&quot;starlin&quot;));    }}</code></pre><p>输出的结果为：</p><pre><code>hello: starlin111</code></pre><p>以上就是用OpenFegin作为http客户端的简单使用，End，感谢阅读！！！</p>]]>
                </content>
            </entry>
            <entry>
                <title><![CDATA[搭建Halo博客]]></title>
                <link rel="alternate" type="text/html" href="https://starlin.top/archives/da-jian-halo-bo-ke" />
                <id>tag:https://starlin.top,2021-08-27:da-jian-halo-bo-ke</id>
                <published>2021-08-27T23:43:50+08:00</published>
                <updated>2021-08-27T23:43:50+08:00</updated>
                <author>
                    <name>starlin</name>
                    <uri>https://starlin.top</uri>
                </author>
                <content type="html">
                        <![CDATA[<p>最近买了个一个阿里云的服务器，于是乎想搭建一个博客，之前玩过hexo，wordpress，觉得还不是适合自己，直到发现了Halo这个博客，让我眼前一亮<br />搭建环境：Centos7<br />下面记录下搭建的过程(部分摘抄官方文档)</p><h2 id="安装jdk11">安装jdk11</h2><pre><code>sudo yum install java-11-openjdk -y</code></pre><h2 id="安装halo">安装Halo</h2><ol><li>创建目录halo</li></ol><pre><code>mkdir halo</code></pre><ol start="2"><li>在Halo包下载至halo目录</li></ol><pre><code>curl -L https://github.com/halo-dev/halo/releases/download/v1.4.13/halo-1.4.13.jar --output halo.jar</code></pre><ol start="3"><li>创建工作目录Halo</li></ol><pre><code>mkdir ~/.halo &amp;&amp; cd ~/.halo</code></pre><ol start="4"><li>下载示例配置文件到工作目录</li></ol><pre><code>wget https://dl.halo.run/config/application-template.yaml -O ./application.yaml </code></pre><ol start="5"><li>编辑配置文件，配置数据库或者端口<br />如有其他需求，比如更改数据库为mysql，请参考官方文档<a href="https://docs.halo.run/getting-started/config/">参考配置</a><br />以下是我的最终配置（密码部分请自行修改）:</li></ol><pre><code class="language-xml">server:  port: 8090  # Response data gzip.  compression:    enabled: falsespring:  datasource:    # H2 database configuration.    driver-class-name: org.h2.Driver    url: jdbc:h2:file:~/.halo/db/halo    username: admin    password: xxxx    # MySQL database configuration.#    driver-class-name: com.mysql.cj.jdbc.Driver#    url: jdbc:mysql://127.0.0.1:3306/halodb?characterEncoding=utf8&amp;useSSL=false&amp;serverTimezone=Asia/Shanghai&amp;allowPublicKeyRetrieval=true#    username: root#    password: xxxxx  # H2 database console configuration.  h2:    console:      settings:        web-allow-others: true      path: /h2-console      enabled: truehalo:  # Your admin client path is https://your-domain/{admin-path}  admin-path: admin  # memory or level  cache: level</code></pre><ol start="6"><li>回到下载jar包的目录halo，运行如下命令</li></ol><pre><code>java -jar halo.jar</code></pre><p>如果出现以下提示，表示安装成功</p><pre><code>2021-10-27 16:48:32.938  INFO 1590 --- [           main] run.halo.app.listener.StartedListener    : Halo admin started at   http://127.0.0.1:8090/admin2021-10-27 16:48:32.938  INFO 1590 --- [           main] run.halo.app.listener.StartedListener    : Halo has started successfully!</code></pre><p>打开 <a href="http://ip">http://ip</a>: 端口号 即可看到安装引导界面。</p><h2 id="创建halo服务">创建halo服务</h2><ol><li>下载 Halo 官方的 halo.service 模板</li></ol><pre><code>wget https://dl.halo.run/config/halo.service -O /etc/systemd/system/halo.service</code></pre><ol start="2"><li>修改halo.service</li></ol><pre><code>vim /etc/systemd/system/halo.service</code></pre><ol start="3"><li>修改配置</li></ol><ul><li><strong>YOUR_JAR_PATH</strong>：Halo 运行包的绝对路径，例如 <code>/root/halo/halo.jar</code>，注意：此路径不支持 <code>~</code> 符号。</li><li><strong>USER</strong>：运行 Halo 的系统用户，如果有按照官方教程创建新的用户来运行 Halo，修改为你创建的用户名称即可。反之请删除 <code>User=USER</code>。</li></ul><ol start="4"><li>重新加载 systemd</li></ol><pre><code>systemctl daemon-reload</code></pre><ol start="5"><li>启动halo服务</li></ol><pre><code>systemctl start halo</code></pre><ol start="6"><li>在系统启动时启动服务</li></ol><pre><code>systemctl enable halo</code></pre><ol start="7"><li>查看服务日志检查启动状态</li></ol><pre><code>journalctl -n 20 -u halo</code></pre><h2 id="配置nginx">配置nginx</h2><ol><li>安装nginx</li></ol><pre><code>yum install nginx</code></pre><ol start="2"><li>修改配置文件<br />因为要配置ssl，还请提前准备好证书，<br />我这里是用的阿里云的免费CA证书<br />最终的配置如下：</li></ol><pre><code class="language-conf">upstream halo {  server 127.0.0.1:8090;}server {  listen 80;  listen [::]:80;  server_name starlin.top www.starlin.top;  client_max_body_size 1024m;  location / {    proxy_pass http://halo;    proxy_set_header HOST $host;    proxy_set_header X-Forwarded-Proto $scheme;    proxy_set_header X-Real-IP $remote_addr;    proxy_set_header X-Forwarded-For $proxy_add_x_forwarded_for;  }}server {    listen       443 ssl http2;    listen       [::]:443 ssl http2;    server_name  starlin.top www.starlin.top;    root         /usr/share/nginx/html;    ssl_certificate &quot;/root/halo/starlin.top.pem&quot;;    ssl_certificate_key &quot;/root/halo/starlin.top.key&quot;;    ssl_session_cache shared:SSL:1m;    ssl_session_timeout  10m;    ssl_ciphers HIGH:!aNULL:!MD5;    ssl_prefer_server_ciphers on;# Load configuration files for the default server block.    include /etc/nginx/default.d/*.conf;    location / {      proxy_pass http://halo;      proxy_set_header HOST $host;      proxy_set_header X-Forwarded-Proto $scheme;      proxy_set_header X-Real-IP $remote_addr;      proxy_set_header X-Forwarded-For $proxy_add_x_forwarded_for;     }    error_page 404 /404.html;        location = /40x.html {    }    error_page 500 502 503 504 /50x.html;        location = /50x.html {    }}</code></pre><h2 id="博客主题">博客主题</h2><p>推荐这个主题<br /><a href="https://github.com/xzhuz/halo-theme-xue">下载地址</a></p><p>以上，感谢阅读！！！</p>]]>
                </content>
            </entry>
            <entry>
                <title><![CDATA[动态修改线程池]]></title>
                <link rel="alternate" type="text/html" href="https://starlin.top/archives/动态修改线程池" />
                <id>tag:https://starlin.top,2021-07-02:动态修改线程池</id>
                <published>2021-07-02T22:00:12+08:00</published>
                <updated>2021-07-02T22:00:12+08:00</updated>
                <author>
                    <name>starlin</name>
                    <uri>https://starlin.top</uri>
                </author>
                <content type="html">
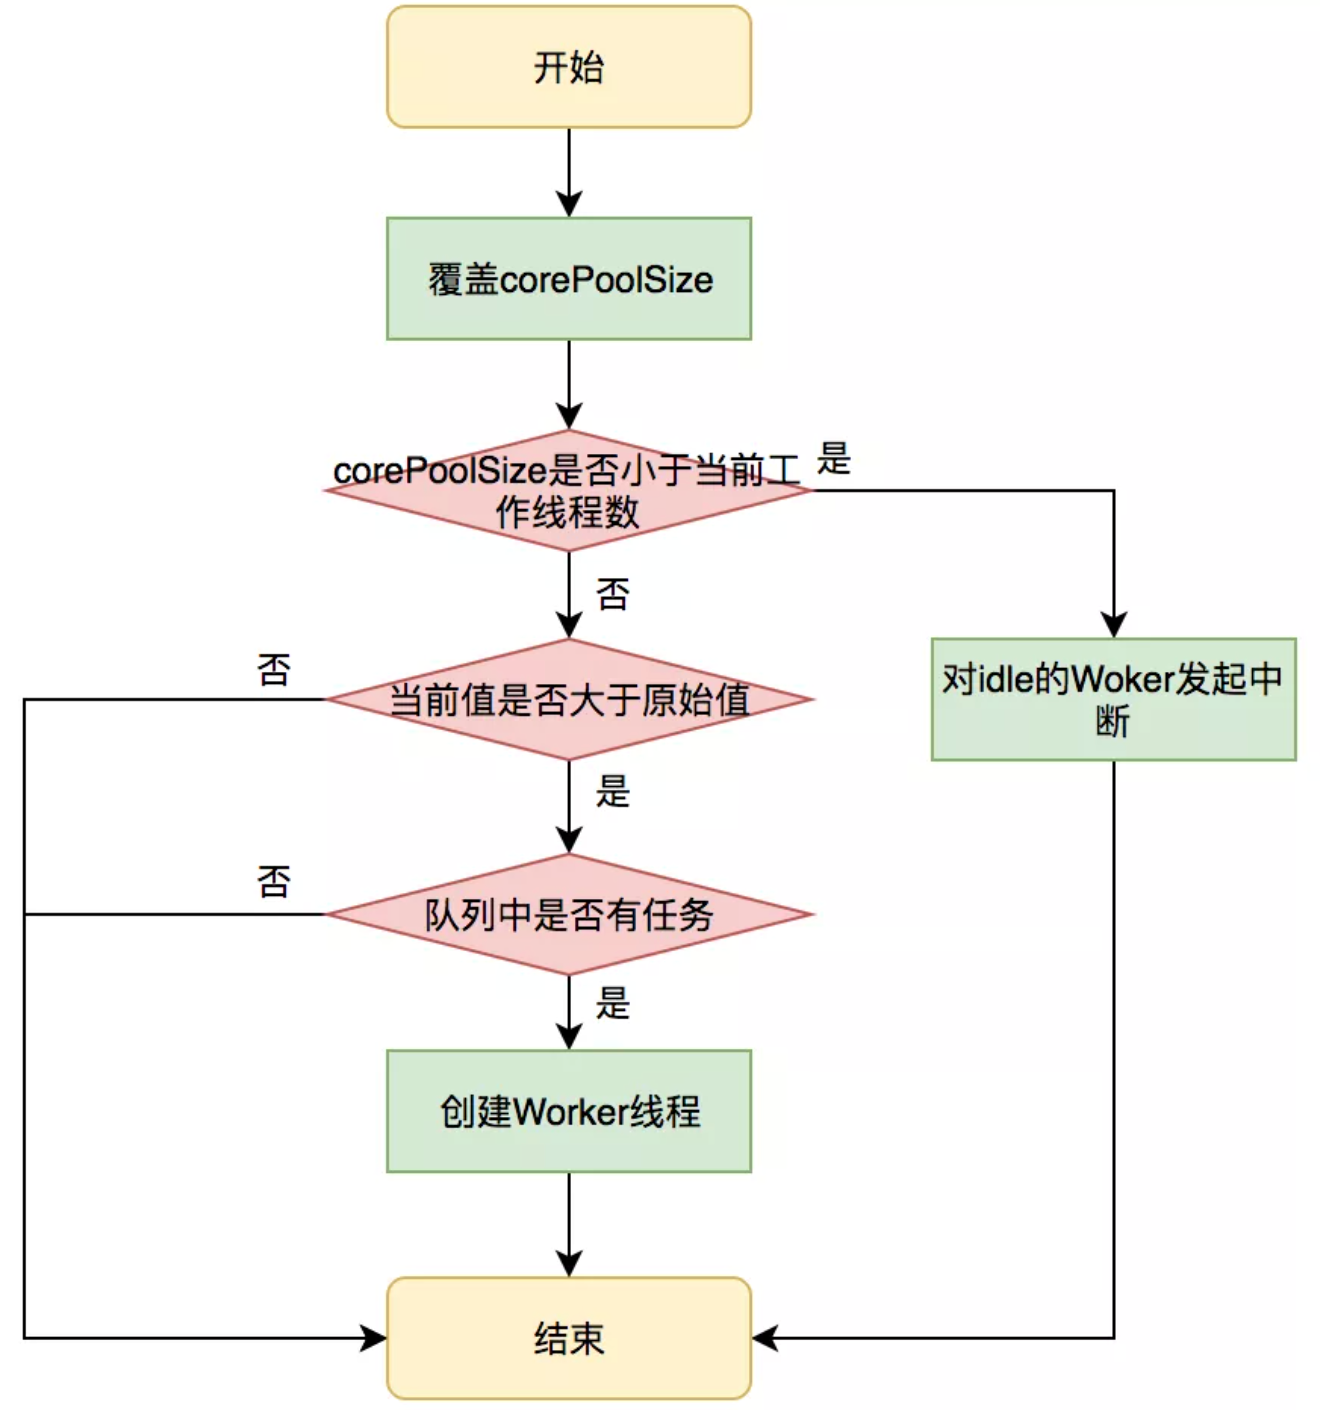
                        <![CDATA[<p>在平时工作中，用到的最多的应该是线程池了，那么，当自定义线程池的时候 corePoolSize、maximumPoolSize、workQueue（队列长度）如何动态化调整了</p><h2 id="动态更新的原理">动态更新的原理</h2><h3 id="更新corepoolsize的源码">更新corePoolSize的源码</h3><pre><code class="language-java">public void setCorePoolSize(int corePoolSize) {    if (corePoolSize &lt; 0)        throw new IllegalArgumentException();    int delta = corePoolSize - this.corePoolSize;    this.corePoolSize = corePoolSize;    if (workerCountOf(ctl.get()) &gt; corePoolSize)        interruptIdleWorkers();    else if (delta &gt; 0) {        // We don't really know how many new threads are &quot;needed&quot;.        // As a heuristic, prestart enough new workers (up to new        // core size) to handle the current number of tasks in        // queue, but stop if queue becomes empty while doing so.        int k = Math.min(delta, workQueue.size());        while (k-- &gt; 0 &amp;&amp; addWorker(null, true)) {            if (workQueue.isEmpty())                break;        }    }}</code></pre><blockquote><p>在运行期间线程池使用此方法设置corePoolSize之后，线程池会直接覆盖原来的corePoolSize值，并且基于当前值和原始值的比较结果采取不同的处理策略。<br />对于当前值小于当前工作线程数的情况，说明有多余的worker线程，此时会向当前idle的worker线程发起中断请求以实现回收，多余的worker在下次idel的时候也会被回收；<br />对于当前值大于原始值且当前队列中有待执行任务，则线程池会创建新的worker线程来执行队列任务</p></blockquote><p>![](<a href="https://raw.githubusercontent.com/smartlin/pic/main/_posts/java%E5%B9%B6%E5%8F%91/%E5%8A%A8%E6%80%81%E4%BF%AE%E6%94%B9%E7%BA%BF%E7%A8%8B%E6%B1%A0.md/5084111706496.png">https://raw.githubusercontent.com/smartlin/pic/main/_posts/java%E5%B9%B6%E5%8F%91/%E5%8A%A8%E6%80%81%E4%BF%AE%E6%94%B9%E7%BA%BF%E7%A8%8B%E6%B1%A0.md/5084111706496.png</a> =678x)</p><h3 id="更新maximumpoolsize的源码">更新maximumPoolSize的源码</h3><pre><code class="language-java">public void setMaximumPoolSize(int maximumPoolSize) {    //校验参数合理性    if (maximumPoolSize &lt;= 0 || maximumPoolSize &lt; corePoolSize)        throw new IllegalArgumentException();    //覆盖原值    this.maximumPoolSize = maximumPoolSize;    //工作线程是否是大于最大线程数，若大于，则对空闲线程发起中断请求    if (workerCountOf(ctl.get()) &gt; maximumPoolSize)        interruptIdleWorkers();}</code></pre><h3 id="如何更新队列长度">如何更新队列长度</h3><p>在ThreadPoolExecutor源码中没有设置队列长度的的方法，如下图：<br />![](<a href="https://raw.githubusercontent.com/smartlin/pic/main/_posts/java%E5%B9%B6%E5%8F%91/%E5%8A%A8%E6%80%81%E4%BF%AE%E6%94%B9%E7%BA%BF%E7%A8%8B%E6%B1%A0.md/5530597505588.png">https://raw.githubusercontent.com/smartlin/pic/main/_posts/java%E5%B9%B6%E5%8F%91/%E5%8A%A8%E6%80%81%E4%BF%AE%E6%94%B9%E7%BA%BF%E7%A8%8B%E6%B1%A0.md/5530597505588.png</a> =652x)<br />那么问题来来，该如何去更新队列长度</p><p>先来看看LinkedBlockingQueue源码中的，发现是被final修饰的,所以没有提供set方法，如下：</p><pre><code>private final int capacity;</code></pre><p>于是乎我参考了大神的做法，把LinkedBlockingQueue源码复制出来，将capacity前面的final修饰去掉，重新定一个名为ResizeLinkedBlockIngQueue的类<br />在创建线程池的时候，把里面的LinkedBlockingQueue替换为ResizeLinkedBlockIngQueue，如下：</p><pre><code>private ThreadPoolExecutor buildThreadPoolExecutorResizeBlockQueue() {    return new ThreadPoolExecutor(2, 5, 60, TimeUnit.MILLISECONDS, new ResizeLinkedBlockIngQueue&lt;&gt;(10));}</code></pre><blockquote><p>Tips：这里会有一个问题，如果将LinkedBlockingQueue换成其他的阻塞队列，则需要将相应阻塞队列中的capacity前面的final修饰去掉，也就是要自定义多个阻塞队列</p></blockquote><p>来看看效果，测试代码如下：</p><pre><code>@org.junit.Testpublic void getThreadPoolInfounUseLinkedBlockingQueue() throws InterruptedException {    ThreadPoolExecutor executor = buildThreadPoolExecutorResizeBlockQueue();    ThreadPoolUtil.threadPoolStatus(executor, &quot;before&quot;);    for (int i = 0; i &lt; 15; i++) {        executor.submit(() -&gt;{            ThreadPoolUtil.threadPoolStatus(executor, &quot;create-thread-starlin&quot;);            try {                TimeUnit.SECONDS.sleep(5);            } catch (InterruptedException e) {                e.printStackTrace();            }        });    }    executor.setCorePoolSize(10);    executor.setMaximumPoolSize(10);    ResizeLinkedBlockIngQueue queue = (ResizeLinkedBlockIngQueue) executor.getQueue();    queue.setCapacity(100);    ThreadPoolUtil.threadPoolStatus(executor, &quot;after&quot;);    Thread.currentThread().join();}</code></pre><p>运行结果，如下图所示：<br />![](<a href="https://raw.githubusercontent.com/smartlin/pic/main/_posts/java%E5%B9%B6%E5%8F%91/%E5%8A%A8%E6%80%81%E4%BF%AE%E6%94%B9%E7%BA%BF%E7%A8%8B%E6%B1%A0.md/3621315809743.png">https://raw.githubusercontent.com/smartlin/pic/main/_posts/java%E5%B9%B6%E5%8F%91/%E5%8A%A8%E6%80%81%E4%BF%AE%E6%94%B9%E7%BA%BF%E7%A8%8B%E6%B1%A0.md/3621315809743.png</a> =1264x)</p><p>从上图可以很明显的看出队列长度、核心线程数、最大线程数都已经改变了</p><h3 id="利用动态配置中心实现方式思路版">利用动态配置中心实现方式（思路版）</h3><p>因为我之前是用Apollo来实现，主要思路是通过的Apollo的监听方式来实现，如果监听到配置发生来改变后刷新线程池的配置，重新set对应的值即可（仅仅配置了是无法生效的）<br />下面拿一个监听日志级别的的listen类（原来监听线程池的代码没找到，这里懒得写了），展示如下：</p><pre><code>@Servicepublic class ApolloChangeListener {    private static final Logger logger = LoggerFactory.getLogger(ApolloChangeListener.class);    private static final String LOGGER_TAG = &quot;logging.level.&quot;;    @ApolloConfig    private Config config;    @Resource    private LoggingSystem loggingSystem;    @ApolloConfigChangeListener    private void someChangeHandler(ConfigChangeEvent changeEvent) {        for (String key : changeEvent.changedKeys()) {            ConfigChange change = changeEvent.getChange(key);            logger.info(&quot;Found change - 【{}】&quot;, change.toString());        }        Set&lt;String&gt; keyNames = config.getPropertyNames();        for (String key : keyNames) {            if (StringUtils.isEmpty(key)) {                continue;            }            if (!key.startsWith(LOGGER_TAG)) {                continue;            }            String loggerName = key.replace(LOGGER_TAG, &quot;&quot;);            String strLevel = config.getProperty(key, &quot;info&quot;);            LogLevel level = LogLevel.valueOf(strLevel.toUpperCase());            loggingSystem.setLogLevel(loggerName, level);            logger.info(&quot;{}:{}&quot;, key, strLevel);        }    }}</code></pre><p>因为我对Nacos没有那么熟悉，在官方文档中也能找到监听器的API，<a href="https://nacos.io/zh-cn/docs/open-api.html">点击跳转</a>，实现方式和Apollo原理一样</p><p>以上，end，感谢阅读！！！</p>]]>
                </content>
            </entry>
            <entry>
                <title><![CDATA[springboot使用druid连接池]]></title>
                <link rel="alternate" type="text/html" href="https://starlin.top/archives/springboot使用druid连接池" />
                <id>tag:https://starlin.top,2021-06-15:springboot使用druid连接池</id>
                <published>2021-06-15T22:00:12+08:00</published>
                <updated>2021-10-28T10:49:06+08:00</updated>
                <author>
                    <name>starlin</name>
                    <uri>https://starlin.top</uri>
                </author>
                <content type="html">
                        <![CDATA[<h1></h1><p>今天在测试druid数据库连接池公平锁对性能的影响的时候，发现了一个尴尬的问题，我们druid配置参数完全没起作用啊</p><p>居然是jdbc，<br /><img src="https://raw.githubusercontent.com/smartlin/pic/main/_posts/spring/sprinboot%E4%BD%BF%E7%94%A8druid%E8%BF%9E%E6%8E%A5%E6%B1%A0.md/%E4%BD%BF%E7%94%A8%E7%9A%84%E6%98%AFjdbc%E8%BF%9E%E6%8E%A5.png" alt="" /></p><p>后来我写了个单元测试证实了，虽然数据库连接池类型是druid，但是druid的参数无效啊，代码如下：</p><pre><code class="language-java">@Testpublic void contextLoads() throws SQLException {    //默认数据源    System.out.println(&quot;默认数据源&quot; + dataSource.getClass());    //获得连接    Connection connection = dataSource.getConnection();    DruidDataSource druidDataSource = (DruidDataSource) dataSource;    System.out.println(&quot;druid 数据源最大连接数：&quot; + druidDataSource.getMaxActive());    System.out.println(&quot;druid 数据源初始化连接数：&quot; + druidDataSource.getInitialSize());    System.out.println(&quot;druid 数据源初始化maxWait：&quot; + druidDataSource.getMaxWait());    System.out.println(&quot;druid 数据源初始化minIdle：&quot; + druidDataSource.getMinIdle());    connection.close();}</code></pre><p>输出结果：</p><pre><code>默认数据源class com.alibaba.druid.pool.DruidDataSource$$EnhancerBySpringCGLIB$$211f72e7com.mysql.cj.jdbc.ConnectionImpl@6b4b6cd6druid 数据源最大连接数：8druid 数据源初始化连接数：0druid 数据源初始化maxWait：-1druid 数据源初始化minIdle：0</code></pre><p>然后看了pom文件，druid引入jar包如下：</p><pre><code class="language-xml">&lt;dependency&gt;    &lt;groupId&gt;com.alibaba&lt;/groupId&gt;    &lt;artifactId&gt;druid&lt;/artifactId&gt;    &lt;version&gt;1.1.20&lt;/version&gt;&lt;/dependency&gt;</code></pre><p>继续，在代码中<strong>没发现druid的配置类</strong>，一口老血差点喷在屏幕上</p><p><strong>解决方案，有2中，如下：</strong></p><ol><li>增加配置类，代码如下：</li></ol><pre><code class="language-java">/** * Created by starlin * on 2021/06/15 16:17. */@Configurationpublic class DruidConfig {    private static final Logger log = org.slf4j.LoggerFactory.getLogger(DruidConfig.class);    @Bean    @ConfigurationProperties(prefix = &quot;spring.datasource&quot;)    public DataSource createDataSource() {        return new DruidDataSource();    }}</code></pre><p>配置发现既然没用，看了下yml文件，发现druid中的配置属性前面还有druid前缀，导致属性装配失败，修改后如下：<br /><img src="https://raw.githubusercontent.com/smartlin/pic/main/_posts/spring/sprinboot%E4%BD%BF%E7%94%A8druid%E8%BF%9E%E6%8E%A5%E6%B1%A0.md/yml%E9%85%8D%E7%BD%AE%E6%96%87%E4%BB%B61.png" alt="" /></p><p>再次调用查询数据的单元测试，截图如下<br /><img src="https://raw.githubusercontent.com/smartlin/pic/main/_posts/spring/sprinboot%E4%BD%BF%E7%94%A8druid%E8%BF%9E%E6%8E%A5%E6%B1%A0.md/%E4%BD%BF%E7%94%A8druid%E8%BF%9E%E6%8E%A5%E6%B1%A0.png" alt="" /></p><p>获取数据库连接池参数的单元测试，结果如下：</p><pre><code>默认数据源class com.alibaba.druid.pool.DruidDataSource$$EnhancerBySpringCGLIB$$5d4b2b3fdruid 数据源最大连接数：20druid 数据源初始化连接数：5druid 数据源初始化maxWait：60000druid 数据源初始化minIdle：5</code></pre><ol start="2"><li>将druid换成starter启动类，就不需要上面的配置类<br />对应的pom如下：</li></ol><pre><code class="language-xml">&lt;dependency&gt;    &lt;groupId&gt;com.alibaba&lt;/groupId&gt;    &lt;artifactId&gt;druid-spring-boot-starter&lt;/artifactId&gt;    &lt;version&gt;1.1.23&lt;/version&gt;&lt;/dependency&gt;</code></pre><p>对应的yml文件还原即可，如下截图：<br /><img src="https://raw.githubusercontent.com/smartlin/pic/main/_posts/spring/sprinboot%E4%BD%BF%E7%94%A8druid%E8%BF%9E%E6%8E%A5%E6%B1%A0.md/yml%E9%85%8D%E7%BD%AE%E6%96%87%E4%BB%B62.png" alt="" /></p><p>测试结果如下：</p><pre><code>默认数据源class com.alibaba.druid.spring.boot.autoconfigure.DruidDataSourceWrapper$$EnhancerBySpringCGLIB$$639ba436druid 数据源最大连接数：20druid 数据源初始化连接数：5druid 数据源初始化maxWait：60000druid 数据源初始化minIdle：5</code></pre>]]>
                </content>
            </entry>
            <entry>
                <title><![CDATA[利用docker部署RocketMQ]]></title>
                <link rel="alternate" type="text/html" href="https://starlin.top/archives/利用docker部署rocketmq" />
                <id>tag:https://starlin.top,2021-06-03:利用docker部署rocketmq</id>
                <published>2021-06-03T22:00:12+08:00</published>
                <updated>2021-06-03T22:00:12+08:00</updated>
                <author>
                    <name>starlin</name>
                    <uri>https://starlin.top</uri>
                </author>
                <content type="html">
                        <![CDATA[<h2 id="下载rocketmq-docker版">下载rocketmq docker版</h2><ol><li>找个目录，在cmd下执行以下命令：</li></ol><pre><code>git clone https://github.com/apache/rocketmq-docker.gitcd image-buildsh build-image.sh 4.5.0 alpine</code></pre><ol start="2"><li>返回上级目录，执行以下命令</li></ol><pre><code>cd ..sh stage.sh 4.5.0</code></pre><ol start="3"><li>切换到docker-compose目录，修改docker-compose.yml，增加console image，注释broker1如下：</li></ol><pre><code>version: '2'services:  #Service for nameserver  namesrv:    image: apacherocketmq/rocketmq:4.5.0    container_name: rmqnamesrv    ports:      - 9876:9876    volumes:      - ./data/namesrv/logs:/home/rocketmq/logs    command: sh mqnamesrv  #Service for broker  broker:    image: apacherocketmq/rocketmq:4.5.0    container_name: rmqbroker    links:      - namesrv    ports:      - 10909:10909      - 10911:10911      - 10912:10912    environment:      - NAMESRV_ADDR=namesrv:9876    volumes:      - ./data/broker/logs:/home/rocketmq/logs      - ./data/broker/store:/home/rocketmq/store      - ./data/broker/conf/broker.conf:/opt/rocketmq-4.5.0/conf/broker.conf    command: sh mqbroker -c /opt/rocketmq-4.5.0/conf/broker.conf  rocketmq-console:    image: styletang/rocketmq-console-ng    container_name: rocketmq-console    hostname: rocketmq-console    ports:      - 6060:8080    environment:      JAVA_OPTS: &quot;-Xms128m -Xmx128m -Xmn64m -Drocketmq.namesrv.addr=namesrv:9876 -Dcom.rocketmq.sendMessageWithVIPChannel=false&quot;    depends_on:      - namesrv  #Service for another broker -- broker1  # broker1:  #   image: apacherocketmq/rocketmq:4.5.0  #   container_name: rmqbroker-b  #   links:  #     - namesrv  #   ports:  #     - 10929:10909  #     - 10931:10911  #     - 10932:10912  #   environment:  #     - NAMESRV_ADDR=namesrv:9876  #   volumes:  #     - ./data1/broker/logs:/home/rocketmq/logs  #     - ./data1/broker/store:/home/rocketmq/store  #     - ./data1/broker/conf/broker.conf:/opt/rocketmq-4.5.0/conf/broker.conf  #   command: sh mqbroker -c /opt/rocketmq-4.5.0/conf/broker.conf</code></pre><p>可以在linux下修改，也可以在目录中修改</p><h2 id="启动rocketmq容器">启动RocketMQ容器</h2><p>最后启动MQ容器，命令如下：</p><pre><code>docker-compose up -d</code></pre><p>启动成功后如下：</p><pre><code>Creating rmqnamesrv ... doneCreating rmqbroker        ... doneCreating rocketmq-console ... done</code></pre><p>打开<a href="http://localhost:6060/，就能看到mq的console界面，则表示部署成功">http://localhost:6060/，就能看到mq的console界面，则表示部署成功</a></p>]]>
                </content>
            </entry>
            <entry>
                <title><![CDATA[mybatis-plus批量处理遇到的坑]]></title>
                <link rel="alternate" type="text/html" href="https://starlin.top/archives/mybatis-plus批量处理遇到的坑" />
                <id>tag:https://starlin.top,2021-04-21:mybatis-plus批量处理遇到的坑</id>
                <published>2021-04-21T22:49:21+08:00</published>
                <updated>2021-04-21T22:49:21+08:00</updated>
                <author>
                    <name>starlin</name>
                    <uri>https://starlin.top</uri>
                </author>
                <content type="html">
                        <![CDATA[<p>最近项目中有用到mybatis-plus插件，遇到了一些坑，发现saveBatch中的批量方法效率太慢了，看了下源码</p><pre><code class="language-java">public boolean saveBatch(Collection&lt;T&gt; entityList, int batchSize) {    String sqlStatement = sqlStatement(SqlMethod.INSERT_ONE);    try (SqlSession batchSqlSession = sqlSessionBatch()) {        int i = 0;        for (T anEntityList : entityList) {            batchSqlSession.insert(sqlStatement, anEntityList);            if (i &gt;= 1 &amp;&amp; i % batchSize == 0) {                batchSqlSession.flushStatements();            }            i++;        }        batchSqlSession.flushStatements();    }    return true;}</code></pre><p>看到这里，惊不惊喜，意不意外，这样不慢才怪</p><p>后面在看了mybatis-plus的官方文档中有提出一个选装插件InsertBatchSomeColumn，和拼接sql比效率还是慢，后面有测试对比，这里重点说下拼接sql的处理方法：</p>]]>
                </content>
            </entry>
            <entry>
                <title><![CDATA[阻塞队列]]></title>
                <link rel="alternate" type="text/html" href="https://starlin.top/archives/阻塞队列" />
                <id>tag:https://starlin.top,2021-03-31:阻塞队列</id>
                <published>2021-03-31T10:56:00+08:00</published>
                <updated>2021-03-31T10:56:00+08:00</updated>
                <author>
                    <name>starlin</name>
                    <uri>https://starlin.top</uri>
                </author>
                <content type="html">
                        <![CDATA[<p>BlockingQueue 经常被考察的点，就是是否有界（ Bounded 、 Unbounded ），这一点也往往会影响我们在应用开发中的选择，我这里简单总结一下。</p><h3 id="linkedblockingqueue">LinkedBlockingQueue</h3><p><strong>LinkedBlockingQueue</strong>，容易被误解为无边界，但其实其行为和内部代码都是基于有界的逻辑实现的，只不过如果我们没有在创建队列时就指定容量，<strong>那么其容量限制就自动被 设置为 Integer.MAX_VALUE ，成为了无界队列</strong>。</p><pre><code class="language-java">public class LinkedBlockingQueue&lt;E&gt; extends AbstractQueue&lt;E&gt;        implements BlockingQueue&lt;E&gt;, java.io.Serializablestatic class Node&lt;E&gt; {        E item;        /**         * 下列三种情况之一：         * - 真正的后继节点         * - 自己，发生在出队时         * - null, 表示没有后继节点，是最后了         */        Node&lt;E&gt; next;        Node(E x) { item = x; }    }</code></pre><h4 id="入队">入队</h4><pre><code class="language-java">private void enqueue(Node&lt;E&gt; node) {    // assert putLock.isHeldByCurrentThread();    // assert last.next == null;    last = last.next = node;}</code></pre><p>初始化列表 last = head = new Node<E>(null);Dummy节点用来占位，item为null<br />![入队图示](<a href="https://raw.githubusercontent.com/smartlin/pic/main/_posts/java%E5%B9%B6%E5%8F%91/%E9%98%BB%E5%A1%9E%E9%98%9F%E5%88%97.md/LinkedBlockingQueue%E5%85%A5%E9%98%9F%E5%9B%BE%E7%A4%BA.png">https://raw.githubusercontent.com/smartlin/pic/main/_posts/java%E5%B9%B6%E5%8F%91/%E9%98%BB%E5%A1%9E%E9%98%9F%E5%88%97.md/LinkedBlockingQueue%E5%85%A5%E9%98%9F%E5%9B%BE%E7%A4%BA.png</a> =888x)</p><h4 id="出队">出队</h4><pre><code class="language-java">private E dequeue() {    // assert takeLock.isHeldByCurrentThread();    // assert head.item == null;    Node&lt;E&gt; h = head;    Node&lt;E&gt; first = h.next;    h.next = h; // help GC    head = first;    E x = first.item;    first.item = null;    return x;}</code></pre><p>![出队示意图](<a href="https://raw.githubusercontent.com/smartlin/pic/main/_posts/java%E5%B9%B6%E5%8F%91/%E9%98%BB%E5%A1%9E%E9%98%9F%E5%88%97.md/%E5%87%BA%E9%98%9F%E7%A4%BA%E6%84%8F%E5%9B%BE.png">https://raw.githubusercontent.com/smartlin/pic/main/_posts/java%E5%B9%B6%E5%8F%91/%E9%98%BB%E5%A1%9E%E9%98%9F%E5%88%97.md/%E5%87%BA%E9%98%9F%E7%A4%BA%E6%84%8F%E5%9B%BE.png</a> =1088x)</p><h4 id="加锁分析">加锁分析</h4><p>两把锁，同一时刻，允许两个线程（一个生产者，一个消费者）同时执行</p><ul><li>当节点总数大于2时（包括Dummy节点），putLock保证的last节点的线程安全，takeLock保证的时head节点的安全，两把锁同时保证了入队和出队么有竞争</li><li>当节点总数等于2时（即一个Dummy节点，一个正常节点），这时候仍然时2把锁，不会竞争</li><li>当节点总数等于1时（即只有Dummy节点）这时的take线程会被notEmpty条件阻塞，有竞争，会阻塞</li></ul><pre><code class="language-java">    //用于put（阻塞） offer（非阻塞）    private final ReentrantLock putLock = new ReentrantLock();    //用于take（阻塞） poll（非阻塞）    private final Condition notFull = putLock.newCondition();</code></pre><h4 id="put操作">put操作</h4><pre><code class="language-java">    public void put(E e) throws InterruptedException {        //不允许有空值        if (e == null) throw new NullPointerException();        int c = -1;        Node&lt;E&gt; node = new Node&lt;E&gt;(e);        final ReentrantLock putLock = this.putLock;        //count用于维护元素技术        final AtomicInteger count = this.count;        //加锁，可打断        putLock.lockInterruptibly();        try {            //满了等待            while (count.get() == capacity) {                //倒过来读，等待notFull                notFull.await();            }            //有空位，入队且计数+1            enqueue(node);            c = count.getAndIncrement();            //除了自己put以外，队列还有空位，由自己唤醒其他put线程            if (c + 1 &lt; capacity)                notFull.signal();        } finally {            putLock.unlock();        }        //如果队列中只有一个元素，唤醒take线程        if (c == 0)            signalNotEmpty();    }</code></pre><h4 id="take操作">take操作</h4><pre><code class="language-java">public E take() throws InterruptedException {    E x;    int c = -1;    final AtomicInteger count = this.count;    final ReentrantLock takeLock = this.takeLock;    takeLock.lockInterruptibly();    try {        while (count.get() == 0) {            notEmpty.await();        }        x = dequeue();        c = count.getAndDecrement();        if (c &gt; 1)            notEmpty.signal();    } finally {        takeLock.unlock();    }    //如果队列中只有一个空位，唤醒put线程    //如果有多个队列进行出队，第一个线程满足c == capacity，但后续线程c &lt; capacity    if (c == capacity)        signalNotFull();    return x;}</code></pre><h3 id="与arrayblockingqueue比较">与ArrayBlockingQueue比较</h3><p><strong>ArrayBlockingQueue</strong>是最典型的的有界队列，其内部以fnal的数组保存数据，数组的大小就决定了队列的边界，所以我们在创建ArrayBlockingQueue时，都要指定容量，如</p><pre><code>public ArrayBlockingQueue(int capacity, boolean fair)</code></pre><ul><li>LinkedBlockingQueue支持有界，ArrayBlockingQueue强制有界</li><li>LinkedBlockingQueue实现是链表，ArrayBlockingQueue是数组</li><li>LinkedBlockingQueue是懒加载，ArrayBlockingQueue需要提前初始化node数组</li><li>LinkedBlockingQueue每次入队会生产新Node，而ArrayBlockingQueue的Node是提前创建好的</li><li>LinkedBlockingQueue两把锁(put,take)，ArrayBlockingQueue一把锁，<strong>两者都是用ReentrantLock加锁</strong></li></ul><h3 id="synchronousqueue">SynchronousQueue</h3><p><strong>SynchronousQueue</strong>，这是一个非常奇葩的队列实现，每个删除操作都要等待插入操作，反之每个插入操作也都要等待删除动作。那么这个队列的容量是多少呢？是1吗？其实不 是的，<strong>其内部容量是0</strong><br />利用 CAS 替换掉了原本基于锁的逻辑，同步开销比较小。它是 Executors.newCachedThreadPool() 的默认队列。</p><h3 id="priorityblockingqueue">PriorityBlockingQueue</h3><p><strong>PriorityBlockingQueue</strong> 是无边界的优先队列，虽然严格意义上来讲，其大小总归是要受系统资源影响。</p><h3 id="delayedqueue">DelayedQueue</h3><p><strong>DelayedQueue</strong>和<strong>LinkedTransferQueue</strong>同样是无边界的队列。对于无边界的队列，有一个自然的结果，就是put操作永远也不会发生其他BlockingQueue的那种等待情况。<br />如果我们分析不同队列的底层实现， BlockingQueue 基本都是基于锁实现</p><h3 id="concurrentlinkedqueue">ConcurrentLinkedQueue</h3><p>ConcurrentLinkedQueue与LinkedBlockingQueue非常像，只是在加锁的部分使用了CAS</p><h3 id="deque">Deque</h3><p>有两个特别的Deque实现，ConcurrentLinkedDeque 和 LinkedBlockingDeque。<br />Deque 的侧重点是支持对队列头尾都进行插入和删除，所以提供了特定的方法，</p><ul><li>尾部插入时需要的addLast(e)、offerLast(e)</li><li>尾部删除所需要的removeLast()、pollLast()</li></ul><hr /><p>以 LinkedBlockingQueue 、 ArrayBlockingQueue 和 SynchronousQueue 为例，<br />我们一起来分析一下，根据需求可以从很多方面考量： 考虑应用场景中对队列边界的要求。<br />ArrayBlockingQueue是有明确的容量限制的，<br />而LinkedBlockingQueue则取决于我们是否在创建时指定，<br />SynchronousQueue则干脆不能缓存任何元素。<br />从空间利用角度，数组结构的ArrayBlockingQueue要比LinkedBlockingQueue紧凑，因为其不需要创建所谓节点，但是其初始分配阶段就需要一段连续的空间，所以初始内存 需求更大。<br />通用场景中，LinkedBlockingQueue的吞吐量一般优于ArrayBlockingQueue，因为它实现了更加细粒度的锁操作。<br />ArrayBlockingQueue实现比较简单，性能更好预测，属于表现稳定的“选手”。<br />如果我们需要实现的是两个线程之间接力性（handof）的场景，你可能会选择CountDownLatch，但是SynchronousQueue也是完美符合这种场景的，而且线程间协调和数据传输统一起来，代码更加规范。<br />可能令人意外的是，很多时候SynchronousQueue的性能表现，往往大大超过其他实现，尤其是在队列元素较小的场景。</p>]]>
                </content>
            </entry>
            <entry>
                <title><![CDATA[DBeaver Error occurred during initialization of VM]]></title>
                <link rel="alternate" type="text/html" href="https://starlin.top/archives/dbeavererroroccurredduringinitializationofvm" />
                <id>tag:https://starlin.top,2021-01-06:dbeavererroroccurredduringinitializationofvm</id>
                <published>2021-01-06T23:34:48+08:00</published>
                <updated>2021-01-06T23:34:48+08:00</updated>
                <author>
                    <name>starlin</name>
                    <uri>https://starlin.top</uri>
                </author>
                <content type="html">
                        <![CDATA[<p>最近把Mac版的DBeaverEE升级到了7.3版本，发起启动报错，信息如下：</p><pre><code>Error occurred during initialization of VMCould not find agent library instrument on the library path, with error: dlopen(libinstrument.dylib, 1): image not foundModule java.instrument may be missing from runtime image.</code></pre><p>根据错误信息提示，可能是无法加载虚拟机（自带的jre已经被阉割了，建议自己安装jdk），于是在github上的issue上找到了解决方案，如下：</p><p>只需编辑程序下的该文件Info.plist，增加java虚拟机的目录即可</p><pre><code>/Applications/DBeaver.app/Contents/Info.plist</code></pre><p>如下图所示：<br /><img src="https://raw.githubusercontent.com/smartlin/pic/main/_posts/mysql/dbeaver%20error%20occurred%20during%20initialization%20of%20vm.md/16099475906106.jpg" alt="-w820" /></p><p>再次启动就OK了</p><p>以上，End，感谢阅读！</p>]]>
                </content>
            </entry>
            <entry>
                <title><![CDATA[使用lombok注意事项]]></title>
                <link rel="alternate" type="text/html" href="https://starlin.top/archives/使用lombok注意事项" />
                <id>tag:https://starlin.top,2020-09-21:使用lombok注意事项</id>
                <published>2020-09-21T17:00:43+08:00</published>
                <updated>2020-09-21T17:00:43+08:00</updated>
                <author>
                    <name>starlin</name>
                    <uri>https://starlin.top</uri>
                </author>
                <content type="html">
                        <![CDATA[<p>在java开发的过程中基本上都使用过lombok这个插件吧，是不是觉得这个插件很好用，一个注解@Data就搞定了，其他的都不用管了，今天我们来看看这个插件是不是这么简单？</p><p>众说周知@Data注解会帮我们实现 equals 和 hashcode 方法，但是有继承关系时， Lombok 自动生成的方法可能就不是我们期望的了，</p><p>先定义个Person类，包含id和name两个字断：</p><pre><code class="language-java">@Datapublic class Person {    private int id;    private String name;    public Person(int id, String name) {        this.id = id;        this.name = name;    }    public static void main(String[] args) {        Person p1 = new Person(1, &quot;zhangsan&quot;);        Person p2 = new Person(1, &quot;lishi&quot;);        System.out.println(p1.equals(p2));    }}</code></pre><p>相信很多老司机一眼就能过知道答案是false<br /><a href="mailto:假如有一个场景是，只要id相同，就认为是相等的。这种要如何实现了，只需要用到lombok中一句注解即可，就是在不需要的比较的属性上增加@EqualsAndHashCode.Exclude">假如有一个场景是，只要id相同，就认为是相等的。这种要如何实现了，只需要用到lombok中一句注解即可，就是在不需要的比较的属性上增加@EqualsAndHashCode.Exclude</a></p><p>我们在name属性上增加此注解，在来看看结果</p><pre><code class="language-java">@Datapublic class Person {    private int id;    @EqualsAndHashCode.Exclude    private String name;    public Person(int id, String name) {        this.id = id;        this.name = name;    }    public static void main(String[] args) {        Person p1 = new Person(1, &quot;zhangsan&quot;);        Person p2 = new Person(1, &quot;lishi&quot;);        System.out.println(p1.equals(p2));    }}</code></pre><p>感兴趣的可以看看编译后的代码，其中equals方法只有id属性。</p><p>在来看看如果类有继承，lombok会怎么处理子类的 equals 和 hashCode 呢？我们来重新定义一个类Company，Person继承该类，如下：</p><pre><code class="language-java">@Datapublic class Company extends Person {    /**     * 公司     */    private String company;    public Company(int id, String name,String company) {        super(id, name);        this.company = company;    }    public static void main(String[] args) {        Company c1 = new Company(1, &quot;zhangs&quot;, &quot;c&quot;);        Company c2 = new Company(2, &quot;lisi&quot;, &quot;c&quot;);        System.out.println(c1.equals(c2));    }}</code></pre><p>在测试方法中，只有公司是相同的，运行后结果居然是true，显然是没考虑到父类的属性，为解决这个问题，我们可以手动设置callSuper 开关为 true，改进后的代码如下：</p><pre><code class="language-java">@Data@EqualsAndHashCode(callSuper = true)public class Company extends Person {    /**     * 公司     */    private String company;    public Company(int id, String name,String company) {        super(id, name);        this.company = company;    }    public static void main(String[] args) {        Company c1 = new Company(1, &quot;zhangs&quot;, &quot;c&quot;);        Company c2 = new Company(2, &quot;lisi&quot;, &quot;c&quot;);        System.out.println(c1.equals(c2));    }}</code></pre><p>再次运行后结果为false</p><p>通过以上介绍了下，才知道lombok绝对不是想象中的那样简单，需要以后的使用深挖其原理才行，仅此记录一下告诫自己</p><p>以上，感谢阅读，end！！！</p>]]>
                </content>
            </entry>
            <entry>
                <title><![CDATA[记一次wp升级php7.4.x版本的坑]]></title>
                <link rel="alternate" type="text/html" href="https://starlin.top/archives/ji-yi-ci-wp-sheng-ji-php74x-ban-ben-de-keng" />
                <id>tag:https://starlin.top,2020-09-13:ji-yi-ci-wp-sheng-ji-php74x-ban-ben-de-keng</id>
                <published>2020-09-13T23:53:51+08:00</published>
                <updated>2020-09-13T23:53:51+08:00</updated>
                <author>
                    <name>starlin</name>
                    <uri>https://starlin.top</uri>
                </author>
                <content type="html">
                        <![CDATA[<p>最近想把自己wp博客的php版本升级下，结果升级的并不是很顺利，特此记录一下</p><h2 id="升级php版本">升级PHP版本</h2><p>因本博客使用lnmp一键安装包安装的，所以利用如下命令升级php版本：</p><pre><code class="language-sh">cd /root/lnmp1.7./upgrade.sh php</code></pre><p>提示如下：</p><pre><code>+-----------------------------------------------------------------------+|            Upgrade script for LNMP V1.6, Written by Licess            |+-----------------------------------------------------------------------+|     A tool to upgrade Nginx,MySQL/Mariadb,PHP for LNMP/LNMPA/LAMP     |+-----------------------------------------------------------------------+|           For more information please visit https://lnmp.org          |+-----------------------------------------------------------------------+include/main.sh:行681: /usr/local/php/bin/php-config: 没有那个文件或目录include/main.sh:行682: /usr/local/php/bin/php-config: 没有那个文件或目录Current PHP Version:You can get version number from http://www.php.net/Please enter a PHP Version you want:</code></pre><p>输入要升级的PHP的版本即可，原以为会很顺利，结果发现报错了，大概的报错信息如下：</p><pre><code> /bin/lnmp /etc/init.d/php-fpm no such file or directory</code></pre><p>google搜了一圈，基本上都是让你重新创建/etc/init.d/php-fpm文件，但是创建依然不小，看了lnmp的错误日志，发现如下信息：</p><pre><code>checking for libzip &gt;= 0.11 libzip != 1.3.1 libzip != 1.7.0... noconfigure: error: Package requirements (libzip &gt;= 0.11 libzip != 1.3.1 libzip != 1.7.0) were not met:Requested 'libzip &gt;= 0.11' but version of libzip is 0.10.1Consider adjusting the PKG_CONFIG_PATH environment variable if youinstalled software in a non-standard prefix.</code></pre><p>原来是libzip的版本过低导致的问题</p><h2 id="安装高版本libzip">安装高版本libzip</h2><ol><li>先卸载旧版本</li></ol><pre><code>yum  -y remove libzip-devel</code></pre><ol><li>下载最新的libzip版本，如果下载的是1.5.x版本的还需要安装cmake 相关命令如下：</li></ol><pre><code class="language-sh">yum -y install cmakewget https://libzip.org/download/libzip-1.7.3.tar.gztar -zxvf libzip-1.7.3.tar.gzcd libzip-1.7.3mkdir buildcd buildcmake ..make &amp;&amp; make install</code></pre><p>安装的过程又出错了，提示cmake的版本过低</p><h2 id="安装cmake">安装cmake</h2><p>如果安装的低版本，此步骤可以跳过<br />安装新版本的cmake</p><pre><code>cd /optwget  https://cmake.org/files/v3.18/cmake-3.18.2.tar.gztar zxvf cmake-3.18.2-Linux-x86_64.tar.gz</code></pre><p>解压成功后，就可以在 /opt 目录下看到一个 cmake-3.10.2-Linux-x86_64 目录</p><p>然后添加cmake环境变量，编辑 /etc/profile.d/cmake.sh 文件，写入以下内容：</p><pre><code>export CMAKE_HOME=/opt/cmake-3.18.2-Linux-x86_64export PATH=$PATH:$CMAKE_HOME/bin</code></pre><p>保存并退出，执行命令让cmake环境文件生效：</p><pre><code>source /etc/profile</code></pre><p>此时，你再次查看cmake版本，</p><pre><code>cmake -version</code></pre><p>显示为cmake version 3.18.2，说明更新成功了</p><h2 id="配置pkg-config-path环境变量">配置PKG_CONFIG_PATH环境变量</h2><p>上面的几步都完成后，再次安装PHP7.4.10版本，发现还是提示文章中开头的错误，也就是libzip版本依然过低，这时候查看一下libzip.so的路径，<br />比如我的在/usr/local/lib64下，因此在lnmp目录环境下配置如下命令：</p><pre><code>export PKG_CONFIG_PATH=/usr/local/lib64/pkgconfig/</code></pre><p>让configure过程找到libzip，这样就可以完成php7.4的升级编译安装了</p><h2 id="安装libzipso5依赖包">安装libzip.so.5依赖包</h2><p>本以为上一步设置完成就可以了，再次安装的时候又报错了，到这个时候心态已有点爆炸了，再次查看升级的报错日志，如下：</p><pre><code>Generating phar.phar/lnmp1.7/src/php-7.4.10/sapi/cli/php: error while loading shared libraries: libzip.so.5: cannot open shared object file: No such file or directorymake: *** [ext/phar/phar.phar] 错误 127</code></pre><p>一般是相应库的路径不对导致的，于是查找libzip.so.5，命令如下：</p><pre><code>[root@instance-1-tw ~]# find / -name libzip.so.5 -print/root/libzip-1.7.3/build/lib/libzip.so.5/usr/local/lib64/libzip.so.5</code></pre><p>然后将执行以下命令，将依赖包链接到lib目录</p><pre><code>ln -s /usr/local/lib64/libzip.so.5 /usr/lib64</code></pre><h2 id="大功告成">大功告成</h2><p>最后再次安装，终于成功了，如下显示：</p><pre><code>+--------------------------------------------------------------------+| License:                                                           || This software is subject to the PHP License, available in this     || distribution in the file LICENSE. By continuing this installation  || process, you are bound by the terms of this license agreement.     || If you do not agree with the terms of this license, you must abort || the installation process at this point.                            |+--------------------------------------------------------------------+Thank you for using PHP....+-------------------------------------------+|    Manager for LNMP, Written by Licess    |+-------------------------------------------+|              https://lnmp.org             |+-------------------------------------------+Starting LNMP...Starting nginx...  doneStarting MySQL.. SUCCESS!Starting php-fpm  done======== upgrade php completed ======</code></pre><p>再次查看php的版本，如下：</p><pre><code>[root@instance-1-tw ~]# php -vPHP 7.4.10 (cli) (built: Sep 14 2020 17:35:05) ( NTS )Copyright (c) The PHP GroupZend Engine v3.4.0, Copyright (c) Zend Technologies</code></pre><p>终于终于，升级成功了，不容易。。。</p><h2 id="升级失败后的恢复方案">升级失败后的恢复方案</h2><p>如果要恢复原PHP版本，，将 /usr/local/ 下 oldphp 日志的目录重命名为 php，如图：<br /><img src="https://raw.githubusercontent.com/smartlin/pic/main/_posts/hexo/%E8%AE%B0%E4%B8%80%E6%AC%A1wp%E5%8D%87%E7%BA%A7php7.4.x%E7%89%88%E6%9C%AC%E7%9A%84%E5%9D%91.md/oldphp.jpg" alt="oldphp" /></p><p>并将 /usr/local/oldphp日期/init.d.php-fpm.bak.日期 的文件拷贝到 /etc/init.d/ 目录下重命名为 php-fpm<br /><img src="https://raw.githubusercontent.com/smartlin/pic/main/_posts/hexo/%E8%AE%B0%E4%B8%80%E6%AC%A1wp%E5%8D%87%E7%BA%A7php7.4.x%E7%89%88%E6%9C%AC%E7%9A%84%E5%9D%91.md/init.d.php-fpm-1.jpg" alt="init.d.php-fpm" /></p><p>再重新启动php-fpm，如下：</p><pre><code>service php-fpm start</code></pre><p>再重新加载nginx后即可：</p><pre><code>service nginx restart</code></pre><p>以上，感谢阅读，End！！！</p>]]>
                </content>
            </entry>
            <entry>
                <title><![CDATA[线程状态]]></title>
                <link rel="alternate" type="text/html" href="https://starlin.top/archives/线程状态" />
                <id>tag:https://starlin.top,2020-08-26:线程状态</id>
                <published>2020-08-26T22:00:12+08:00</published>
                <updated>2020-08-26T22:00:12+08:00</updated>
                <author>
                    <name>starlin</name>
                    <uri>https://starlin.top</uri>
                </author>
                <content type="html">
                        <![CDATA[<h2 id="线程状态">线程状态</h2><p>线程的工作模式是，首先先要创建线程并指定线程需要执行的业务方法，然后再调用线程的 start() 方法，此时线程就从 NEW（新建）状态变成了 RUNNABLE（就绪）状态，此时线程会判断要执行的方法中有没有 synchronized 同步代码块，如果有并且其他线程也在使用此锁，那么线程就会变为 BLOCKED（阻塞等待）状态，当其他线程使用完此锁之后，线程会继续执行剩余的方法。</p><p>当遇到 Object.wait() 或 Thread.join() 方法时，线程会变为 WAITING（等待状态）状态，如果是带了超时时间的等待方法，那么线程会进入 TIMED_WAITING（计时等待）状态，当有其他线程执行了 notify() 或 notifyAll() 方法之后，线程被唤醒继续执行剩余的业务方法，直到方法执行完成为止，此时整个线程的流程就执行完了，执行流程如下图所示：<br />![线程状态](<a href="https://raw.githubusercontent.com/smartlin/pic/main/_posts/java%E5%B9%B6%E5%8F%91/%E7%BA%BF%E7%A8%8B%E7%8A%B6%E6%80%81.md/%E7%BA%BF%E7%A8%8B%E7%8A%B6%E6%80%81.png">https://raw.githubusercontent.com/smartlin/pic/main/_posts/java%E5%B9%B6%E5%8F%91/%E7%BA%BF%E7%A8%8B%E7%8A%B6%E6%80%81.md/%E7%BA%BF%E7%A8%8B%E7%8A%B6%E6%80%81.png</a> =866x)</p><p><strong>Java线程具有五种基本状态：</strong><br /><strong>1.新建状态（New）</strong>：当线程对象对创建后，即进入了新建状态，如：Thread t = new MyThread();<br /><strong>2.就绪状态（Runnable）</strong>：当调用线程对象的start()方法（t.start();），线程即进入就绪状态。处于就绪状态的线程，只是说明此线程已经做好了准备，随时等待CPU调度执行，并不是说执行了t.start()此线程立即就会执行；<br /><strong>3.运行状态（Running）</strong>：当CPU开始调度处于就绪状态的线程时，此时线程才得以真正执行，即进入到运行状态。注：就 绪状态是进入到运行状态的唯一入口，也就是说，线程要想进入运行状态执行，首先必须处于就绪状态中；<br /><strong>4.阻塞状态（Blocked）</strong>：处于运行状态中的线程由于某种原因，暂时放弃对CPU的使用权，停止执行，此时进入阻塞状态，直到其进入到就绪状态，才 有机会再次被CPU调用以进入到运行状态。根据阻塞产生的原因不同，阻塞状态又可以分为三种：</p><ul><li>等待阻塞：运行状态中的线程执行wait()方法，使本线程进入到等待阻塞状态；</li><li>同步阻塞 — 线程在获取synchronized同步锁失败(因为锁被其它线程所占用)，它会进入同步阻塞状态；</li><li>其他阻塞 — 通过调用线程的sleep()或join()或发出了I/O请求时，线程会进入到阻塞状态。当sleep()状态超时、join()等待线程终止或者超时、或者I/O处理完毕时，线程重新转入就绪状态。<br /><strong>5.死亡状态（Dead）</strong>：线程执行完了或者因异常退出了run()方法，该线程结束生命周期。</li></ul><h3 id="blocked-和-waiting-的区别">BLOCKED 和 WAITING 的区别</h3><p>虽然 BLOCKED 和 WAITING 都有等待的含义，但二者有着本质的区别，首先它们状态形成的调用方法不同，其次 BLOCKED 可以理解为当前线程还处于活跃状态，只是在阻塞等待其他线程使用完某个锁资源；而 WAITING 则是因为自身调用了 Object.wait() 或着是 Thread.join() 又或者是 LockSupport.park() 而进入等待状态，只能等待其他线程执行某个特定的动作才能被继续唤醒，比如当线程因为调用了 Object.wait() 而进入 WAITING 状态之后，则需要等待另一个线程执行 Object.notify() 或 Object.notifyAll() 才能被唤醒。</p><h2 id="runstart方法的区别">run()、start()方法的区别</h2><p>从源码上来看：<br />start() 方法属于 Thread 自身的方法，并且使用了 synchronized 来保证线程安全<br />run() 方法为 Runnable 的抽象方法，必须由调用类重写此方法，重写的 run() 方法其实就是此线程要执行的业务方法</p><p>当你调用 start() 方法时，它会新建一个线程然后执行 run() 方法中的代码。<br />如果直接调用 run() 方法，并不会创建新线程，只是一个普通方法，方法中的代码会在当前调用者的线程中执行</p><p>实现并启动线程有两种方法<br />1、写一个类继承自Thread类，重写run方法。用start方法启动线程<br />2、写一个类实现Runnable接口，实现run方法。用new Thread(Runnable target).start()方法来启动</p><p>调用start（）后，线程会被放到等待队列，等待CPU调度，并不一定要马上开始执行，只是将这个线程置于可动行状态。然后通过JVM，线程Thread会调用run（）方法，执行本线程的线程体。先调用start后调用run</p><p>为什么不直接调用run？就是为了实现多线程的优点，没这个start不行。</p><ol><li>start（）方法来启动线程，真正实现了多线程运行。这时无需等待run方法体代码执行完毕，可以直接继续执行下面的代码；通过调用Thread类的start()方法来启动一个线程， 这时此线程是处于就绪状态， 并没有运行。 然后通过此Thread类调用方法run()来完成其运行操作的， 这里方法run()称为线程体，它包含了要执行的这个线程的内容， Run方法运行结束， 此线程终止。然后CPU再调度其它线程。</li><li>run（）方法当作普通方法的方式调用。程序还是要顺序执行，要等待run方法体执行完毕后，才可继续执行下面的代码； 程序中只有主线程——这一个线程， 其程序执行路径还是只有一条， 这样就没有达到写线程的目的。</li></ol><p>另外，它们可调用的次数不同，start() 方法不能被多次调用，否则会抛出 java.lang.IllegalStateException；而 run() 方法可以进行多次调用，因为它只是一个普通的方法而已。</p><h2 id="线程优先级">线程优先级</h2><pre><code class="language-java">// 线程可以拥有的最小优先级public final static int MIN_PRIORITY = 1;// 线程默认优先级public final static int NORM_PRIORITY = 5;// 线程可以拥有的最大优先级public final static int MAX_PRIORITY = 10</code></pre><p>线程的优先级可以理解为线程抢占 CPU 时间片的概率，优先级越高的线程优先执行的概率就越大，但并不能保证优先级高的线程一定先执行。</p><p>在程序中我们可以通过 Thread.setPriority() 来设置优先级，setPriority() 源码如下：</p><pre><code class="language-java">public final void setPriority(int newPriority) {    ThreadGroup g;    checkAccess();    // 先验证优先级的合理性    if (newPriority &gt; MAX_PRIORITY || newPriority &lt; MIN_PRIORITY) {        throw new IllegalArgumentException();    }    if((g = getThreadGroup()) != null) {        // 优先级如果超过线程组的最高优先级，则把优先级设置为线程组的最高优先级        if (newPriority &gt; g.getMaxPriority()) {            newPriority = g.getMaxPriority();        }        setPriority0(priority = newPriority);    }}</code></pre><h2 id="线程中的常用方法">线程中的常用方法</h2><h3 id="sleep-waitjoinyield区别">sleep() 、wait()、join（）、yield（）区别</h3><ol><li><p>sleep：<strong>Thread类的方法，必须带一个时间参数</strong> 会让当前线程休眠进入阻塞状态并释放CPU（阿里面试题 Sleep释放CPU，wait 也会释放cpu，因为cpu资源太宝贵了，只有在线程running的时候，才会获取cpu片段），提供其他线程运行的机会且不考虑优先级，但<strong>如果有同步锁则sleep不会释放锁即其他线程无法获得同步锁</strong> ,可通过调用interrupt()方法来唤醒休眠线程。</p></li><li><p>wait：<strong>Object类的方法</strong>(notify()、notifyAll()  也是Object对象)，必须放在循环体和同步代码块中，执行该方法的线程会释放锁，进入线程等待池中等待被再次唤醒(notify随机唤醒，notifyAll全部唤醒，线程结束自动唤醒)即放入锁池中竞争同步锁</p></li><li><p>join：<strong>一种特殊的wait（内部调用wait方法</strong>），<strong>当前运行线程调用另一个线程的join方法，当前线程进入阻塞状态直到另一个线程运行结束等待该线程终止</strong>。 <strong>注意该方法也需要捕捉异常</strong>。如：在一个线程中调用 other.join() ，这时候当前线程会让出执行权给 other 线程，直到 other 线程执行完或者过了超时时间之后再继续执行当前线程</p></li><li><p>yield：Thread 的源码可以知道 yield() 为本地方法，源码如下：</p></li></ol><pre><code class="language-java">public static native void yield();</code></pre><ul><li><strong>让出CPU调度</strong>，Thread类的方法，<strong>类似sleep只是不能由用户指定暂停多长时间</strong> ，并且yield()方法只能让同优先级的线程有执行的机会。 <strong>yield()只是使当前线程重新回到可执行状态</strong>，所以执行yield()的线程有可能在进入到可执行状态后马上又被执行。调用yield方法只是一个建议，告诉线程调度器我的工作已经做的差不多了，可以让别的相同优先级的线程使用CPU了，没有任何机制保证采纳</li><li>使当前线程从执行状态（运行状态）变为可执行态（就绪状态）。</li><li>yield() 方法表示给线程调度器一个当前线程愿意出让 CPU 使用权的暗示，但是线程调度器可能会忽略这个暗示。</li></ul><h3 id="sleep-和-yield区别">sleep() 和 yield（）区别</h3><p>sleep()和yield()都是Thread类中的静态方法，都会使得当前处于运行状态的线程放弃CPU，但是两者的区别还是有比较大的：</p><ol><li>sleep使当前线程（即调用sleep方法的线程暂停一段时间），给其它的线程运行的机会，而且是不考虑其它线程的优先级的，而且不释放资源锁，也就是说如果有synchronized同步块，其它线程仍然是不能访问共享数据的；yeild只会让位给优先级一样或者比它优先级高的线程，而且不能由用户指定暂停多长时间</li><li>当线程执行了sleep方法之后，线程将转入到睡眠状态，直到时间结束，而执行yield方法，直接转入到就绪状态。这些对线程的生命周期会造成影响的。</li><li>sleep方法需要抛出或者捕获异常，因为线程在睡眠中可能被打断，而yield方法则没异常。</li></ol><h3 id="sleep-和-wait区别">sleep() 和 wait（）区别</h3><p>sleep(long mills)：让出CPU资源，但是不会释放锁资源<br />wait()：让出CPU资源和锁资源</p><h2 id="线程和进程的区别">线程和进程的区别？</h2><p>线程是指进程内的一个执行单元,也是进程内的可调度实体.</p><p>与进程的区别:</p><ul><li><p>地址空间:进程内的一个执行单元;进程至少有一个线程;它们共享进程的地址空间;而进程有自己独立的地址空间;</p></li><li><p>资源拥有:进程是资源分配和拥有的单位,同一个进程内的线程共享进程的资源</p></li><li><p>线程是处理器调度的基本单位,但进程不是.</p></li></ul><p>二者均可并发执行.</p><p>进程和线程都是由操作系统所体会的程序运行的基本单元，系统利用该基本单元实现系统对应用的并发性。进程和线程的区别在于：</p><p>简而言之,一个程序至少有一个进程,一个进程至少有一个线程。线程的划分尺度小于进程，使得多线程程序的并发性高。</p><p>另外，进程在执行过程中拥有独立的内存单元，而多个线程共享内存，从而极大地提高了程序的运行效率。 线程在执行过程中与进程还是有区别的。每个独立的线程有一个程序运行的入口、顺序执行序列和程序的出口。但是线程不能够独立执行，必须依存在应用程序中，由应用程序提供多个线程执行控制。</p><p>从逻辑角度来看，多线程的意义在于一个应用程序中，有多个执行部分可以同时执行。但操作系统并没有将多个线程看做多个独立的应用，来实现进程的调度和管理以及资源分配。这就是进程和线程的重要区别。</p><p>进程是具有一定独立功能的程序关于某个数据集合上的一次运行活动,进程是系统进行资源分配和调度的一个独立单位.</p><p>线程是进程的一个实体,是CPU调度和分派的基本单位,它是比进程更小的能独立运行的基本单位.线程自己基本上不拥有系统资源,只拥有一点在运行中必不可少的资源(如程序计数器,一组寄存器和栈),但是它可与同属一个进程的其他的线程共享进程所拥有的全部资源.</p><p>一个线程可以创建和撤销另一个线程;同一个进程中的多个线程之间可以并发执行.<br />以上，end，感谢阅读！</p>]]>
                </content>
            </entry>
            <entry>
                <title><![CDATA[JVM之问题排除和优化]]></title>
                <link rel="alternate" type="text/html" href="https://starlin.top/archives/jvm之问题排除和优化" />
                <id>tag:https://starlin.top,2020-08-24:jvm之问题排除和优化</id>
                <published>2020-08-24T22:24:18+08:00</published>
                <updated>2020-08-24T22:24:18+08:00</updated>
                <author>
                    <name>starlin</name>
                    <uri>https://starlin.top</uri>
                </author>
                <content type="html">
                        <![CDATA[<p>今天总结下如何利用java自带的工具来排查生成环境的问题，先介绍下自带的工具，它们分别是：jps、jstat、jinfo、jmap、jhat、jstack，，它们都位于 JDK 的 bin 目录下，可以使用命令行工具直接运行，其目录如下图所示：<br /><img src="https://raw.githubusercontent.com/smartlin/pic/main/_posts/jvm/%20jvm%E4%B9%8B%E9%97%AE%E9%A2%98%E6%8E%92%E9%99%A4%E5%92%8C%E4%BC%98%E5%8C%96.md/java%E6%96%87%E4%BB%B6bin%E7%9B%AE%E5%BD%95.jpg" alt="java文件bin目录-w287" /><br />接下来看看，这些工具的具体使用</p><h2 id="1-jps虚拟机进程查看工具">1. jps（虚拟机进程查看工具）</h2><p>jps（JVM Process Status tool，虚拟机进程状况工具）它的功能和 Linux 中的 ps 命令比较类似，用于列出正在运行的 JVM 的 LVMID（Local Virtual Machine IDentifier，本地虚拟机唯一 ID），以及 JVM 的执行主类、JVM 启动参数等信息。语法如下：</p><pre><code>jps [options] [hostid]</code></pre><p>常用的 options 选项：</p><ul><li>l：用于输出运行主类的全名，如果是 jar 包，则输出 jar 包的路径；</li><li>q：用于输出 LVMID（Local Virtual Machine Identifier，虚拟机唯一 ID）；</li><li>m：用于输出虚拟机启动时传递给主类 main() 方法的参数；</li><li>v：用于输出启动时的 JVM 参数。</li></ul><h2 id="2-jstat虚拟机统计信息监视工具">2. jstat（虚拟机统计信息监视工具）</h2><p>jstat（JVM Statistics Monitoring Tool，虚拟机统计信息监视工具）用于监控虚拟机的运行状态信息。<br />例如，我们用它来查询某个 Java 进程的垃圾收集情况，示例如下：</p><pre><code>➜  ~ jstat -gc 89546 S0C    S1C    S0U    S1U      EC       EU        OC         OU       MC     MU    CCSC   CCSU   YGC     YGCT    FGC    FGCT     GCT43520.0 43520.0  0.0    0.0   262144.0 83896.4   699392.0     0.0     4480.0 791.7  384.0   76.6       0    0.000   0      0.000    0.000</code></pre><p>参数说明如下：</p><table><thead><tr><th>参数</th><th>说明</th></tr></thead><tbody><tr><td>S0C</td><td>年轻代中第一个存活区的大小</td></tr><tr><td>S1C</td><td>年轻代中第二个存活区的大小</td></tr><tr><td>S0U</td><td>年轻代中第一个存活区已使用的空间（字节</td></tr><tr><td>S1U</td><td>年轻代中第二个存活区已使用的空间（字节）</td></tr><tr><td>EC</td><td>Edem 区大小</td></tr><tr><td>EU</td><td>年轻代中 Edem 区已使用的空间（字节</td></tr><tr><td>OC</td><td>老年代大小</td></tr><tr><td>OU</td><td>老年代已使用的空间（字节）</td></tr><tr><td>YGC</td><td>从应用程序启动到采样时 young gc 的次数</td></tr><tr><td>YGCT</td><td>从应用程序启动到采样时 young gc 的所用的时间（s）</td></tr><tr><td>FGC</td><td>从应用程序启动到采样时 full gc 的次数</td></tr><tr><td>FGCT</td><td>从应用程序启动到采样时 full gc 的所用的时间</td></tr><tr><td>GCT</td><td>从应用程序启动到采样时整个 gc 所用的时间</td></tr></tbody></table><blockquote><p>注意：年轻代的 Edem 区满了会触发 young gc，老年代满了会触发 old gc。full gc 指的是清除整个堆，包括 young 区 和 old 区。</p></blockquote><p>jstat 常用的查询参数有：</p><ul><li>class，查询类加载器信息；</li><li>compiler，JIT 相关信息；</li><li>gc，GC 堆状态；</li><li>gcnew，新生代统计信息；</li><li>gcutil，GC 堆统计汇总信息。</li></ul><h2 id="3-jinfo查询虚拟机参数配置工具">3. jinfo（查询虚拟机参数配置工具）</h2><p>jinfo（Configuration Info for Java）用于查看和调整虚拟机各项参数。语法如下：</p><pre><code>jinfo &lt;option&gt; &lt;pid&gt;</code></pre><h2 id="4-jmap堆快照生成工具">4. jmap（堆快照生成工具）</h2><p>jmap（Memory Map for Java）用于查询堆的快照信息。<br />命令如下：</p><pre><code>jmap -heap 89948</code></pre><p>我们也可以直接生成堆快照文件，示例如下：</p><pre><code>➜  ~ jmap -dump:format=b,file=/Users/starlin/2020.dump 89948Dumping heap to /Users/starlin/2020.dump ...Heap dump file created</code></pre><h2 id="5-jhat堆快照分析功能">5. jhat（堆快照分析功能）</h2><p>jhat（JVM Heap Analysis Tool，堆快照分析工具）和 jmap 搭配使用，用于启动一个 web 站点来分析 jmap 生成的快照文件。<br />执行示例如下：</p><pre><code>➜  ~ jhat /Users/starlin/2020.dumpReading from /Users/starlin/2020.dump...Dump file created Mon Aug 24 22:59:36 CST 2020Snapshot read, resolving...Resolving 333407 objects...Chasing references, expect 66 dots..................................................................Eliminating duplicate references..................................................................Snapshot resolved.Started HTTP server on port 7000Server is ready.</code></pre><p>上述信息表示 jhat 启动了一个 http 的服务器端口为 7000 的站点来展示信息，<br />此时我们在浏览器中输入：<a href="http://localhost:7000/，会看到如下图所示的信息：">http://localhost:7000/，会看到如下图所示的信息：</a><br /><img src="https://raw.githubusercontent.com/smartlin/pic/main/_posts/jvm/%20jvm%E4%B9%8B%E9%97%AE%E9%A2%98%E6%8E%92%E9%99%A4%E5%92%8C%E4%BC%98%E5%8C%96.md/jhat%E6%88%AA%E5%9B%BE.jpg" alt="jhat截图" /></p><h2 id="6-jstack查询虚拟机当前的线程快照信息">6. jstack（查询虚拟机当前的线程快照信息）</h2><p>jstack（Stack Trace for Java）用于查看当前虚拟机的线程快照，用它可以排查线程的执行状况，例如排查死锁、死循环等问题。<br />利用如下命令：</p><pre><code>jstack -l 50016</code></pre><p>显示如下：</p><pre><code>Full thread dump Java HotSpot(TM) 64-Bit Server VM (25.231-b11 mixed mode):&quot;RMI TCP Connection(2)-127.0.0.1&quot; #30 daemon prio=9 os_prio=31 tid=0x00007fe0ce07d000 nid=0x9403 runnable [0x0000700004c2f000]   java.lang.Thread.State: RUNNABLEat java.net.SocketInputStream.socketRead0(Native Method)at java.net.SocketInputStream.socketRead(SocketInputStream.java:116)at java.net.SocketInputStream.read(SocketInputStream.java:171)at java.net.SocketInputStream.read(SocketInputStream.java:141)at java.io.BufferedInputStream.fill(BufferedInputStream.java:246)at java.io.BufferedInputStream.read(BufferedInputStream.java:265)- locked &lt;0x000000066f2b0c70&gt; (a java.io.BufferedInputStream)at java.io.FilterInputStream.read(FilterInputStream.java:83)at sun.rmi.transport.tcp.TCPTransport.handleMessages(TCPTransport.java:555)at sun.rmi.transport.tcp.TCPTransport$ConnectionHandler.run0(TCPTransport.java:834)at sun.rmi.transport.tcp.TCPTransport$ConnectionHandler.lambda$run$0(TCPTransport.java:688)at sun.rmi.transport.tcp.TCPTransport$ConnectionHandler$$Lambda$3/1798010815.run(Unknown Source)at java.security.AccessController.doPrivileged(Native Method)at sun.rmi.transport.tcp.TCPTransport$ConnectionHandler.run(TCPTransport.java:687)at java.util.concurrent.ThreadPoolExecutor.runWorker(ThreadPoolExecutor.java:1149)at java.util.concurrent.ThreadPoolExecutor$Worker.run(ThreadPoolExecutor.java:624)at java.lang.Thread.run(Thread.java:748)   Locked ownable synchronizers:- &lt;0x000000066de42e10&gt; (a java.util.concurrent.ThreadPoolExecutor$Worker)&quot;JMX server connection timeout 29&quot; #29 daemon prio=9 os_prio=31 tid=0x00007fe0fe8c0800 nid=0x9603 in Object.wait() [0x0000700004b2d000]   java.lang.Thread.State: TIMED_WAITING (on object monitor)at java.lang.Object.wait(Native Method)at com.sun.jmx.remote.internal.ServerCommunicatorAdmin$Timeout.run(ServerCommunicatorAdmin.java:168)- locked &lt;0x000000066e602030&gt; (a [I)at java.lang.Thread.run(Thread.java:748)   Locked ownable synchronizers:- None&quot;RMI Scheduler(0)&quot; #28 daemon prio=9 os_prio=31 tid=0x00007fe0fe8c0000 nid=0x6d03 waiting on condition [0x0000700004a2a000]   java.lang.Thread.State: TIMED_WAITING (parking)at sun.misc.Unsafe.park(Native Method)- parking to wait for  &lt;0x000000066d3fc4b8&gt; (a java.util.concurrent.locks.AbstractQueuedSynchronizer$ConditionObject)at java.util.concurrent.locks.LockSupport.parkNanos(LockSupport.java:215)at java.util.concurrent.locks.AbstractQueuedSynchronizer$ConditionObject.awaitNanos(AbstractQueuedSynchronizer.java:2078)at java.util.concurrent.ScheduledThreadPoolExecutor$DelayedWorkQueue.take(ScheduledThreadPoolExecutor.java:1093)at java.util.concurrent.ScheduledThreadPoolExecutor$DelayedWorkQueue.take(ScheduledThreadPoolExecutor.java:809)at java.util.concurrent.ThreadPoolExecutor.getTask(ThreadPoolExecutor.java:1074)at java.util.concurrent.ThreadPoolExecutor.runWorker(ThreadPoolExecutor.java:1134)at java.util.concurrent.ThreadPoolExecutor$Worker.run(ThreadPoolExecutor.java:624)at java.lang.Thread.run(Thread.java:748)   Locked ownable synchronizers:- None&quot;RMI TCP Accept-0&quot; #26 daemon prio=9 os_prio=31 tid=0x00007fe0fe06e800 nid=0x9a03 runnable [0x0000700004824000]   java.lang.Thread.State: RUNNABLEat java.net.PlainSocketImpl.socketAccept(Native Method)at java.net.AbstractPlainSocketImpl.accept(AbstractPlainSocketImpl.java:409)at java.net.ServerSocket.implAccept(ServerSocket.java:545)at java.net.ServerSocket.accept(ServerSocket.java:513)at sun.management.jmxremote.LocalRMIServerSocketFactory$1.accept(LocalRMIServerSocketFactory.java:52)at sun.rmi.transport.tcp.TCPTransport$AcceptLoop.executeAcceptLoop(TCPTransport.java:405)at sun.rmi.transport.tcp.TCPTransport$AcceptLoop.run(TCPTransport.java:377)at java.lang.Thread.run(Thread.java:748)   Locked ownable synchronizers:- None&quot;Attach Listener&quot; #24 daemon prio=9 os_prio=31 tid=0x00007fe0fe812800 nid=0x3d07 waiting on condition [0x0000000000000000]   java.lang.Thread.State: RUNNABLE   Locked ownable synchronizers:- None&quot;DestroyJavaVM&quot; #23 prio=5 os_prio=31 tid=0x00007fe0aedc4800 nid=0x1103 waiting on condition [0x0000000000000000]   java.lang.Thread.State: RUNNABLE   Locked ownable synchronizers:- None&quot;Thread-1&quot; #22 prio=5 os_prio=31 tid=0x00007fe09e01b000 nid=0x9c03 waiting for monitor entry [0x000070000461e000]   java.lang.Thread.State: BLOCKED (on object monitor)at cn.lxh.java.ManyThread.Lock.deadlock.DeadLockTest.calLock21(DeadLockTest.java:49)- waiting to lock &lt;0x000000066aefc610&gt; (a java.lang.Object)- locked &lt;0x000000066aefc620&gt; (a java.lang.Object)at cn.lxh.java.ManyThread.Lock.deadlock.DeadLockTest.access$100(DeadLockTest.java:8)at cn.lxh.java.ManyThread.Lock.deadlock.DeadLockTest$2.run(DeadLockTest.java:28)at java.lang.Thread.run(Thread.java:748)   Locked ownable synchronizers:- None&quot;Thread-0&quot; #21 prio=5 os_prio=31 tid=0x00007fe0ff84a800 nid=0x9d03 waiting for monitor entry [0x000070000451b000]   java.lang.Thread.State: BLOCKED (on object monitor)at cn.lxh.java.ManyThread.Lock.deadlock.DeadLockTest.calLock12(DeadLockTest.java:40)- waiting to lock &lt;0x000000066aefc620&gt; (a java.lang.Object)- locked &lt;0x000000066aefc610&gt; (a java.lang.Object)at cn.lxh.java.ManyThread.Lock.deadlock.DeadLockTest.access$000(DeadLockTest.java:8)at cn.lxh.java.ManyThread.Lock.deadlock.DeadLockTest$1.run(DeadLockTest.java:21)at java.lang.Thread.run(Thread.java:748)   Locked ownable synchronizers:- None&quot;Service Thread&quot; #20 daemon prio=9 os_prio=31 tid=0x00007fe0ff80f800 nid=0x6603 runnable [0x0000000000000000]   java.lang.Thread.State: RUNNABLE   Locked ownable synchronizers:- None&quot;C1 CompilerThread11&quot; #19 daemon prio=9 os_prio=31 tid=0x00007fe0aedc3800 nid=0x6503 waiting on condition [0x0000000000000000]   java.lang.Thread.State: RUNNABLE   Locked ownable synchronizers:- None&quot;C1 CompilerThread10&quot; #18 daemon prio=9 os_prio=31 tid=0x00007fe09f008800 nid=0x6303 waiting on condition [0x0000000000000000]   java.lang.Thread.State: RUNNABLE   Locked ownable synchronizers:- None&quot;C1 CompilerThread9&quot; #17 daemon prio=9 os_prio=31 tid=0x00007fe0de826800 nid=0xa103 waiting on condition [0x0000000000000000]   java.lang.Thread.State: RUNNABLE   Locked ownable synchronizers:- None&quot;C1 CompilerThread8&quot; #16 daemon prio=9 os_prio=31 tid=0x00007fe0df008800 nid=0xa303 waiting on condition [0x0000000000000000]   java.lang.Thread.State: RUNNABLE   Locked ownable synchronizers:- None&quot;C2 CompilerThread7&quot; #15 daemon prio=9 os_prio=31 tid=0x00007fe0fe812000 nid=0xa503 waiting on condition [0x0000000000000000]   java.lang.Thread.State: RUNNABLE   Locked ownable synchronizers:- None&quot;C2 CompilerThread6&quot; #14 daemon prio=9 os_prio=31 tid=0x00007fe0fe85a000 nid=0xa703 waiting on condition [0x0000000000000000]   java.lang.Thread.State: RUNNABLE   Locked ownable synchronizers:- None&quot;C2 CompilerThread5&quot; #13 daemon prio=9 os_prio=31 tid=0x00007fe0de825800 nid=0x6103 waiting on condition [0x0000000000000000]   java.lang.Thread.State: RUNNABLE   Locked ownable synchronizers:- None&quot;C2 CompilerThread4&quot; #12 daemon prio=9 os_prio=31 tid=0x00007fe09e808800 nid=0x5f03 waiting on condition [0x0000000000000000]   java.lang.Thread.State: RUNNABLE   Locked ownable synchronizers:- None&quot;C2 CompilerThread3&quot; #11 daemon prio=9 os_prio=31 tid=0x00007fe09e012000 nid=0x5d03 waiting on condition [0x0000000000000000]   java.lang.Thread.State: RUNNABLE   Locked ownable synchronizers:- None&quot;C2 CompilerThread2&quot; #10 daemon prio=9 os_prio=31 tid=0x00007fe0df00a000 nid=0x5c03 waiting on condition [0x0000000000000000]   java.lang.Thread.State: RUNNABLE   Locked ownable synchronizers:- None&quot;C2 CompilerThread1&quot; #9 daemon prio=9 os_prio=31 tid=0x00007fe0ae028800 nid=0x5b03 waiting on condition [0x0000000000000000]   java.lang.Thread.State: RUNNABLE   Locked ownable synchronizers:- None&quot;C2 CompilerThread0&quot; #8 daemon prio=9 os_prio=31 tid=0x00007fe0aedb8800 nid=0x5903 waiting on condition [0x0000000000000000]   java.lang.Thread.State: RUNNABLE   Locked ownable synchronizers:- None&quot;JDWP Command Reader&quot; #7 daemon prio=10 os_prio=31 tid=0x00007fe0de815000 nid=0x5703 runnable [0x0000000000000000]   java.lang.Thread.State: RUNNABLE   Locked ownable synchronizers:- None&quot;JDWP Event Helper Thread&quot; #6 daemon prio=10 os_prio=31 tid=0x00007fe0ce008800 nid=0x5503 runnable [0x0000000000000000]   java.lang.Thread.State: RUNNABLE   Locked ownable synchronizers:- None&quot;JDWP Transport Listener: dt_socket&quot; #5 daemon prio=10 os_prio=31 tid=0x00007fe0de808800 nid=0x4307 runnable [0x0000000000000000]   java.lang.Thread.State: RUNNABLE   Locked ownable synchronizers:- None&quot;Signal Dispatcher&quot; #4 daemon prio=9 os_prio=31 tid=0x00007fe0ff80e800 nid=0x4503 runnable [0x0000000000000000]   java.lang.Thread.State: RUNNABLE   Locked ownable synchronizers:- None&quot;Finalizer&quot; #3 daemon prio=8 os_prio=31 tid=0x00007fe0fe015000 nid=0x4d03 in Object.wait() [0x00007000030dc000]   java.lang.Thread.State: WAITING (on object monitor)at java.lang.Object.wait(Native Method)- waiting on &lt;0x000000066ab08ed8&gt; (a java.lang.ref.ReferenceQueue$Lock)at java.lang.ref.ReferenceQueue.remove(ReferenceQueue.java:144)- locked &lt;0x000000066ab08ed8&gt; (a java.lang.ref.ReferenceQueue$Lock)at java.lang.ref.ReferenceQueue.remove(ReferenceQueue.java:165)at java.lang.ref.Finalizer$FinalizerThread.run(Finalizer.java:216)   Locked ownable synchronizers:- None&quot;Reference Handler&quot; #2 daemon prio=10 os_prio=31 tid=0x00007fe0fe012000 nid=0x3903 in Object.wait() [0x0000700002fd9000]   java.lang.Thread.State: WAITING (on object monitor)at java.lang.Object.wait(Native Method)- waiting on &lt;0x000000066ab06c00&gt; (a java.lang.ref.Reference$Lock)at java.lang.Object.wait(Object.java:502)at java.lang.ref.Reference.tryHandlePending(Reference.java:191)- locked &lt;0x000000066ab06c00&gt; (a java.lang.ref.Reference$Lock)at java.lang.ref.Reference$ReferenceHandler.run(Reference.java:153)   Locked ownable synchronizers:- None&quot;VM Thread&quot; os_prio=31 tid=0x00007fe0ee811800 nid=0x3703 runnable&quot;GC task thread#0 (ParallelGC)&quot; os_prio=31 tid=0x00007fe0ff80d800 nid=0x1d07 runnable&quot;GC task thread#1 (ParallelGC)&quot; os_prio=31 tid=0x00007fe0ff80e000 nid=0x2203 runnable&quot;GC task thread#2 (ParallelGC)&quot; os_prio=31 tid=0x00007fe0fe81b800 nid=0x1f03 runnable&quot;GC task thread#3 (ParallelGC)&quot; os_prio=31 tid=0x00007fe0fe81c000 nid=0x2a03 runnable&quot;GC task thread#4 (ParallelGC)&quot; os_prio=31 tid=0x00007fe0fe81c800 nid=0x2b03 runnable&quot;GC task thread#5 (ParallelGC)&quot; os_prio=31 tid=0x00007fe0fe81d000 nid=0x2d03 runnable&quot;GC task thread#6 (ParallelGC)&quot; os_prio=31 tid=0x00007fe0fe81e000 nid=0x2f03 runnable&quot;GC task thread#7 (ParallelGC)&quot; os_prio=31 tid=0x00007fe0fe81e800 nid=0x5303 runnable&quot;GC task thread#8 (ParallelGC)&quot; os_prio=31 tid=0x00007fe0fe81f000 nid=0x3103 runnable&quot;GC task thread#9 (ParallelGC)&quot; os_prio=31 tid=0x00007fe0fe81f800 nid=0x3303 runnable&quot;GC task thread#10 (ParallelGC)&quot; os_prio=31 tid=0x00007fe0fe820800 nid=0x3403 runnable&quot;GC task thread#11 (ParallelGC)&quot; os_prio=31 tid=0x00007fe0fe821000 nid=0x5003 runnable&quot;GC task thread#12 (ParallelGC)&quot; os_prio=31 tid=0x00007fe0fe821800 nid=0x4f03 runnable&quot;VM Periodic Task Thread&quot; os_prio=31 tid=0x00007fe0de812000 nid=0x9e03 waiting on conditionJNI global references: 5087Found one Java-level deadlock:=============================&quot;Thread-1&quot;:  waiting to lock monitor 0x00007fe0de009808 (object 0x000000066aefc610, a java.lang.Object),  which is held by &quot;Thread-0&quot;&quot;Thread-0&quot;:  waiting to lock monitor 0x00007fe0de00d8a8 (object 0x000000066aefc620, a java.lang.Object),  which is held by &quot;Thread-1&quot;Java stack information for the threads listed above:===================================================&quot;Thread-1&quot;:at cn.lxh.java.ManyThread.Lock.deadlock.DeadLockTest.calLock21(DeadLockTest.java:49)- waiting to lock &lt;0x000000066aefc610&gt; (a java.lang.Object)- locked &lt;0x000000066aefc620&gt; (a java.lang.Object)at cn.lxh.java.ManyThread.Lock.deadlock.DeadLockTest.access$100(DeadLockTest.java:8)at cn.lxh.java.ManyThread.Lock.deadlock.DeadLockTest$2.run(DeadLockTest.java:28)at java.lang.Thread.run(Thread.java:748)&quot;Thread-0&quot;:at cn.lxh.java.ManyThread.Lock.deadlock.DeadLockTest.calLock12(DeadLockTest.java:40)- waiting to lock &lt;0x000000066aefc620&gt; (a java.lang.Object)- locked &lt;0x000000066aefc610&gt; (a java.lang.Object)at cn.lxh.java.ManyThread.Lock.deadlock.DeadLockTest.access$000(DeadLockTest.java:8)at cn.lxh.java.ManyThread.Lock.deadlock.DeadLockTest$1.run(DeadLockTest.java:21)at java.lang.Thread.run(Thread.java:748)Found 1 deadlock.</code></pre><p>从上述信息可以看出使用 jstack ，可以很方便地排查出代码中出现“deadlock”（死锁）的问题。</p><h2 id="jvisualvm">JVisualVM</h2><p>出了上面的命令行工具，还有可视化的工具JVisualVM，启动后的界面如下：<br /><img src="https://raw.githubusercontent.com/smartlin/pic/main/_posts/jvm/%20jvm%E4%B9%8B%E9%97%AE%E9%A2%98%E6%8E%92%E9%99%A4%E5%92%8C%E4%BC%98%E5%8C%96.md/JVisualVM.jpg" alt="JVisualVM" /></p><p>从上图中，可以清晰的看出来，发生了一个死锁，另外还可以在IDEA中的安装插件使用</p><h2 id="jvm调优">JVM调优</h2><p>JVM 调优主要是根据实际的硬件配置信息重新设置 JVM 参数来进行调优的，例如，硬件的内存配置很高，但 JVM 因为是默认参数，所以最大内存和初始化堆内存很小，这样就不能更好地利用本地的硬件优势了。因此，需要调整这些参数，让 JVM 在固定的配置下发挥最大的价值。</p><p>JVM 常见调优参数包含以下这些：</p><ul><li>Xmx，设置最大堆内存大小；</li><li>Xms，设置初始堆内存大小；</li><li>XX:MaxNewSize，设置新生代的最大内存；</li><li>XX:MaxTenuringThreshold，设置新生代对象经过一定的次数晋升到老生代；</li><li>XX:PretrnureSizeThreshold，设置大对象的值，超过这个值的对象会直接进入老生代；</li><li>XX:NewRatio，设置分代垃圾回收器新生代和老生代内存占比；</li><li>XX:SurvivorRatio，设置新生代 Eden、Form Survivor、To Survivor 占比。</li></ul>]]>
                </content>
            </entry>
            <entry>
                <title><![CDATA[Idea 2020.2导入maven工程一直read maven project解决办法]]></title>
                <link rel="alternate" type="text/html" href="https://starlin.top/archives/idea20202导入maven工程一直readmavenproject解决办法" />
                <id>tag:https://starlin.top,2020-08-09:idea20202导入maven工程一直readmavenproject解决办法</id>
                <published>2020-08-09T17:07:21+08:00</published>
                <updated>2020-08-09T17:07:21+08:00</updated>
                <author>
                    <name>starlin</name>
                    <uri>https://starlin.top</uri>
                </author>
                <content type="html">
                        <![CDATA[<p>最近把IDEA升级到来2020.2的版本，在导入工程maven工程的时候，右下角一直有个任务（read maven project）,运行了好久还是未结束，如下图所示：</p><p><img src="https://raw.githubusercontent.com/smartlin/pic/main/_posts/%E5%85%B6%E4%BB%96/idea%202020.2%E5%AF%BC%E5%85%A5maven%E5%B7%A5%E7%A8%8B%E4%B8%80%E7%9B%B4read%20maven%20project%E8%A7%A3%E5%86%B3%E5%8A%9E%E6%B3%95.md/20200809153959996_230144111.png" alt="20200809153959996_230144111" /></p><p>于是在jetbrains 官网上找了如下的解决办法：</p><pre><code>移除工程目录/.mvn/maven-wrapper.properties 文件即可</code></pre><p>IDEA官方的解释是：</p><pre><code>从idea 2020.2版本开始支持maven wrapper，如果你的Maven项目已经配置了Maven包装器，则IntelliJ IDEA将从.properties文件中获取Maven版本。</code></pre><p>相关的可用性增强:<br /><a href="https://youtrack.jetbrains.com/issue/IDEA-246835">IDEA-246835</a></p><p>以上，感谢阅读，end！！！</p>]]>
                </content>
            </entry>
            <entry>
                <title><![CDATA[Java SPI 与 Dubbo SPI]]></title>
                <link rel="alternate" type="text/html" href="https://starlin.top/archives/javaspiyu-dubbospi" />
                <id>tag:https://starlin.top,2020-08-01:javaspiyu-dubbospi</id>
                <published>2020-08-01T23:52:20+08:00</published>
                <updated>2020-08-01T23:52:20+08:00</updated>
                <author>
                    <name>starlin</name>
                    <uri>https://starlin.top</uri>
                </author>
                <content type="html">
                        <![CDATA[<p>最近在看dubbo的源码，其中有了解到Java的SPI机制，特此记录下（更详细的介绍还请看官方文档）<br />同时也会记录下Dubbo SPI的实现方式</p><h2 id="spi初探">SPI初探</h2><p>SPI的全称是Servcie Provider Interface，起初是提供给厂商做插件开发的</p><p>Java SPI使用了策略模式，一个接口多种实现。我们只声明接口，具体的实现并不在程序中直接确定，而是由程序之外的的配置掌控，用于具体实现的装配</p><p>和java spi 比较，dubbo SPI 做了一定的改进和优化，官方文档中描述如下：</p><blockquote><ol><li>JDK标准的SPI会一次性实例化扩展点所有实现，如果有扩展实现则初始化很耗时，如果没有用上也加载，则浪费资源</li><li>如果扩展加载失败，则连扩展的名称都获取不到</li><li>增加了对扩展IOC和AOP的支持，一个扩展可以直接setter注入其他扩展。Dubbo SPI只加载配置文件中的类，并分成不同的种类缓存在内存中，而不会立即全部初始化</li></ol></blockquote><p>另外Dubbo SPI配置文件的用途，将其分成了三类目录：</p><ul><li>META-INF/services/ 目录：该目录下的 SPI 配置文件用来兼容 JDK SPI</li><li>META-INF/dubbo/ 目录：该目录用于存放用户自定义 SPI 配置文件</li><li>META-INF/dubbo/internal/ 目录：该目录用于存放 Dubbo 内部使用的 SPI 配置文件</li></ul><p>然后，Dubbo 将 SPI 配置文件改成了 KV 格式，例如：</p><blockquote><p>dubbo=org.apache.dubbo.rpc.protocol.dubbo.DubboProtocol</p></blockquote><h2 id="java-spi实现步骤">Java SPI实现步骤</h2><ol><li>定义一个接口以及对应的方法</li><li>编写该接口的一个实现类</li><li>在META-INF/services/目录下，创建一个以接口全路径命名的文件，文件内容为具体实现类的全路径名，如果有多个，用分行符号隔开</li><li>在代码中通过java.util.ServiceLoader来加载具体的实现类</li></ol><h2 id="java-spi-demo演示">java spi demo演示</h2><ol><li>定义1个service</li></ol><pre><code class="language-java">public interface PrintService {    void sayHello();}</code></pre><ol start="2"><li>定义实现类</li></ol><pre><code class="language-java">public class PrintServiceImpl implements PrintService{    @Override    public void sayHello() {        System.out.println(&quot;hello java spi&quot;);    }}</code></pre><ol start="3"><li>resources中增加文件添加META-INF.service文件夹，并且在其中定义一个以接口全名为文件名称的文件，我的文件名称如下：</li></ol><pre><code>com.alibaba.dubbo.registry.spi.PrintService</code></pre><ol start="4"><li>文件内容是实现类的全路径，我的文件内容如下</li></ol><pre><code>com.alibaba.dubbo.registry.spi.PrintServiceImpl</code></pre><ol start="5"><li>测试方法：</li></ol><pre><code class="language-java">public class TestSpi {    public static void main(String[] args) {        ServiceLoader&lt;PrintService&gt; services = ServiceLoader.load(PrintService.class);        for (PrintService printService : services) {            printService.sayHello();        }    }}</code></pre><p>不出意外，输出结果为：</p><pre><code>hello java spi</code></pre><h2 id="dubbo-spi-demo">dubbo spi demo</h2><ol><li><p>在resources目录下的META-INF中建立配置文件目录dubbo/internal<br />名称为：com.alibaba.dubbo.registry.spi.PrintService<br />内容为：impl=com.alibaba.dubbo.registry.spi.PrintServiceImpl</p></li><li><p>在原来service上加上注解@SPI(&quot;impl&quot;)</p></li></ol><pre><code class="language-java">@SPI(&quot;impl&quot;)public interface PrintService {    void sayHello();}</code></pre><ol start="3"><li>实现类保持不变</li></ol><pre><code class="language-java">public class PrintServiceImpl implements PrintService{    @Override    public void sayHello() {        System.out.println(&quot;hello java spi&quot;);    }}</code></pre><ol start="4"><li>测试方法：</li></ol><pre><code class="language-java">public class TestDubboSpi {    public static void main(String[] args) {        PrintService printService = ExtensionLoader.getExtensionLoader(PrintService.class).getDefaultExtension();        printService.sayHello();    }}</code></pre><p>输出结果：</p><pre><code>hello java spi</code></pre><p>以上，感谢阅读，end！！！</p>]]>
                </content>
            </entry>
            <entry>
                <title><![CDATA[maven parent.relativePath用法详解]]></title>
                <link rel="alternate" type="text/html" href="https://starlin.top/archives/mavenparentrelativepath用法详解" />
                <id>tag:https://starlin.top,2020-02-06:mavenparentrelativepath用法详解</id>
                <published>2020-02-06T12:08:22+08:00</published>
                <updated>2020-02-06T12:08:22+08:00</updated>
                <author>
                    <name>starlin</name>
                    <uri>https://starlin.top</uri>
                </author>
                <content type="html">
                        <![CDATA[<p>我们在使用springboot搭建框架时，有一个parent.relativePath，如下图：</p><pre><code class="language-xml">&lt;parent&gt;    &lt;groupId&gt;org.springframework.boot&lt;/groupId&gt;    &lt;artifactId&gt;spring-boot-starter-parent&lt;/artifactId&gt;    &lt;version&gt;1.5.6.RELEASE&lt;/version&gt;    &lt;relativePath /&gt; &lt;!-- lookup parent from repository --&gt;&lt;/parent&gt;</code></pre><p>设定一个空值代表将始终从仓库中获取，不从本地路径获取<br />默认值为：../pom.xml<br />查找顺序：relativePath元素中的地址–本地仓库–远程仓库</p><p>以上，仅仅用于记录下</p><p>end，感谢阅读</p>]]>
                </content>
            </entry>
            <entry>
                <title><![CDATA[DBeaverEE保持长连接]]></title>
                <link rel="alternate" type="text/html" href="https://starlin.top/archives/dbeaveree保持长连接" />
                <id>tag:https://starlin.top,2020-01-18:dbeaveree保持长连接</id>
                <published>2020-01-18T00:20:51+08:00</published>
                <updated>2020-01-18T00:20:51+08:00</updated>
                <author>
                    <name>starlin</name>
                    <uri>https://starlin.top</uri>
                </author>
                <content type="html">
                        <![CDATA[<p>最近换了台电脑，将数据库连接工具从Navicat变成了DBeaverEE企业版，该数据库的界面和Eclipse很像，刚开始难免有点不适应，但是慢慢习惯就好了<br />我们都知道Navicat可以设置连接超时时间的，DBeaver在网上找了很久都没找到，可能也是用的人少的原因的吧，幸运的是被我鬼使神差的设置好了，现在记录以下：</p><h3 id="1-创建一个数据库连接">1. 创建一个数据库连接</h3><p>如下图：<br /><img src="https://raw.githubusercontent.com/smartlin/pic/main/_posts/mysql/dbeaveree%E4%BF%9D%E6%8C%81%E9%95%BF%E8%BF%9E%E6%8E%A5.md/20200118003124596_3690692.png" alt="" /></p><h3 id="2-编辑连接">2. 编辑连接</h3><p>右键编辑数据库连接属性，如图：<br /><img src="https://raw.githubusercontent.com/smartlin/pic/main/_posts/mysql/dbeaveree%E4%BF%9D%E6%8C%81%E9%95%BF%E8%BF%9E%E6%8E%A5.md/20200118003314074_1899918328.png" alt="" /></p><h3 id="设置连接保持">设置连接保持</h3><p>在连接设置中找到连接保持，设值即可（看个人需求，我设置的1），如图所示<br /><img src="https://raw.githubusercontent.com/smartlin/pic/main/_posts/mysql/dbeaveree%E4%BF%9D%E6%8C%81%E9%95%BF%E8%BF%9E%E6%8E%A5.md/20200118003510443_992991453.png" alt="" /></p><p>以上就是DBeaver设置连接超时时间的教程</p><p>End，感谢阅读！！！</p>]]>
                </content>
            </entry>
            <entry>
                <title><![CDATA[mybatis中使用ON DUPLICATE KEY UPDATE]]></title>
                <link rel="alternate" type="text/html" href="https://starlin.top/archives/mybatis中使用onduplicatekeyupdate" />
                <id>tag:https://starlin.top,2019-10-18:mybatis中使用onduplicatekeyupdate</id>
                <published>2019-10-18T22:49:21+08:00</published>
                <updated>2019-10-18T22:49:21+08:00</updated>
                <author>
                    <name>starlin</name>
                    <uri>https://starlin.top</uri>
                </author>
                <content type="html">
                        <![CDATA[<p>以前只知道在ssm框架xml中配置foreach实现批量处理数据（不存在执行insert语句，存在执行update语句），如果我想要分别给不同的记录插入不同的值怎么办，那么可以通过<strong>VALUES修改</strong>，特此记录下：</p><pre><code class="language-sql">    &lt;insert id=&quot;editformDataFlows&quot;&gt;        insert into formdataflow (id,flowname, nodename, approvalrelation, prenodename, approvalperson, approvalpersonname,                       approvalcondition, approvalconditionzh, nodecontent, inputdate)        values        &lt;foreach collection=&quot;list&quot; item=&quot;item&quot; index=&quot;index&quot; separator=&quot;,&quot;&gt;            (#{item.id},#{item.flowName},#{item.nodeName},#{item.approvalRelation},#{item.preNodeName},#{item.approvalPerson},#{item.approvalPersonName},#{item.approvalCondition},#{item.approvalConditionZH}            ,#{item.nodeContent},NOW())        &lt;/foreach&gt;        ON DUPLICATE KEY UPDATE        id = values(id),        flowName = values(flowName),        nodename = values(nodeName),        prenodename = values(preNodeName),        approvalrelation = values(approvalRelation),        approvalperson = values(approvalPerson),        approvalpersonname = values(approvalPersonName),        approvalcondition = values(approvalCondition),        approvalconditionzh = values(approvalConditionZH),        nodecontent = values(nodeContent)    &lt;/insert&gt;</code></pre><p>end，感谢阅读！</p>]]>
                </content>
            </entry>
            <entry>
                <title><![CDATA[IDEA调试Apache RocketMQ源码]]></title>
                <link rel="alternate" type="text/html" href="https://starlin.top/archives/idea调试apacherocketmq源码" />
                <id>tag:https://starlin.top,2019-09-27:idea调试apacherocketmq源码</id>
                <published>2019-09-27T14:36:21+08:00</published>
                <updated>2019-09-27T14:36:21+08:00</updated>
                <author>
                    <name>starlin</name>
                    <uri>https://starlin.top</uri>
                </author>
                <content type="html">
                        <![CDATA[<p>最近打算看看RocketMQ的源码，首当其冲的肯定是搭建RocketMQ的调试环境，网上看了很多介绍，都是简单的介绍（大佬们可能觉得太简单了吧），于是乎就有了这一篇文章了</p><h3 id="下载">下载</h3><p><a href="https://github.com/apache/rocketmq">点击此处</a>跳转至github RocketMQ项目，利用git clone下来后，通过IDEA导入即可，如下图：</p><p><img src="media/导入idea.jpg" alt="导入idea" /></p><h3 id="准备环境">准备环境</h3><p>在D盘再建立一个rocketmq-env的文件夹（我的目录是D:\IDEAWorkSpace\private\rocketmq-env），将源码文件夹中的distribution/conf/broker.conf、distribution/conf/logback_broker.xml、distribution/conf/logback_namesrv.xml复制到D:\IDEAWorkSpace\private\rocketmq-env目录下<br />修改broker.conf，配置如下：</p><pre><code class="language-conf">brokerClusterName = DefaultClusterbrokerName = broker-abrokerId = 0#nameServer地址，分号分割namesrvAddr=127.0.0.1:9876deleteWhen = 04fileReservedTime = 48brokerRole = ASYNC_MASTERflushDiskType = ASYNC_FLUSH#存储路径storePathRootDir=D:\\IDEAWorkSpace\\private\\rocketmq-env\\stores#commitLog存储路径storePathCommitLog=D:\\IDEAWorkSpace\\private\\rocketmq-env\\stores\\commitlog#消费队列存储路径storePathConsumeQueue=D:\\IDEAWorkSpace\\private\\rocketmq-env\\stores\\consumequeue#消息索引存储路径storePathIndex=D:\\IDEAWorkSpace\\private\\rocketmq-env\\stores\\index#checkpoint文件存储路径storeCheckpoint=D:\\IDEAWorkSpace\\private\\rocketmq-env\\stores\\checkpoint#abort文件存储路径abortFile=D:\\IDEAWorkSpace\\private\\rocketmq-env\\stores\\abort</code></pre><h3 id="启动nameserver">启动NameServer</h3><p>找到rocketmq\namesrv\NamesrvStartup.java,执行main函数即可，执行之前需要修改一下配置，增加Environment variables（ROCKETMQ_HOME=D:\IDEAWorkSpace\private\rocketmq-env），如下图所示：</p><p><img src="media/nameserver.jpg" alt="nameserver" /></p><p>启动成功后，控制台输出如下：</p><pre><code>The Name Server boot success. serializeType=JSON</code></pre><h3 id="启动broker">启动Broker</h3><p>找到 rocketmq\broker\BrokerStartup.java,执行main函数即可。执行之前先修改一下配置文件，同样的也要先增加下Environment variables（ROCKETMQ_HOME=D:\IDEAWorkSpace\private\rocketmq-env），若不配置，启动会报错找不到环境变量。还要修改Program arguments（-c D:\IDEAWorkSpace\private\rocketmq-env\conf\broker.conf），如下所示：</p><p><img src="media/broker.jpg" alt="broker" /></p><p>启动成功后，控制台输出如下：</p><pre><code>The broker[broker-a, 10.50.4.105:10911] boot success. serializeType=JSON and name server is 127.0.0.1:9876</code></pre><h3 id="启动producer">启动Producer</h3><p>找到 example\quickstart\Producer.java ，修改 nameserver 的地址</p><pre><code>producer.setNamesrvAddr(&quot;127.0.0.1:9876&quot;);</code></pre><p>如果启动后报如下错误，则表示磁盘空间不够用，但是磁盘空间明明还剩余5G多，怎么会提示空间不够了</p><pre><code>Caused by: org.apache.rocketmq.client.exception.MQBrokerException: CODE: 14  DESC: service not available now, maybe disk full, CL:  0.94 CQ:  0.94 INDEX:  0.94, maybe your broker machine memory too small.For more information, please visit the url, http://rocketmq.apache.org/docs/faq/at org.apache.rocketmq.client.impl.MQClientAPIImpl.processSendResponse(MQClientAPIImpl.java:671)at org.apache.rocketmq.client.impl.MQClientAPIImpl.sendMessageSync(MQClientAPIImpl.java:467)at org.apache.rocketmq.client.impl.MQClientAPIImpl.sendMessage(MQClientAPIImpl.java:449)at org.apache.rocketmq.client.impl.MQClientAPIImpl.sendMessage(MQClientAPIImpl.java:403)</code></pre><p>查看源码DefaultMessageStore类后发现原来是按照使用磁盘比率来计算的，默认为75%，而我的磁盘使用率已经94%了，所以才会出现次错误提示，解决办法有2个：</p><ol><li>清理磁盘空间</li><li>在broker.conf中配置属性diskMaxUsedSpaceRatio=95（源码中最大也只能设置为95，这种方式我没有测试过）</li></ol><p>启动成功后，控制台会输出：</p><pre><code>SendResult [sendStatus=SEND_OK, msgId=0A3204690D4818B4AAC28947C57803E2, offsetMsgId=0A32046900002A9F000000000006136E, messageQueue=MessageQueue [topic=TopicTest, brokerName=broker-a, queueId=1], queueOffset=553]SendResult [sendStatus=SEND_OK, msgId=0A3204690D4818B4AAC28947C57903E3, offsetMsgId=0A32046900002A9F0000000000061422, messageQueue=MessageQueue [topic=TopicTest, brokerName=broker-a, queueId=2], queueOffset=553]SendResult [sendStatus=SEND_OK, msgId=0A3204690D4818B4AAC28947C57B03E4, offsetMsgId=0A32046900002A9F00000000000614D6, messageQueue=MessageQueue [topic=TopicTest, brokerName=broker-a, queueId=3], queueOffset=554]SendResult [sendStatus=SEND_OK, msgId=0A3204690D4818B4AAC28947C57C03E5, offsetMsgId=0A32046900002A9F000000000006158A, messageQueue=MessageQueue [topic=TopicTest, brokerName=broker-a, queueId=0], queueOffset=554]SendResult [sendStatus=SEND_OK, msgId=0A3204690D4818B4AAC28947C57E03E6, offsetMsgId=0A32046900002A9F000000000006163E, messageQueue=MessageQueue [topic=TopicTest, brokerName=broker-a, queueId=1], queueOffset=554]SendResult [sendStatus=SEND_OK, msgId=0A3204690D4818B4AAC28947C57F03E7, offsetMsgId=0A32046900002A9F00000000000616F2, messageQueue=MessageQueue [topic=TopicTest, brokerName=broker-a, queueId=2], queueOffset=554]15:46:22.234 [NettyClientSelector_1] INFO  RocketmqRemoting - closeChannel: close the connection to remote address[10.50.4.105:10911] result: true15:46:22.336 [NettyClientSelector_1] INFO  RocketmqRemoting - closeChannel: close the connection to remote address[127.0.0.1:9876] result: true</code></pre><h3 id="启动consumer">启动Consumer</h3><p>找到 example\quickstart\Consumer.java ，修改 nameserver 的地址</p><pre><code>consumer.setNamesrvAddr(&quot;127.0.0.1:9876&quot;);</code></pre><p>启动成功后，控制台如下：</p><pre><code>ConsumeMessageThread_8 Receive New Messages: [MessageExt [queueId=2, storeSize=180, queueOffset=553, sysFlag=0, bornTimestamp=1569570382201, bornHost=/10.50.4.105:1213, storeTimestamp=1569570382202, storeHost=/10.50.4.105:10911, msgId=0A32046900002A9F0000000000061422, commitLogOffset=398370, bodyCRC=801108784, reconsumeTimes=0, preparedTransactionOffset=0, toString()=Message{topic='TopicTest', flag=0, properties={MIN_OFFSET=0, MAX_OFFSET=554, CONSUME_START_TIME=1569570382203, UNIQ_KEY=0A3204690D4818B4AAC28947C57903E3, WAIT=true, TAGS=TagA}, body=[72, 101, 108, 108, 111, 32, 82, 111, 99, 107, 101, 116, 77, 81, 32, 57, 57, 53], transactionId='null'}]] ConsumeMessageThread_11 Receive New Messages: [MessageExt [queueId=3, storeSize=180, queueOffset=554, sysFlag=0, bornTimestamp=1569570382203, bornHost=/10.50.4.105:1213, storeTimestamp=1569570382204, storeHost=/10.50.4.105:10911, msgId=0A32046900002A9F00000000000614D6, commitLogOffset=398550, bodyCRC=917938826, reconsumeTimes=0, preparedTransactionOffset=0, toString()=Message{topic='TopicTest', flag=0, properties={MIN_OFFSET=0, MAX_OFFSET=555, CONSUME_START_TIME=1569570382206, UNIQ_KEY=0A3204690D4818B4AAC28947C57B03E4, WAIT=true, TAGS=TagA}, body=[72, 101, 108, 108, 111, 32, 82, 111, 99, 107, 101, 116, 77, 81, 32, 57, 57, 54], transactionId='null'}]] ConsumeMessageThread_7 Receive New Messages: [MessageExt [queueId=0, storeSize=180, queueOffset=554, sysFlag=0, bornTimestamp=1569570382204, bornHost=/10.50.4.105:1213, storeTimestamp=1569570382205, storeHost=/10.50.4.105:10911, msgId=0A32046900002A9F000000000006158A, commitLogOffset=398730, bodyCRC=1102156316, reconsumeTimes=0, preparedTransactionOffset=0, toString()=Message{topic='TopicTest', flag=0, properties={MIN_OFFSET=0, MAX_OFFSET=555, CONSUME_START_TIME=1569570382208, UNIQ_KEY=0A3204690D4818B4AAC28947C57C03E5, WAIT=true, TAGS=TagA}, body=[72, 101, 108, 108, 111, 32, 82, 111, 99, 107, 101, 116, 77, 81, 32, 57, 57, 55], transactionId='null'}]] ConsumeMessageThread_7 Receive New Messages: [MessageExt [queueId=1, storeSize=180, queueOffset=554, sysFlag=0, bornTimestamp=1569570382206, bornHost=/10.50.4.105:1213, storeTimestamp=1569570382206, storeHost=/10.50.4.105:10911, msgId=0A32046900002A9F000000000006163E, commitLogOffset=398910, bodyCRC=1359908749, reconsumeTimes=0, preparedTransactionOffset=0, toString()=Message{topic='TopicTest', flag=0, properties={MIN_OFFSET=0, MAX_OFFSET=555, CONSUME_START_TIME=1569570382209, UNIQ_KEY=0A3204690D4818B4AAC28947C57E03E6, WAIT=true, TAGS=TagA}, body=[72, 101, 108, 108, 111, 32, 82, 111, 99, 107, 101, 116, 77, 81, 32, 57, 57, 56], transactionId='null'}]] ConsumeMessageThread_2 Receive New Messages: [MessageExt [queueId=2, storeSize=180, queueOffset=554, sysFlag=0, bornTimestamp=1569570382207, bornHost=/10.50.4.105:1213, storeTimestamp=1569570382208, storeHost=/10.50.4.105:10911, msgId=0A32046900002A9F00000000000616F2, commitLogOffset=399090, bodyCRC=638172955, reconsumeTimes=0, preparedTransactionOffset=0, toString()=Message{topic='TopicTest', flag=0, properties={MIN_OFFSET=0, MAX_OFFSET=555, CONSUME_START_TIME=1569570382212, UNIQ_KEY=0A3204690D4818B4AAC28947C57F03E7, WAIT=true, TAGS=TagA}, body=[72, 101, 108, 108, 111, 32, 82, 111, 99, 107, 101, 116, 77, 81, 32, 57, 57, 57], transactionId='null'}]] </code></pre><h3 id="总结">总结</h3><ol><li>启动 NameServer 和 Broker 要配置 ROCKETMQ_HOME 变量</li><li>注意是否开启自动创建Topic的配置，如果没有开启，需要主动创建Topic</li><li>配置文件（broker.conf，日志文件输出目录）的修改</li></ol><p>end，感谢阅读！</p>]]>
                </content>
            </entry>
            <entry>
                <title><![CDATA[redis报cant resolve localhost address错误]]></title>
                <link rel="alternate" type="text/html" href="https://starlin.top/archives/redis报cantresolvelocalhostaddress错误" />
                <id>tag:https://starlin.top,2019-08-30:redis报cantresolvelocalhostaddress错误</id>
                <published>2019-08-30T12:54:18+08:00</published>
                <updated>2019-08-30T12:54:18+08:00</updated>
                <author>
                    <name>starlin</name>
                    <uri>https://starlin.top</uri>
                </author>
                <content type="html">
                        <![CDATA[<h2 id="问题描述">问题描述</h2><p>最近公司把项目都开源至公司内部的gitlab上面，所有的单元测试都是通过gitlab中的CI脚本来运行的，可是在CI上面跑单元测试时产生如下图错误：</p><p>![redis_error](<a href="medhttps://raw.githubusercontent.com/smartlin/pic/main/_posts/redis/redis%E4%B8%8D%E8%83%BD%E8%A7%A3%E6%9E%90localhost%E5%9C%B0%E5%9D%80.md/redis_error.png">medhttps://raw.githubusercontent.com/smartlin/pic/main/_posts/redis/redis%E4%B8%8D%E8%83%BD%E8%A7%A3%E6%9E%90localhost%E5%9C%B0%E5%9D%80.md/redis_error.png</a><a href="/images/redis/redis_error.png"></a></p><p>当时纳闷了，为什么本地环境没问题，代码在GitLab上的服务器就有问题了？</p><h2 id="问题解决">问题解决</h2><p>仔细看了下错误信息，发现就是Jedis里面报错，查看源码也找到了报错的地方，如下代码：</p><pre><code class="language-java">public static String getLocalHostQuietly() {String localAddress;try {  localAddress = InetAddress.getLocalHost().getHostAddress();} catch (Exception ex) {  log.logp(Level.SEVERE, HostAndPort.class.getName(), &quot;getLocalHostQuietly&quot;, &quot;cant resolve localhost address&quot;, ex);  localAddress = &quot;localhost&quot;;}return localAddress}</code></pre><p>简单的分析了下，此处报错就是为获取到服务器上localhost address</p><p>于是登陆CI服务器，查看hostname后，<a href="https://raw.githubusercontent.com/smartlin/pic/main/_posts/redis/redis%E4%B8%8D%E8%83%BD%E8%A7%A3%E6%9E%90localhost%E5%9C%B0%E5%9D%80.md/bug.png">https://raw.githubusercontent.com/smartlin/pic/main/_posts/redis/redis%E4%B8%8D%E8%83%BD%E8%A7%A3%E6%9E%90localhost%E5%9C%B0%E5%9D%80.md/bug.png</a></p><pre><code class="language-shell">[root@template conf]# hostnamehostname[root@template conf]# </code></pre><p>在host文件中的localhost后添加hostname即可</p><pre><code class="language-shell">127.0.0.1   localhost localhost.localdomain localhost4 localhost4.localdomain4 hostname::1         localhost localhost.localdomain localhost6 localhost6.localdomain6</code></pre><p>配置完成后，神奇般的好了，不在报之前的错误，单元测试也OK了</p><h2 id="刨根问底">刨根问底</h2><p>那么问题来了，Jedis为什么要获取linux主机的hostname了？<br />终于让我在stackoverflow找到答案，详情<a href="https://stackoverflow.com/questions/44252750/error-redis-clients-jedis-hostandport-cant-resolve-localhost-address">请点击</a>，居然是个bug，天呐！！！！使用2.9.x之后的版本即可解决此问题，截图如下：</p><p><img src="media/bug.png" alt="bug" /></p><p>end，感谢阅读！！！</p>]]>
                </content>
            </entry>
</feed>