AQS简介
AbstractQueuedSynchronizer简称AQS,即抽象的队列同步器,它是构建锁或者其他同步组件的基础框架(如ReentrantLock、ReentrantReadWriteLock、Semaphore等),JUC并发包的作者(Doug Lea)期望它能够成为实现大部分同步需求的基础。它是JUC并发包中的核心基础组件。
整个 AQS 分为以下几部分:
- Node 节点, 用于存放获取线程的节点, 存在于 Sync Queue, Condition Queue, 这些节点主要的区分在于 waitStatus 的值
- Condition Queue, 这个队列是用于独占模式中, 只有用到 Condition.awaitXX 时才会将 node加到 tail 上
- Sync Queue, 独占 共享的模式中均会使用到的存放 Node 的 CLH queue
- ConditionObject, 用于独占的模式, 主要是线程释放lock, 加入 Condition Queue, 并进行相应的 signal 操作
- 独占的获取lock (acquire, release), 例如 ReentrantLock
- 共享的获取lock (acquireShared, releaseShared), 例如 ReeantrantReadWriteLock, Semaphore, CountDownLatch
AQS原理概览
AQS核心思想是,如果被请求的共享资源空闲,那么就将当前请求资源的线程设置为有效的工作线程,将共享资源设置为锁定状态;
如果共享资源被占用,就需要一定的阻塞等待唤醒机制来保证锁分配。
这个机制主要用的是CLH队列的变体实现的,将暂时获取不到锁的线程加入到队列中。
CLH:(Craig、Landin and Hagersten)队列,是单向链表,AQS中的队列是CLH变体的虚拟双向队列(FIFO),AQS是通过将每条请求共享资源的线程封装成一个节点来实现锁的分配。
主要原理图如下:
AQS使用一个Volatile的int类型的成员变量来表示同步状态,通过内置的FIFO队列来完成资源获取的排队工作,通过CAS完成对State值的修改。

CAS
CAS(Compare and Swap),比较并交换,通过利用底层硬件平台的特性,实现原子性操作。CAS 操作涉及到3个操作数,内存值 V,旧的期望值 A,需要修改的新值 B。当且仅当预期值 A 和 内存值 V 相同时,才将内存值 V 修改为 B,否则什么都不做。CAS 操作类似于执行了下面流程
if(oldValue == memory[valueAddress]) {
    memory[valueAddress] = newValue;
}
在上面的流程中,其实涉及到了两个操作,比较以及替换,为了确保程序正确,需要确保这两个操作的原子性(也就是说确保这两个操作同时进行,中间不会有其他线程干扰)。现在的 CPU 中,提供了相关的底层 CAS 指令,即 CPU 底层指令确保了比较和交换两个操作作为一个原子操作进行(其实在这一点上还是有排他锁的. 只是比起用synchronized, 这里的排他时间要短的多.),Java 中的 CAS 函数是借助于底层的 CAS 指令来实现的.我们来看下 Java 中对于 CAS 函数的定义:
/**
 * Atomically update Java variable to x if it is currently
 * holding expected.
 * @return true if successful
 */
public final native boolean compareAndSwapObject(Object o, long offset, Object expected, Object x);
/**
 * Atomically update Java variable to x if it is currently
 * holding expected.
 * @return true if successful
 */
public final native boolean compareAndSwapInt(Object o, long offset, int expected, int x);
/**
 * Atomically update Java variable to x if it is currently
 * holding expected.
 * @return true if successful
 */
public final native boolean compareAndSwapLong(Object o, long offset, long expected, long x);
上面三个函数定义在 sun.misc.Unsafe 类中,使用该类可以进行一些底层的操作,例如直接操作原生内存,更多关于 Unsafe 类的文章可以参考 这篇。
这里简单介绍一下CAS,详情请点击这里
同步队列
AQS 依赖内部的同步队列(一个 FIFO的双向队列)来完成同步状态的管理,当前线程获取同步状态失败时,同步器会将当前线程以及等待状态等信息构造成一个节点(Node)并将其加入同步队列,同时会阻塞当前线程,当同步状态释放时,会把队列中第一个等待节点线程唤醒(下图中的 Node1),使其再次尝试获取同步状态。同步队列的结构如下所示

Head 节点本身不保存等待线程的信息,它通过 next 变量指向第一个保存线程等待信息的节点(Node1)。当线程被唤醒之后,会删除 Head 节点,而唤醒线程所在的节点会设置为 Head 节点(Node1 被唤醒之后,Node1会被置为 Head 节点)。
内部类Node
Node 节点是代表获取lock的线程, 存在于 Condition Queue, Sync Queue 里面, 而其主要就是 nextWaiter (标记共享还是独占),waitStatus 标记node的状态
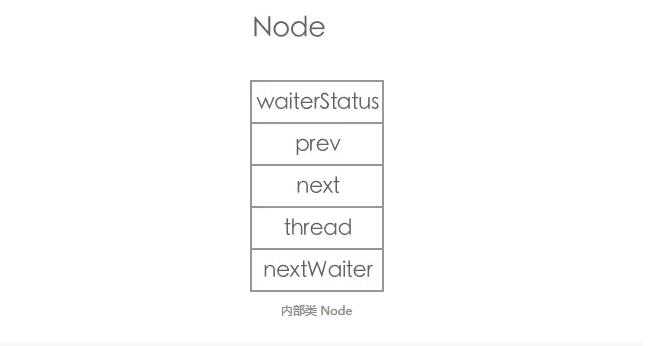
Node 的数据结构其实也挺简单的,就是 thread + waitStatus + pre + next 四个属性而已,源码如下:
 static final class Node {
        /** Marker to indicate a node is waiting in shared mode */
        // 标记当前节点在共享模式下
        static final Node SHARED = new Node();
        /** Marker to indicate a node is waiting in exclusive mode */
        // 标记当前节点在独占模式下
        static final Node EXCLUSIVE = null;

        /** waitStatus value to indicate thread has cancelled */
         // 代码此线程取消了争抢这个锁,是唯一一个大于0的状态
        static final int CANCELLED =  1;
        /** waitStatus value to indicate successor's thread needs unparking */
        // 表示当前node的后继节点(即next节点)对应的线程需要被唤醒
        static final int SIGNAL    = -1;
        /** waitStatus value to indicate thread is waiting on condition */
        // 表明线程正在等待一个条件
        static final int CONDITION = -2;
        /**
         * waitStatus value to indicate the next acquireShared should
         * unconditionally propagate
         */
         // 用于acquireShared中向后传播
        static final int PROPAGATE = -3;

        /**
         * Status field, taking on only the values:
         *   SIGNAL:     The successor of this node is (or will soon be)
         *               blocked (via park), so the current node must
         *               unpark its successor when it releases or
         *               cancels. To avoid races, acquire methods must
         *               first indicate they need a signal,
         *               then retry the atomic acquire, and then,
         *               on failure, block.
         *   CANCELLED:  This node is cancelled due to timeout or interrupt.
         *               Nodes never leave this state. In particular,
         *               a thread with cancelled node never again blocks.
         *   CONDITION:  This node is currently on a condition queue.
         *               It will not be used as a sync queue node
         *               until transferred, at which time the status
         *               will be set to 0. (Use of this value here has
         *               nothing to do with the other uses of the
         *               field, but simplifies mechanics.)
         *   PROPAGATE:  A releaseShared should be propagated to other
         *               nodes. This is set (for head node only) in
         *               doReleaseShared to ensure propagation
         *               continues, even if other operations have
         *               since intervened.
         *   0:          None of the above
         *
         * The values are arranged numerically to simplify use.
         * Non-negative values mean that a node doesn't need to
         * signal. So, most code doesn't need to check for particular
         * values, just for sign.
         *
         * The field is initialized to 0 for normal sync nodes, and
         * CONDITION for condition nodes.  It is modified using CAS
         * (or when possible, unconditional volatile writes).
         */
         // 等待状态
        volatile int waitStatus;

        /**
         * Link to predecessor node that current node/thread relies on
         * for checking waitStatus. Assigned during enqueuing, and nulled
         * out (for sake of GC) only upon dequeuing.  Also, upon
         * cancellation of a predecessor, we short-circuit while
         * finding a non-cancelled one, which will always exist
         * because the head node is never cancelled: A node becomes
         * head only as a result of successful acquire. A
         * cancelled thread never succeeds in acquiring, and a thread only
         * cancels itself, not any other node.
         */
         //  前驱节点的引用
        volatile Node prev;

        /**
         * Link to the successor node that the current node/thread
         * unparks upon release. Assigned during enqueuing, adjusted
         * when bypassing cancelled predecessors, and nulled out (for
         * sake of GC) when dequeued.  The enq operation does not
         * assign next field of a predecessor until after attachment,
         * so seeing a null next field does not necessarily mean that
         * node is at end of queue. However, if a next field appears
         * to be null, we can scan prev's from the tail to
         * double-check.  The next field of cancelled nodes is set to
         * point to the node itself instead of null, to make life
         * easier for isOnSyncQueue.
         */
         //  后继节点的引用
        volatile Node next;

        /**
         * The thread that enqueued this node.  Initialized on
         * construction and nulled out after use.
         */
         // 获取同步状态的线程
        volatile Thread thread;

        /**
         * Link to next node waiting on condition, or the special
         * value SHARED.  Because condition queues are accessed only
         * when holding in exclusive mode, we just need a simple
         * linked queue to hold nodes while they are waiting on
         * conditions. They are then transferred to the queue to
         * re-acquire. And because conditions can only be exclusive,
         * we save a field by using special value to indicate shared
         * mode.
         */
        // 作用分2种
        // 1.在 Sync Queue 里面, nextWaiter用来判断节点是 共享模式, 还是独占模式
        // 2.在 Condition queue 里面, 节点主要是链接且后继节点 (Condition queue是一个单向的, 不支持并发的 list)
        Node nextWaiter;

        /**
         * Returns true if node is waiting in shared mode.
         */
        // 当前节点是否是共享模式
        final boolean isShared() {
            return nextWaiter == SHARED;
        }

        /**
         * Returns previous node, or throws NullPointerException if null.
         * Use when predecessor cannot be null.  The null check could
         * be elided, but is present to help the VM.
         *
         * @return the predecessor of this node
         */
        // 获取node的前继节点
        final Node predecessor() throws NullPointerException {
            Node p = prev;
            if (p == null)
                throw new NullPointerException();
            else
                return p;
        }

        Node() {    // Used to establish initial head or SHARED marker
        }
        // 初始化 Node 用于 Sync Queue 里面
        Node(Thread thread, Node mode) {     // Used by addWaiter
            this.nextWaiter = mode;
            this.thread = thread;
        }
        // 初始化 Node 用于 Condition Queue 里面
        Node(Thread thread, int waitStatus) { // Used by Condition
            this.waitStatus = waitStatus;
            this.thread = thread;
        }
    }
在 Node 类中定义了四种等待状态:
- CANCELED: 1,因为等待超时 (timeout)或者中断(interrupt),节点会被置为取消状态。处于取消状态的节点不会再去竞争锁,也就是说不会再被阻塞。节点会一直保持取消状态,而不会转换为其他状态。处于 CANCELED 的节点会被移出队列,被 GC 回收。
- SIGNAL: -1,表明当前的后继结点正在或者将要被阻塞(通过使用 LockSupport.pack 方法),因此当前的节点被释放(release)或者被取消时(cancel)时,要唤醒它的后继结点(通过 LockSupport.unpark 方法)。
- CONDITION: -2,表明当前节点在条件队列中,因为等待某个条件而被阻塞。
- PROPAGATE: -3,在共享模式下,可以认为资源有多个,因此当前线程被唤醒之后,可能还有剩余的资源可以唤醒其他线程。该状态用来表明后续节点会传播唤醒的操作。需要注意的是只有头节点才可以设置为该状态(This is set (for head node only) in doReleaseShared to ensure propagation continues, even if other operations have since intervened.)。
0:新创建的节点会处于这种状态
waitStatus的状态变化:
- 线程刚入Sync Queue 里面, 发现独占锁被其他人获取, 则将其前继节点标记为SIGNAL, 然后再尝试获取一下锁(调用tryAcquire方法)
- 若调用 tryAcquire方法获取失败, 则判断一下是否前继节点被标记为 SIGNAL, 若是的话直接block(block前会确保前继节点被标记为SIGNAL, 因为前继节点在进行释放锁时根据是否标记为 SIGNAL 来决定唤醒后继节点与否 <- 这是独占的情况下)
- 前继节点使用完lock, 进行释放, 因为自己被标记为 SIGNAL, 所以唤醒其后继节点
waitStatus 变化过程:
- 独占模式下: 0(初始) -> signal(被后继节点标记为release需要唤醒后继节点) -> 0 (等释放好lock, 会恢复到0)
- 独占模式 + 使用 Condition情况下: 0(初始) -> signal(被后继节点标记为release需要唤醒后继节点) -> 0 (等释放好lock, 会恢复到0)
其上可能涉及 中断与超时, 只是多了一个 CANCELLED, 当节点变成 CANCELLED, 后就等着被清除 - 共享模式下: 0(初始) -> PROPAGATE(获取 lock 或release lock 时) (获取 lock 时会调用 setHeadAndPropagate 来进行 传递式的唤醒后继节点, 直到碰到 独占模式的节点)
- 共享模式 + 独占模式下: 0(初始) -> signal(被后继节点标记为release需要唤醒后继节点) -> 0 (等释放好lock, 会恢复到0)
其上的这些状态变化主要在: doReleaseShared , shouldParkAfterFailedAcquire 里面
独占锁的获取和释放
独占锁的获取
下面是获取独占锁的流程图:
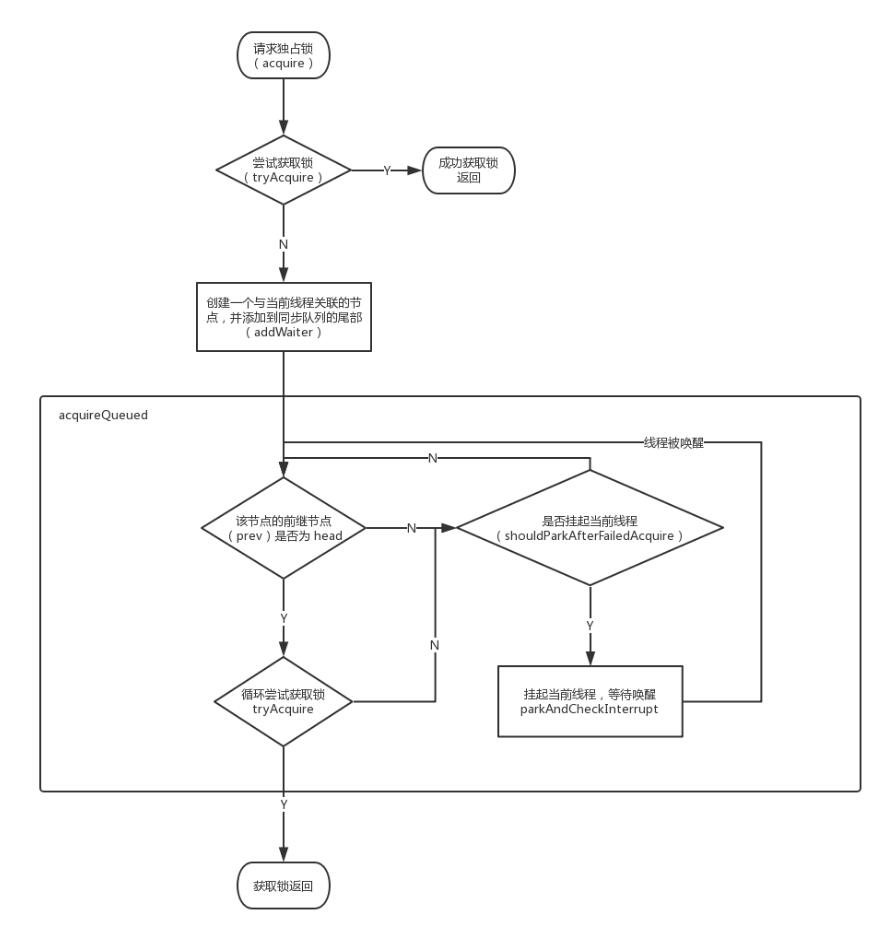
我们通过 acquire 方法来获取独占锁,下面是方法定义
public final void acquire(int arg) {
    // 首先尝试获取锁,如果获取失败,会先调用 addWaiter 方法创建节点并追加到队列尾部
    // 然后调用 acquireQueued 阻塞或者循环尝试获取锁
    if (!tryAcquire(arg) && acquireQueued(addWaiter(Node.EXCLUSIVE), arg)){
        // 在 acquireQueued 中,如果线程是因为中断而退出的阻塞状态会返回 true
        // 这里的 selfInterrupt 主要是为了恢复线程的中断状态
        selfInterrupt();
    }
}
acquire 会首先调用 tryAcquire 方法来获得锁,该方法需要我们来实现,这个在前面已经提过了。如果没有获取锁,会调用 addWaiter 方法创建一个和当前线程关联的节点追加到同步队列的尾部,我们调用 addWaiter 时传入的是 Node.EXCLUSIVE,表明当前是独占模式。下面是 addWaiter 的具体实现
    private Node addWaiter(Node mode) {
        //新建Node
        Node node = new Node(Thread.currentThread(), mode);
        //快速尝试添加尾节点
        Node pred = tail;
        if (pred != null) {
            node.prev = pred;
            //CAS设置尾节点
            if (compareAndSetTail(pred, node)) {
                pred.next = node;
                return node;
            }
        }
        //多次尝试
        enq(node);
        return node;
    }
addWaiter 方法会首先调用 if 方法,来判断能否成功将节点添加到队列尾部,如果添加失败,再调用 enq 方法(使用循环不断重试)进行添加,下面是 enq 方法的实现:
private Node enq(final Node node) {
    //通过“死循环”的方式来保证节点可以正确添加,只有成功添加后,当前线程才会从该方法返回,否则会一直执行下去。
    for (;;) {
        Node t = tail;
        // 同步队列采用的懒初始化(lazily initialized)的方式,
        // 初始时 head 和 tail 都会被设置为 null,当一次被访问时
        // 才会创建 head 对象,并把尾指针指向 head。
        if (t == null) { // Must initialize
            if (compareAndSetHead(new Node()))
                tail = head;
        } else {
            //设置为尾节点
            node.prev = t;
            if (compareAndSetTail(t, node)) {
                t.next = node;
                return t;
            }
        }
    }
}
addWaiter 仅仅是将节点加到了同步队列的末尾,并没有阻塞线程,线程阻塞的操作是在 acquireQueued 方法中完成的,下面是 acquireQueued 的实现:
final boolean acquireQueued(final Node node, int arg) {
    boolean failed = true;
    try {
        //中断标志
        boolean interrupted = false;
        //自旋过程,其实就是一个死循环而已
        for (;;) {
            final Node p = node.predecessor();
            // 如果当前节点的前继节点是 head,就使用自旋(循环)的方式不断请求锁
            if (p == head && tryAcquire(arg)) {
                // 成功获得锁,将当前节点置为 head 节点,同时删除原 head 节点
                setHead(node);
                p.next = null; // help GC
                failed = false;
                return interrupted;
            }
            // shouldParkAfterFailedAcquire 检查是否可以挂起线程,
            // 如果可以挂起进程,会调用 parkAndCheckInterrupt 挂起线程,
            // 如果 parkAndCheckInterrupt 返回 true,表明当前线程是因为中断而退出挂起状态的,
            // 所以要将 interrupted 设为 true,表明当前线程被中断过
            if (shouldParkAfterFailedAcquire(p, node) &&
                parkAndCheckInterrupt())
                interrupted = true;
        }
    } finally {
        if (failed)
            cancelAcquire(node);
    }
}
acquireQueued 会首先检查当前节点的前继节点是否为 head,如果为 head,将使用自旋的方式不断的请求锁,如果不是 head,则调用 shouldParkAfterFailedAcquire 查看是否应该挂起当前节点关联的线程,下面是 shouldParkAfterFailedAcquire 的实现
private static boolean shouldParkAfterFailedAcquire(Node pred, Node node) {
    // 当前节点的前继节点的等待状态
    int ws = pred.waitStatus;
    // 如果前继节点的等待状态为 SIGNAL 我们就可以将当前节点对应的线程挂起
    if (ws == Node.SIGNAL)
        return true;
    if (ws > 0) {
        // ws 大于 0,表明当前线程的前继节点处于 CANCELED 的状态,
        // 所以我们需要从当前节点开始往前查找,直到找到第一个不为
        // CAECELED  状态的节点
        do {
            node.prev = pred = pred.prev;
        } while (pred.waitStatus > 0);
        pred.next = node;
    } else {
        /*
         * waitStatus must be 0 or PROPAGATE.  Indicate that we
         * need a signal, but don't park yet.  Caller will need to
         * retry to make sure it cannot acquire before parking.
         */
        compareAndSetWaitStatus(pred, ws, Node.SIGNAL);
    }
    return false;
}
shouldParkAfterFailedAcquire 会检查前继节点的等待状态,如果前继节点状态为 SIGNAL,则可以将当前节点关联的线程挂起,如果不是 SIGNAL,会做一些其他的操作,在当前循环中不会挂起线程。如果确定了可以挂起线程,就调用 parkAndCheckInterrupt 方法对线程进行阻塞:
private final boolean parkAndCheckInterrupt() {
    // 挂起当前线程
    LockSupport.park(this);
    // 可以通过调用 interrupt 方法使线程退出 park 状态,
    // 为了使线程在后面的循环中还可以响应中断,会重置线程的中断状态。
    // 这里使用 interrupted 会先返回线程当前的中断状态,然后将中断状态重置为 false,
    // 线程的中断状态会返回给上层调用函数,在线程获得锁后,
    // 如果发现线程曾被中断过,会将中断状态重新设为 true
    return Thread.interrupted();
}
独占锁的释放
下面是获取独占锁的流程图:
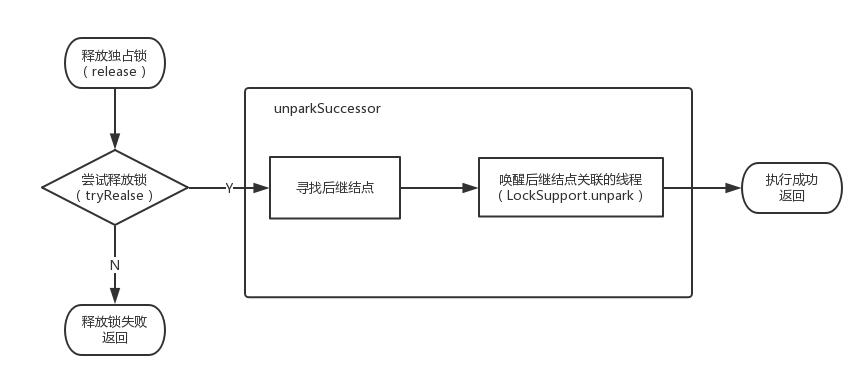
通过 release 方法,我们可以释放互斥锁。下面是 release 方法的实现:
public final boolean release(int arg) {
    if (tryRelease(arg)) {
        Node h = head;
        // waitStatus 为 0,证明是初始化的空队列或者后继结点已经被唤醒了
        if (h != null && h.waitStatus != 0)
            unparkSuccessor(h);
        return true;
    }
    return false;
}
在独占模式下释放锁时,是没有其他线程竞争的,所以处理会简单一些。首先尝试释放锁,如果失败就直接返回(失败不是因为多线程竞争,而是线程本身就不拥有锁)。如果成功的话,会检查 h 的状态,然后调用 unparkSuccessor 方法来唤醒后续线程。
下面是unparkSuccessor的实现
private void unparkSuccessor(Node node) {
    int ws = node.waitStatus;
    // 将 head 节点的状态置为 0,表明当前节点的后续节点已经被唤醒了,
    // 不需要再次唤醒,修改 ws 状态主要作用于 release 的判断
    if (ws < 0)
        compareAndSetWaitStatus(node, ws, 0);
    /*
     * Thread to unpark is held in successor, which is normally
     * just the next node.  But if cancelled or apparently null,
     * traverse backwards from tail to find the actual
     * non-cancelled successor.
     */
    Node s = node.next;
    if (s == null || s.waitStatus > 0) {
        s = null;
        for (Node t = tail; t != null && t != node; t = t.prev)
            if (t.waitStatus <= 0)
                s = t;
    }
    if (s != null)
        LockSupport.unpark(s.thread);
}
共享锁获取和释放
独占锁的流程和原理比较容易理解,因为只有一个锁,但是共享锁的处理就相对复杂一些了。在独占锁中,只有在释放锁之后,才能唤醒等待的线程,而在共享模式中,获取锁和释放锁之后,都有可能唤醒等待的线程。如果想要理清共享锁的工作过程,必须将共享锁的获取和释放结合起来看。这里我们先看一下共享锁的释放过程,只有明白了释放过程做了哪些工作,才能更好的理解获取锁的过程。
共享锁释放
下面是释放共享锁的流程:
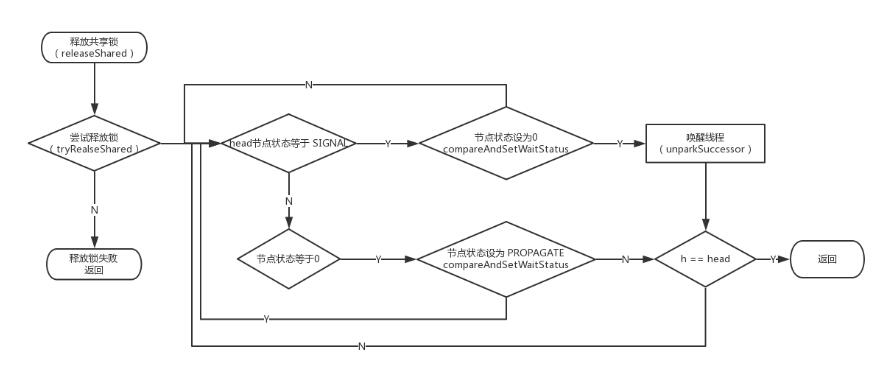
通过 releaseShared 方法会释放共享锁,下面是具体的实现
public final boolean releaseShared(int releases) {
    if (tryReleaseShared(arg)) {
        doReleaseShared();
        return true;
    }
    return false;
}
releases 是要释放的共享资源数量,其中 tryReleaseShared 的方法由我们自己重写,该方法的主要功能就是修改共享资源的数量(state + releases),因为可能会有多个线程同时释放资源,所以实现的时候,一般采用循环加 CAS 操作的方式,如下面的形式:
protected boolean tryReleaseShared(int releases) {
    // 释放共享资源,因为可能有多个线程同时执行,所以需要使用 CAS 操作来修改资源总数。
    for (;;) {
        int lastCount = getState();
        int newCount = lastCount + releases;
        if (compareAndSetState(lastCount, newCount)) {
            return true;
        }
    }
}
当共享资源数量修改了之后,会调用 doReleaseShared 方法,该方法主要唤醒同步队列中的第一个等待节点(head.next),下面是具体实现:
private void doReleaseShared() {
        /*
         * Ensure that a release propagates, even if there are other
         * in-progress acquires/releases.  This proceeds in the usual
         * way of trying to unparkSuccessor of head if it needs
         * signal. But if it does not, status is set to PROPAGATE to
         * ensure that upon release, propagation continues.
         * Additionally, we must loop in case a new node is added
         * while we are doing this. Also, unlike other uses of
         * unparkSuccessor, we need to know if CAS to reset status
         * fails, if so rechecking.
         */
        for (;;) {
            Node h = head;
            // head = null 说明没有初始化,head = tail 说明同步队列中没有等待节点
            if (h != null && h != tail) {
            // 查看当前节点的等待状态
                int ws = h.waitStatus;
                // SIGNAL说明有后续节点需要唤醒
                if (ws == Node.SIGNAL) {
                  /*
                   * 将当前节点的值设为 0,表明已经唤醒了后继节点
                   * 可能会有多个线程同时执行到这一步,所以使用 CAS 保证只有一个线程能修改成功,
                   * 从而执行 unparkSuccessor,其他的线程会执行 continue 操作
                   */
                    if (!compareAndSetWaitStatus(h, Node.SIGNAL, 0))
                        continue;            // loop to recheck cases
                    unparkSuccessor(h);
                }
                else if (ws == 0 &&
                         !compareAndSetWaitStatus(h, 0, Node.PROPAGATE))
                /*
                 * ws 等于 0,说明无需唤醒后继结点(后续节点已经被唤醒或者当前节点没有被阻塞的后继结点),
                 * 也就是这一次的调用其实并没有执行唤醒后继结点的操作。就类似于我只需要一张优惠券,
                 * 但是我的两个朋友,他们分别给我了一张,因此我就剩余了一张。然后我就将这张剩余的优惠券
                 * 送(传播)给其他人使用,因此这里将节点置为可传播的状态(PROPAGATE)
                 */
                    continue;                // loop on failed CAS
            }
            if (h == head)                   // loop if head changed
                break;
        }
    }
从上面的实现中,doReleaseShared 的主要作用是用来唤醒阻塞的节点并且一次只唤醒一个,让该节点关联的线程去重新竞争锁,它既不修改同步队列,也不修改共享资源。
当多个线程同时释放资源时,可以确保两件事:
- 共享资源的数量能正确的累加
- 至少有一个线程被唤醒,其实只要确保有一个线程被唤醒就可以了,即便唤醒了多个线程,在同一时刻,也只能有一个线程能得到竞争锁的资格,在下面我们会看到。
所以释放锁做的主要工作还是修改共享资源的数量。而有了多个共享资源后,如何确保同步队列中的多个节点可以获取锁,是由获取锁的逻辑完成的。下面看下共享锁的获取。
共享锁的获取
下面是获取共享锁的流程
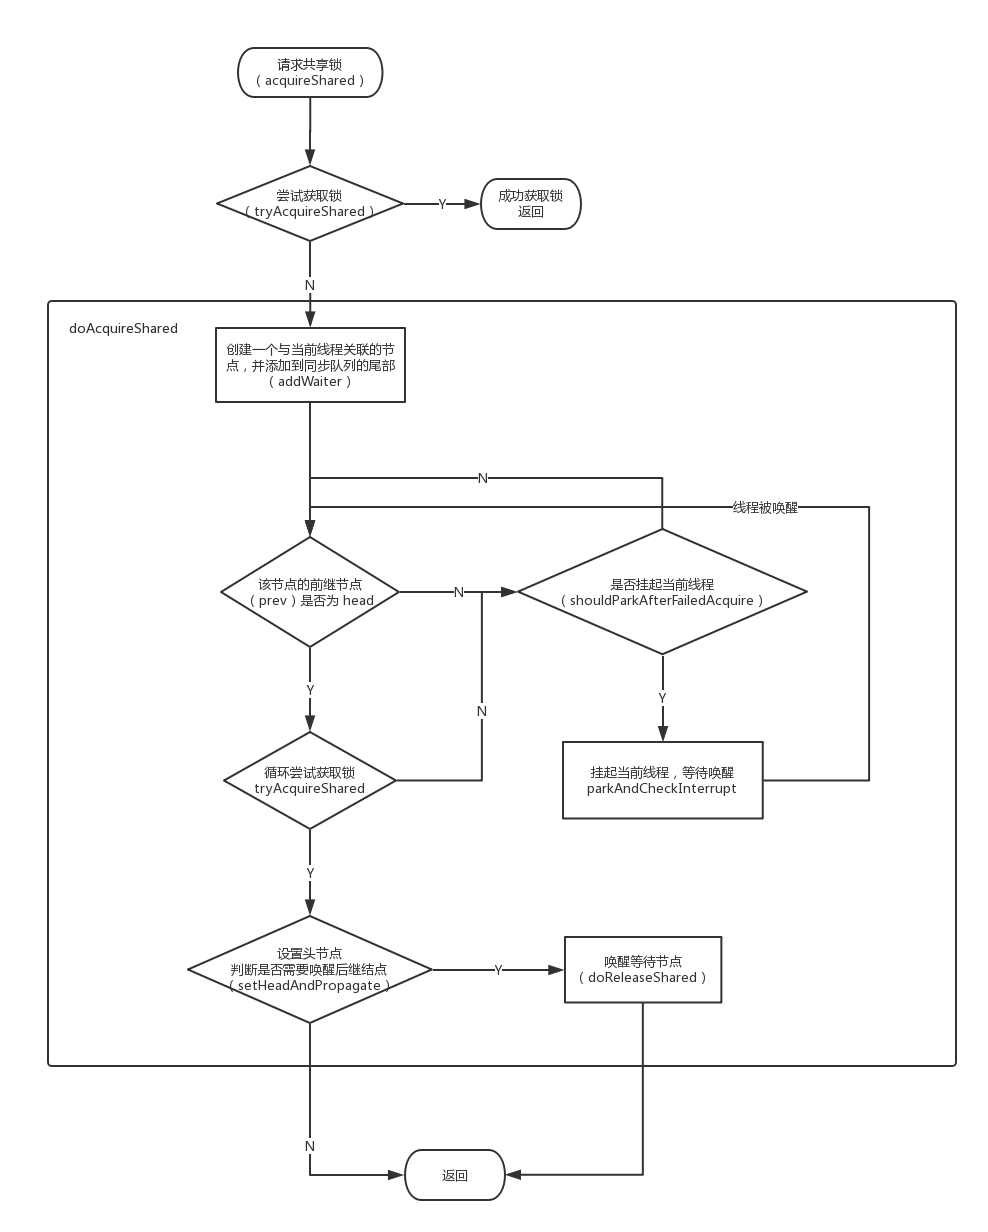
通过 acquireShared 方法,我们可以申请共享锁,下面是具体的实现:
public final void acquireShared(int arg) {
    // 如果返回结果小于 0,证明没有获取到共享资源
    if (tryAcquireShared(arg) < 0)
        doAcquireShared(arg);
}
如果没有获取到共享资源,就会执行 doAcquireShared 方法,下面是该方法的具体实现:
    private void doAcquireShared(int arg) {
        final Node node = addWaiter(Node.SHARED);
        boolean failed = true;
        try {
            boolean interrupted = false;
            for (;;) {
                final Node p = node.predecessor();
                if (p == head) {
                    int r = tryAcquireShared(arg);
                    if (r >= 0) {
                        setHeadAndPropagate(node, r);
                        p.next = null; // help GC
                        if (interrupted)
                            selfInterrupt();
                        failed = false;
                        return;
                    }
                }
                if (shouldParkAfterFailedAcquire(p, node) &&
                    parkAndCheckInterrupt())
                    interrupted = true;
            }
        } finally {
            if (failed)
                cancelAcquire(node);
        }
    }
从上面的代码中可以看到,只有前置节点为 head 的节点才有可能去竞争锁,这点和独占模式的处理是一样的,所以即便唤醒了多个线程,也只有一个线程能进入竞争锁的逻辑,其余线程会再次进入 park 状态,当线程获取到共享锁之后,会执行 setHeadAndPropagate 方法,下面是具体的实现:
private void setHeadAndPropagate(Node node, long propagate) {
    // 备份一下头节点
    Node h = head; // Record old head for check below
    /*
     * 移除头节点,并将当前节点置为头节点
     * 当执行完这一步之后,其实队列的头节点已经发生改变,
     * 其他被唤醒的线程就有机会去获取锁,从而并发的执行该方法,
     * 所以上面备份头节点,以便下面的代码可以正确运行
     */
    setHead(node);
    /*
     * Try to signal next queued node if:
     *   Propagation was indicated by caller,
     *     or was recorded (as h.waitStatus either before
     *     or after setHead) by a previous operation
     *     (note: this uses sign-check of waitStatus because
     *      PROPAGATE status may transition to SIGNAL.)
     * and
     *   The next node is waiting in shared mode,
     *     or we don't know, because it appears null
     *
     * The conservatism in both of these checks may cause
     * unnecessary wake-ups, but only when there are multiple
     * racing acquires/releases, so most need signals now or soon
     * anyway.
     */
     /*
      * 判断是否需要唤醒后继结点,propagate > 0 说明共享资源有剩余,
      * h.waitStatus < 0,表明当前节点状态可能为 SIGNAL,CONDITION,PROPAGATE
      */
    if (propagate > 0 || h == null || h.waitStatus < 0 ||
        (h = head) == null || h.waitStatus < 0) {
        Node s = node.next;
        // 只有 s 不处于独占模式时,才去唤醒后继结点
        if (s == null || s.isShared())
            doReleaseShared();
    }
}
判断后继结点是否需要唤醒的条件是十分宽松的,也就是一定包含必要的唤醒,但是也有可能会包含不必要的唤醒。从前面我们可以知道 doReleaseShared 函数的主要作用是唤醒后继结点,它既不修改共享资源,也不修改同步队列,所以即便有不必要的唤醒也是不影响程序正确性的。如果没有共享资源,节点会再次进入等待状态。
到了这里,脉络就比较清晰了,当一个节点获取到共享锁之后,它除了将自身设为 head 节点之外,还会判断一下是否满足唤醒后继结点的条件,如果满足,就唤醒后继结点,后继结点获取到锁之后,会重复这个过程,直到判断条件不成立。就类似于考试时从第一排往最后一排传卷子,第一排先留下一份,然后将剩余的传给后一排,后一排会重复这个过程。如果传到某一排卷子没了,那么位于这排的人就要等待,直到老师又给了他新的卷子。
中断
在获取锁时还可以设置响应中断,独占锁和共享锁的处理逻辑类似,这里我们以独占锁为例。使用 acquireInterruptibly 方法,在获取独占锁时可以响应中断,下面是具体的实现:
public final void acquireInterruptibly(int arg) throws InterruptedException {
    if (Thread.interrupted())
        throw new InterruptedException();
    if (!tryAcquire(arg))
        doAcquireInterruptibly(arg);
}
doAcquireInterruptibly方法实现:
private void doAcquireInterruptibly(int arg) throws InterruptedException {
    final Node node = addWaiter(Node.EXCLUSIVE);
    boolean failed = true;
    try {
        for (;;) {
            final Node p = node.predecessor();
            if (p == head && tryAcquire(arg)) {
                setHead(node);
                p.next = null; // help GC
                failed = false;
                return;
            }
            if (shouldParkAfterFailedAcquire(p, node) && parkAndCheckInterrupt()) {
                // 这里会抛出异常
                throw new InterruptedException();
            }
        }
    } finally {
        if (failed)
            cancelAcquire(node);
    }
}
从上面的代码中我们可以看出,acquireInterruptibly 和 acquire 的逻辑类似,只是在下面的代码处有所不同:当线程因为中断而退出阻塞状态时,会直接抛出 InterruptedException 异常。
我们知道,不管是抛出异常还是方法返回,程序都会执行 finally 代码,而 failed 肯定为 true,所以抛出异常之后会执行 cancelAcquire 方法,cancelAcquire 方法主要将节点从同步队列中移除。下面是具体的实现:
private void cancelAcquire(Node node) {
    // Ignore if node doesn't exist
    if (node == null)
        return;
    node.thread = null;
    // 跳过前面的已经取消的节点
    Node pred = node.prev;
    while (pred.waitStatus > 0)
        node.prev = pred = pred.prev;
    // 保存下 pred 的后继结点,以便 CAS 操作使用
    // 因为可能存在已经取消的节点,所以 pred.next 不一等于 node
    Node predNext = pred.next;
    // Can use unconditional write instead of CAS here.
    // After this atomic step, other Nodes can skip past us.
    // Before, we are free of interference from other threads.
    // 将节点状态设为 CANCELED
    node.waitStatus = Node.CANCELLED;
    // If we are the tail, remove ourselves.
    if (node == tail && compareAndSetTail(node, pred)) {
        compareAndSetNext(pred, predNext, null);
    } else {
        // If successor needs signal, try to set pred's next-link
        // so it will get one. Otherwise wake it up to propagate.
        int ws;
        if (pred != head &&
            ((ws = pred.waitStatus) == Node.SIGNAL ||
                (ws <= 0 && compareAndSetWaitStatus(pred, ws, Node.SIGNAL))) &&
            pred.thread != null) {
            Node next = node.next;
            if (next != null && next.waitStatus <= 0)
                compareAndSetNext(pred, predNext, next);
        } else {
            unparkSuccessor(node);
        }
        node.next = node; // help GC
    }
}
从上面的代码可以看出,节点的删除分为三种情况:
- 删除节点为尾节点,直接将该节点的第一个有效前置节点置为尾节点
- 删除节点的前置节点为头节点,则对该节点执行 unparkSuccessor 操作
- 删除节点为中间节点,结果如下图所示。下图中(1)表示同步队列的初始状态,假设删除 node2, node1 是正常节点(非 CANCELED),(2)就是删除 node2 后同步队列的状态,此时 node1 节点的后继已经变为 node3,也就是说当 node1 变为 head 之后,会直接唤醒 node3。当另外的一个节点中断之后再次执行 cancelAcquire,在执行下面的代码时,会使同步队列的状态由(2)变为(3),此时 node2 已经没有外界指针了,可以被回收了。如果一直没有另外一个节点中断,也就是同步队列一直处于(2)状态,那么需要等 node3 被回收之后,node2 才可以被回收

超时
超时是在中断的基础上加了一层时间的判断,这里我们还是以独占锁为例。 tryAcquireNanos 支持获取锁的超时处理,下面是具体实现:
public final boolean tryAcquireNanos(int arg, long nanosTimeout) throws InterruptedException {
    if (Thread.interrupted())
        throw new InterruptedException();
    return tryAcquire(arg) || doAcquireNanos(arg, nanosTimeout);
}
当获取锁失败之后,会执行 doAcquireNanos 方法,下面是具体实现:
private boolean doAcquireNanos(int arg, long nanosTimeout) throws InterruptedException {
    if (nanosTimeout <= 0 L)
        return false;
    // 线程最晚结束时间
    final long deadline = System.nanoTime() + nanosTimeout;
    final Node node = addWaiter(Node.EXCLUSIVE);
    boolean failed = true;
    try {
        for (;;) {
            final Node p = node.predecessor();
            if (p == head && tryAcquire(arg)) {
                setHead(node);
                p.next = null; // help GC
                failed = false;
                return true;
            }
            // 判断是否超时,如果超时就返回
            nanosTimeout = deadline - System.nanoTime();
            if (nanosTimeout <= 0 L)
                return false;
            // 这里如果设定了一个阈值,如果超时的时间比阈值小,就认为
            // 当前线程没必要阻塞,再执行几次 for 循环估计就超时了
            if (shouldParkAfterFailedAcquire(p, node) && nanosTimeout > spinForTimeoutThreshold)
                LockSupport.parkNanos(this, nanosTimeout);
            if (Thread.interrupted())
                throw new InterruptedException();
        }
    } finally {
        if (failed)
            cancelAcquire(node);
    }
}
当线程超时返回时,还是会执行 cancelAcquire 方法,cancelAcquire 的逻辑已经在前面说过了,这里不再赘述。
Condition Queue
Condition Queue 是一个并发不安全的, 只用于独占模式的队列(PS: 为什么是并发不安全的呢? 主要是在操作 Condition 时, 线程必需获取 独占的 lock, 所以不需要考虑并发的安全问题)
而当Node存在于 Condition Queue 里面, 则其只有 waitStatus, thread, nextWaiter 有值, 其他的都是null(其中的 waitStatus 只能是 CONDITION, 0(0 代表node进行转移到 Sync Queue里面, 或被中断/timeout)); 这里有个注意点, 就是 当线程被中断或获取 lock 超时, 则一瞬间 node 会存在于 Condition Queue, Sync Queue 两个队列中.

节点 Node4, Node5, Node6, Node7 都是调用 Condition.awaitXX 方法 加入 Condition Queue(PS: 加入后会将原来的 lock 释放)
Condition Queue 入队列方法 addConditionWaiter
源码如下:
        /**
         * Adds a new waiter to wait queue.
         * @return its new wait node
         * 将当前线程封装成一个 Node 节点 放入大 Condition Queue 里面
         */
        private Node addConditionWaiter() {
            // Condition queue 的尾节点
            Node t = lastWaiter;
            // If lastWaiter is cancelled, clean out.
            // 尾节点已经Cancel, 直接进行清除

            // 这里有个问题, 何时出现t.waitStatus != Node.CONDITION -> 在对线程进行中断时 ConditionObject -> await -> checkInterruptWhileWaiting ->
            //transferAfterCancelledWait "compareAndSetWaitStatus(node, Node.CONDITION, 0)" <- 导致这种情况一般是 线程中断或 await 超时

            // 一个注意点: 当Condition进行 awiat 超时或被中断时, Condition里面的节点是没有被删除掉的, 需要其他 await 在将线程加入 Condition Queue 时调用
            //addConditionWaiter而进而删除, 或 await 操作差不多结束时, 调用 "node.nextWaiter != null" 进行判断而删除 (PS: 通过 signal 进行唤醒时
            //node.nextWaiter 会被置空, 而中断和超时时不会)
            if (t != null && t.waitStatus != Node.CONDITION) {
            //调用 unlinkCancelledWaiters 对 "waitStatus != Node.CONDITION" 的节点进行删除(在Condition里面的Node的waitStatus 要么是CONDITION(正常),
            //要么就是 0 (signal/timeout/interrupt))
                unlinkCancelledWaiters();
                // 获取最新的lastWaiter
                t = lastWaiter;
            }
            // 将线程封装成 node 准备放入 Condition Queue 里面
            Node node = new Node(Thread.currentThread(), Node.CONDITION);
            if (t == null)
                firstWaiter = node;
            else
                //加到queue尾部
                t.nextWaiter = node;
            // 重新复制lastWaiter
            lastWaiter = node;
            return node;
        }
Condition Queue 删除Cancelled节点的方法 unlinkCancelledWaiters
当Node在Condition Queue 中, 若状态不是 CONDITION, 则一定是 被中断或超时
        /**
         * Unlinks cancelled waiter nodes from condition queue.
         * Called only while holding lock. This is called when
         * cancellation occurred during condition wait, and upon
         * insertion of a new waiter when lastWaiter is seen to have
         * been cancelled. This method is needed to avoid garbage
         * retention in the absence of signals. So even though it may
         * require a full traversal, it comes into play only when
         * timeouts or cancellations occur in the absence of
         * signals. It traverses all nodes rather than stopping at a
         * particular target to unlink all pointers to garbage nodes
         * without requiring many re-traversals during cancellation
         * storms.
         */
        private void unlinkCancelledWaiters() {
            Node t = firstWaiter;
            Node trail = null;
            while (t != null) {
            // 初始化next节点
                Node next = t.nextWaiter;
            // 节点不有效, 在Condition Queue 里面 Node.waitStatus 只有可能是 CONDITION 或是 0(timeout/interrupt引起的)
                if (t.waitStatus != Node.CONDITION) {
                // Node.nextWaiter 置空
                    t.nextWaiter = null;
                    // 一次都没有遇到有效的节点
                    if (trail == null)
                    // 将 next 赋值给 firstWaiter(此时 next 可能也是无效的, 这只是一个临时处理)
                        firstWaiter = next;
                    else
                    // next 赋值给 trail.nextWaiter, 这一步其实就是删除节点 t
                        trail.nextWaiter = next;
                    // next == null 说明 已经 traverse 完了 Condition Queue
                    if (next == null)
                    // 将有效节点赋值给 trail
                        lastWaiter = trail;
                }
                else
                    trail = t;
                t = next;
            }
        }
Condition Queue 转移节点的方法 transferForSignal
transferForSignal只有在节点被正常唤醒才调用的正常转移的方法,源码如下:
    /**
     * Transfers a node from a condition queue onto sync queue.
     * Returns true if successful.
     * @param node the node
     * @return true if successfully transferred (else the node was
     * cancelled before signal)
     */
    // 将node从 condition queue转移到sync queue
    // 在调用transferForSignal之前, 会 first.nextWaiter = null;
    // 若节点是因为timeout / interrupt 进行转移, 则不会进行这步操作; 两种情况的转移都会把 wautStatus 置为 0
    final boolean transferForSignal(Node node) {
        /*
         * If cannot change waitStatus, the node has been cancelled.
         */
        // 若node已经cancell,则失败
        if (!compareAndSetWaitStatus(node, Node.CONDITION, 0))
            return false;

        /*
         * Splice onto queue and try to set waitStatus of predecessor to
         * indicate that thread is (probably) waiting. If cancelled or
         * attempt to set waitStatus fails, wake up to resync (in which
         * case the waitStatus can be transiently and harmlessly wrong).
         */
        //加入Sync queue
        Node p = enq(node);
        int ws = p.waitStatus;
        //这里的 ws > 0 指Sync Queue中node的前继节点cancelled了, 所以, 唤醒一下node ;
        //compareAndSetWaitStatus(p, ws, Node.SIGNAL)失败, 则说明前继节点已经变成SIGNAL或 cancelled, 所以也要唤醒
        if (ws > 0 || !compareAndSetWaitStatus(p, ws, Node.SIGNAL))
            LockSupport.unpark(node.thread);
        return true;
    }
Condition Queue 转移节点的方法 transferAfterCancelledWait
transferAfterCancelledWait 在节点获取lock时被中断或获取超时才调用的转移方法,其源码如下:
    /**
     * Transfers node, if necessary, to sync queue after a cancelled wait.
     * Returns true if thread was cancelled before being signalled.
     *
     * @param node the node
     * @return true if cancelled before the node was signalled
     */
    //将Condition Queue 中因 timeout/interrupt 而唤醒的节点进行转移
    final boolean transferAfterCancelledWait(Node node) {
    //  没有 node 没有 cancelled , 直接进行转移 (转移后, Sync Queue , Condition Queue 都会存在 node)
        if (compareAndSetWaitStatus(node, Node.CONDITION, 0)) {
            enq(node);
            return true;
        }
        /*
         * If we lost out to a signal(), then we can't proceed
         * until it finishes its enq().  Cancelling during an
         * incomplete transfer is both rare and transient, so just
         * spin.
         */
        //这时是其他的线程发送signal,将本线程转移到 Sync Queue 里面的工程中(转移的过程中 waitStatus = 0了, 所以上面的 CAS 操作失败)
        while (!isOnSyncQueue(node))
        // 这里调用 isOnSyncQueue判断是否已经 入Sync Queue 了
            Thread.yield();
        return false;
    }
参考
The java.util.concurrent Synchronizer Framework
Java并发详解AbstractQueuedSynchronizer
abstractqueuedsynchronizer
CAS