在平时工作中,用到的最多的应该是线程池了,那么,当自定义线程池的时候 corePoolSize、maximumPoolSize、workQueue(队列长度)如何动态化调整了
动态更新的原理
更新corePoolSize的源码
public void setCorePoolSize(int corePoolSize) {
    if (corePoolSize < 0)
        throw new IllegalArgumentException();
    int delta = corePoolSize - this.corePoolSize;
    this.corePoolSize = corePoolSize;
    if (workerCountOf(ctl.get()) > corePoolSize)
        interruptIdleWorkers();
    else if (delta > 0) {
        // We don't really know how many new threads are "needed".
        // As a heuristic, prestart enough new workers (up to new
        // core size) to handle the current number of tasks in
        // queue, but stop if queue becomes empty while doing so.
        int k = Math.min(delta, workQueue.size());
        while (k-- > 0 && addWorker(null, true)) {
            if (workQueue.isEmpty())
                break;
        }
    }
}
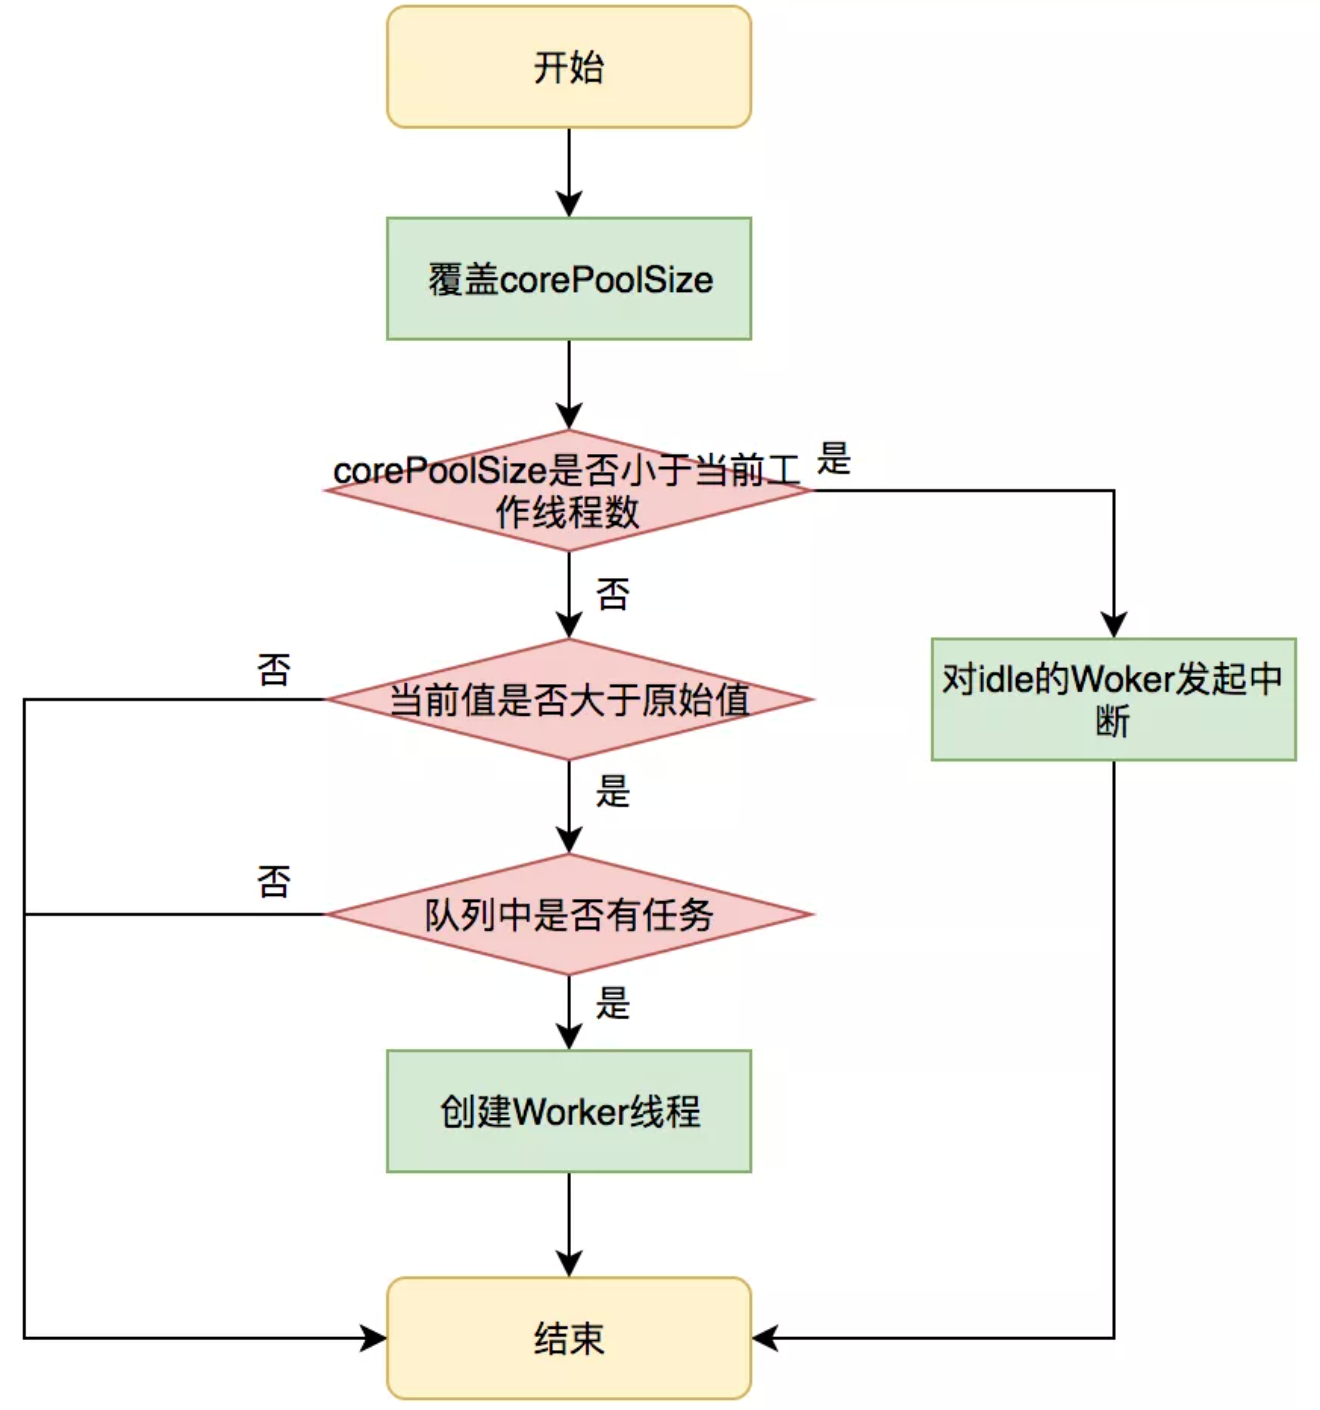
在运行期间线程池使用此方法设置corePoolSize之后,线程池会直接覆盖原来的corePoolSize值,并且基于当前值和原始值的比较结果采取不同的处理策略。
对于当前值小于当前工作线程数的情况,说明有多余的worker线程,此时会向当前idle的worker线程发起中断请求以实现回收,多余的worker在下次idel的时候也会被回收;
对于当前值大于原始值且当前队列中有待执行任务,则线程池会创建新的worker线程来执行队列任务
更新maximumPoolSize的源码
public void setMaximumPoolSize(int maximumPoolSize) {
    //校验参数合理性
    if (maximumPoolSize <= 0 || maximumPoolSize < corePoolSize)
        throw new IllegalArgumentException();
    //覆盖原值
    this.maximumPoolSize = maximumPoolSize;
    //工作线程是否是大于最大线程数,若大于,则对空闲线程发起中断请求
    if (workerCountOf(ctl.get()) > maximumPoolSize)
        interruptIdleWorkers();
}
如何更新队列长度
在ThreadPoolExecutor源码中没有设置队列长度的的方法,如下图:

那么问题来来,该如何去更新队列长度
先来看看LinkedBlockingQueue源码中的,发现是被final修饰的,所以没有提供set方法,如下:
private final int capacity;
于是乎我参考了大神的做法,把LinkedBlockingQueue源码复制出来,将capacity前面的final修饰去掉,重新定一个名为ResizeLinkedBlockIngQueue的类
在创建线程池的时候,把里面的LinkedBlockingQueue替换为ResizeLinkedBlockIngQueue,如下:
private ThreadPoolExecutor buildThreadPoolExecutorResizeBlockQueue() {
    return new ThreadPoolExecutor(2, 5, 60, TimeUnit.MILLISECONDS, new ResizeLinkedBlockIngQueue<>(10));
}
Tips:这里会有一个问题,如果将LinkedBlockingQueue换成其他的阻塞队列,则需要将相应阻塞队列中的capacity前面的final修饰去掉,也就是要自定义多个阻塞队列
来看看效果,测试代码如下:
@org.junit.Test
public void getThreadPoolInfounUseLinkedBlockingQueue() throws InterruptedException {
    ThreadPoolExecutor executor = buildThreadPoolExecutorResizeBlockQueue();
    ThreadPoolUtil.threadPoolStatus(executor, "before");
    for (int i = 0; i < 15; i++) {
        executor.submit(() ->{
            ThreadPoolUtil.threadPoolStatus(executor, "create-thread-starlin");
            try {
                TimeUnit.SECONDS.sleep(5);
            } catch (InterruptedException e) {
                e.printStackTrace();
            }
        });
    }
    executor.setCorePoolSize(10);
    executor.setMaximumPoolSize(10);
    ResizeLinkedBlockIngQueue queue = (ResizeLinkedBlockIngQueue) executor.getQueue();
    queue.setCapacity(100);
    ThreadPoolUtil.threadPoolStatus(executor, "after");
    Thread.currentThread().join();
}
运行结果,如下图所示:

从上图可以很明显的看出队列长度、核心线程数、最大线程数都已经改变了
利用动态配置中心实现方式(思路版)
因为我之前是用Apollo来实现,主要思路是通过的Apollo的监听方式来实现,如果监听到配置发生来改变后刷新线程池的配置,重新set对应的值即可(仅仅配置了是无法生效的)
下面拿一个监听日志级别的的listen类(原来监听线程池的代码没找到,这里懒得写了),展示如下:
@Service
public class ApolloChangeListener {

    private static final Logger logger = LoggerFactory.getLogger(ApolloChangeListener.class);

    private static final String LOGGER_TAG = "logging.level.";

    @ApolloConfig
    private Config config;

    @Resource
    private LoggingSystem loggingSystem;

    @ApolloConfigChangeListener
    private void someChangeHandler(ConfigChangeEvent changeEvent) {
        for (String key : changeEvent.changedKeys()) {
            ConfigChange change = changeEvent.getChange(key);
            logger.info("Found change - 【{}】", change.toString());
        }

        Set<String> keyNames = config.getPropertyNames();
        for (String key : keyNames) {
            if (StringUtils.isEmpty(key)) {
                continue;
            }
            if (!key.startsWith(LOGGER_TAG)) {
                continue;
            }
            String loggerName = key.replace(LOGGER_TAG, "");
            String strLevel = config.getProperty(key, "info");
            LogLevel level = LogLevel.valueOf(strLevel.toUpperCase());
            loggingSystem.setLogLevel(loggerName, level);
            logger.info("{}:{}", key, strLevel);
        }
    }
}
因为我对Nacos没有那么熟悉,在官方文档中也能找到监听器的API,点击跳转,实现方式和Apollo原理一样
以上,end,感谢阅读!!!