线程池是为了避免线程频繁的创建和销毁带来的性能消耗,而建立的一种池化技术,它是把已创建的线程放入“池”中,当有任务来临时就可以重用已有的线程,无需等待创建的过程,这样就可以有效提高程序的响应速度。但如果要说线程池的话一定离不开 ThreadPoolExecutor ,在阿里巴巴的《java开发手册》中是这样规定的:
线程池不允许使用 Executors 去创建,而是通过 ThreadPoolExecutor 的方式,这样的处理方式让写的读者更加明确线程池的运行规则,规避资源耗尽的风险。
说明:Executors 返回的线程池对象的弊端如下:
FixedThreadPool 和 SingleThreadPool:允许的请求队列长度为 Integer.MAX_VALUE,可能会堆积大量的请求,从而导致 OOM。
CachedThreadPool 和 ScheduledThreadPool:允许的创建线程数量为 Integer.MAX_VALUE,可能会创建大量的线程,从而导致 OOM。
线程池参数不合理会导致什么问题
下面列举几种可能出现的场景:
最大线程数设置偏小,工作队列大小设置偏小,导致服务接口大量抛出RejectedExecutionException。
最大线程数设置偏小,工作队列大小设置过大,任务堆积过度,接口响应时长变长。
最大线程数设置过大,线程调度开销增大,处理速度反而下降。
核心线程数设置过小,流量突增时需要先创建线程,导致响应时长过大。
核心线程数设置过大,空闲线程太多,占用系统资源。
线程池状态
ThreadPoolExecutor创建线程池
在看Executors 的源码会发现,在使用Executors创建线程池的时候,其底层都是通过ThreadPoolExecutor方式来实现的,其源码如下:
    public ThreadPoolExecutor(int corePoolSize,
                              int maximumPoolSize,
                              long keepAliveTime,
                              TimeUnit unit,
                              BlockingQueue<Runnable> workQueue) {
        this(corePoolSize, maximumPoolSize, keepAliveTime, unit, workQueue,
             Executors.defaultThreadFactory(), defaultHandler);
    }

    public ThreadPoolExecutor(int corePoolSize,
                              int maximumPoolSize,
                              long keepAliveTime,
                              TimeUnit unit,
                              BlockingQueue<Runnable> workQueue,
                              ThreadFactory threadFactory,
                              RejectedExecutionHandler handler) {
        if (corePoolSize < 0 ||
            maximumPoolSize <= 0 ||
            maximumPoolSize < corePoolSize ||
            keepAliveTime < 0)
            throw new IllegalArgumentException();
        if (workQueue == null || threadFactory == null || handler == null)
            throw new NullPointerException();
        this.acc = System.getSecurityManager() == null ?
                null :
                AccessController.getContext();
        this.corePoolSize = corePoolSize;
        this.maximumPoolSize = maximumPoolSize;
        this.workQueue = workQueue;
        this.keepAliveTime = unit.toNanos(keepAliveTime);
        this.threadFactory = threadFactory;
        this.handler = handler;
    }
ThreadPoolExecutor核心参数
- corePoolSize: 表示线程池的常驻核心线程数。如果设置为 0,则表示在没有任何任务时,销毁线程池;如果大于 0,即使没有任务时也会保证线程池的线程数量等于此值。但需要注意,此值如果设置的比较小,则会频繁的创建和销毁线程(创建和销毁的原因会在本课时的下半部分讲到);如果设置的比较大,则会浪费系统资源,所以开发者需要根据自己的实际业务来调整此值
- maximumPoolSize: 表示线程池在任务最多时,最大可以创建的线程数。官方规定此值必须大于 0,也必须大于等于 corePoolSize,此值只有在任务比较多,且不能存放在任务队列时,才会用到。
- keepAliveTime: 表示线程的存活时间(这个线程指的是maximumPoolSize - corePoolSize的线程 ),当线程池空闲时并且超过了此时间,多余的线程就会销毁,直到线程池中的线程数量销毁的等于 corePoolSize 为止,如果 maximumPoolSize 等于 corePoolSize,那么线程池在空闲的时候也不会销毁任何线程。
- unit: 表示存活时间的单位,它是配合 keepAliveTime 参数共同使用的。
- workQueue: 表示线程池执行的任务队列,当线程池的所有线程都在处理任务时,如果来了新任务就会缓存到此任务队列中排队等待执行
- threadFactory: 表示线程的创建工厂(可以为线程创建一个好名字,和其他线程池区分开,便于调试),此参数一般用的比较少,我们通常在创建线程池时不指定此参数,它会使用默认的线程创建工厂的方法来创建线程,其源码如下:
    public static ThreadFactory defaultThreadFactory() {
        return new DefaultThreadFactory();
    }

    /**
     * The default thread factory
     */
    static class DefaultThreadFactory implements ThreadFactory {
        private static final AtomicInteger poolNumber = new AtomicInteger(1);
        private final ThreadGroup group;
        private final AtomicInteger threadNumber = new AtomicInteger(1);
        private final String namePrefix;

        DefaultThreadFactory() {
            SecurityManager s = System.getSecurityManager();
            group = (s != null) ? s.getThreadGroup() :
                                  Thread.currentThread().getThreadGroup();
            namePrefix = "pool-" +
                          poolNumber.getAndIncrement() +
                         "-thread-";
        }

        public Thread newThread(Runnable r) {
            Thread t = new Thread(group, r,
                                  namePrefix + threadNumber.getAndIncrement(),
                                  0);
            if (t.isDaemon())
                t.setDaemon(false);
            if (t.getPriority() != Thread.NORM_PRIORITY)
                t.setPriority(Thread.NORM_PRIORITY);
            return t;
        }
    }
我们也可以自定义一个线程工厂,通过实现 ThreadFactory 接口来完成,这样就可以自定义线程的名称或线程执行的优先级了。
- RejectedExecutionHandler: 表示指定线程池的拒绝策略,当线程池的任务已经在缓存队列 workQueue 中存储满了之后,并且不能创建新的线程来执行此任务时,就会用到此拒绝策略,它属于一种限流保护的机制
线程池工作流程
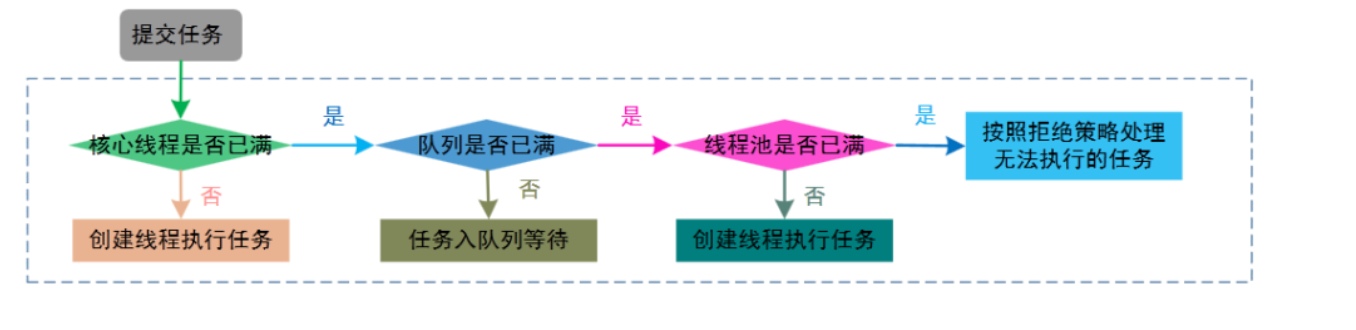
线程池默认的工作行为:
- 不会初始化 corePoolSize 个线程,有任务来了才创建工作线程;
- 当核心线程满了之后不会立即扩容线程池,而是把任务堆积到工作队列中;
- 当工作队列满了后扩容线程池,一直到线程个数达到 maximumPoolSize 为止;
- 如果队列已满且达到了最大线程后还有任务进来,按照拒绝策略处理(handler);
- 当线程数大于核心线程数时,线程等待 keepAliveTime 后还是没有任务需要处理的话, 收缩线程到核心线程数。
线程池的工作流程要从它的执行方法 execute() 说起,源码如下:
    public void execute(Runnable command) {
        if (command == null)
            throw new NullPointerException();
        /*
         * Proceed in 3 steps:
         *
         * 1. If fewer than corePoolSize threads are running, try to
         * start a new thread with the given command as its first
         * task.  The call to addWorker atomically checks runState and
         * workerCount, and so prevents false alarms that would add
         * threads when it shouldn't, by returning false.
         *
         * 2. If a task can be successfully queued, then we still need
         * to double-check whether we should have added a thread
         * (because existing ones died since last checking) or that
         * the pool shut down since entry into this method. So we
         * recheck state and if necessary roll back the enqueuing if
         * stopped, or start a new thread if there are none.
         *
         * 3. If we cannot queue task, then we try to add a new
         * thread.  If it fails, we know we are shut down or saturated
         * and so reject the task.
         */
        int c = ctl.get();
        //当前工作的线程数小于核心线程数
        if (workerCountOf(c) < corePoolSize) {
            if (addWorker(command, true))
                return;
            c = ctl.get();
        }
        //检查线程池是否处于运行状态,如果是则把任务添加到队列
        if (isRunning(c) && workQueue.offer(command)) {
            int recheck = ctl.get();
            // 再出检查线程池是否处于运行状态,防止在第一次校验通过后线程池关闭
            // 如果是非运行状态,则将刚加入队列的任务移除
            if (! isRunning(recheck) && remove(command))
                reject(command);
            // 如果线程池的线程数为 0 时(当 corePoolSize 设置为 0 时会发生)
            else if (workerCountOf(recheck) == 0)
                //新建线程执行任务
                addWorker(null, false);
        }
        // 核心线程都在忙且队列都已爆满,尝试新启动一个线程执行失败
        else if (!addWorker(command, false))
            // 执行拒绝策略
            reject(command);
    }
其中 addWorker(Runnable firstTask, boolean core) 方法的参数说明如下:
- firstTask,线程应首先运行的任务,如果没有则可以设置为 null;
- core,判断是否可以创建线程的阀值(最大值),如果等于 true 则表示使用 corePoolSize 作为阀值,false 则表示使用 maximumPoolSize 作为阀值。
提到execute(),不得不说下submit()方法,
execute() 和 submit() 都是用来执行线程池任务的,它们最主要的区别是,submit() 方法可以接收线程池执行的返回值,而 execute() 不能接收返回值。
execute() 方法属于 Executor 接口的方法,而 submit() 方法则是属于 ExecutorService 接口的方法,
示例:
    ThreadPoolExecutor executor = new ThreadPoolExecutor(2, 10, 10L,
            TimeUnit.SECONDS, new LinkedBlockingQueue(20));
    // execute 使用
    executor.execute(new Runnable() {
        @Override
        public void run() {
            System.out.println("Hello, execute.");
        }
    });

    // submit 使用
    Future<String> future = executor.submit(new Callable<String>() {
        @Override
        public String call() throws Exception {
            System.out.println("Hello, submit.");
            return "Success";
        }
    });
    System.out.println(future.get());
运行结果:
Hello, execute.
Hello, submit.
Success
线程池的拒绝策略
当线程池中的任务队列已经被存满,再有任务添加时会先判断当前线程池中的线程数是否大于等于线程池的最大值,如果是,则会触发线程池的拒绝策略。
Java 自带的拒绝策略有 4 种:
- AbortPolicy,终止策略,线程池会抛出异常并终止执行,它是默认的拒绝策略;
- CallerRunsPolicy,把任务交给当前线程来执行(当线程池饱和时,它会使用用户的线程执行任务。比如,在Controller 里的线程池满了,会阻塞在 Tomcat 的线程池里对任务进行执行,这很容易会将用户线程占满,造成用户业务长时间等待。具体用不用这种策略,还是要看客户对等待时间的忍受程度);
DiscardPolicy,忽略此任务(最新的任务),它什么都不做,连异常都不抛出,这个非常不推荐- DiscardOldestPolicy,忽略最先加入队列的任务(它在遇到线程饱和时,会先弹出队列里最旧的任务,然后把当前的任务添加到队列中)
默认的拒绝策略demo演示:
    public static void main(String[] args) {
        ThreadPoolExecutor executor = new ThreadPoolExecutor(1, 3, 10,
                TimeUnit.SECONDS, new LinkedBlockingQueue<>(2),
                // 添加 AbortPolicy 拒绝策略
                new ThreadPoolExecutor.AbortPolicy());
        for (int i = 0; i < 6; i++) {
            executor.execute(() -> {
                System.out.println(Thread.currentThread().getName());
            });
        }
    }
可以看出当第 6 个任务来的时候,线程池则执行了 AbortPolicy 拒绝策略,抛出了异常。因为队列最多存储 2 个任务,最大可以创建 3 个线程来执行任务(2+3=5),所以当第 6 个任务来的时候,此线程池就“忙”不过来了。
自定义拒绝策略
自定义拒绝策略只需要新建一个 RejectedExecutionHandler 对象,然后重写它的 rejectedExecution() 方法即可,示例如下:
    public static void main(String[] args) {
        ThreadPoolExecutor executor = new ThreadPoolExecutor(1, 3, 10,
                TimeUnit.SECONDS, new LinkedBlockingQueue<>(2),
                // 自定义拒绝策略
                new RejectedExecutionHandler(){
                    @Override
                    public void rejectedExecution(Runnable r, ThreadPoolExecutor executor) {
                        //业务处理方法
                        System.out.println("执行自定义拒绝策略");
                        new Thread(r,"新线程"+new Random().nextInt(10)).start();
                    }
                });
        for (int i = 0; i < 6; i++) {
            executor.execute(() -> {
                System.out.println(Thread.currentThread().getName());
            });
        }
    }
运行结果如下:
pool-1-thread-1
pool-1-thread-3
pool-1-thread-1
执行自定义拒绝策略
pool-1-thread-2
pool-1-thread-3
可以看出线程池执行了自定义的拒绝策略,我们可以在 rejectedExecution 中添加自己业务处理的代码。
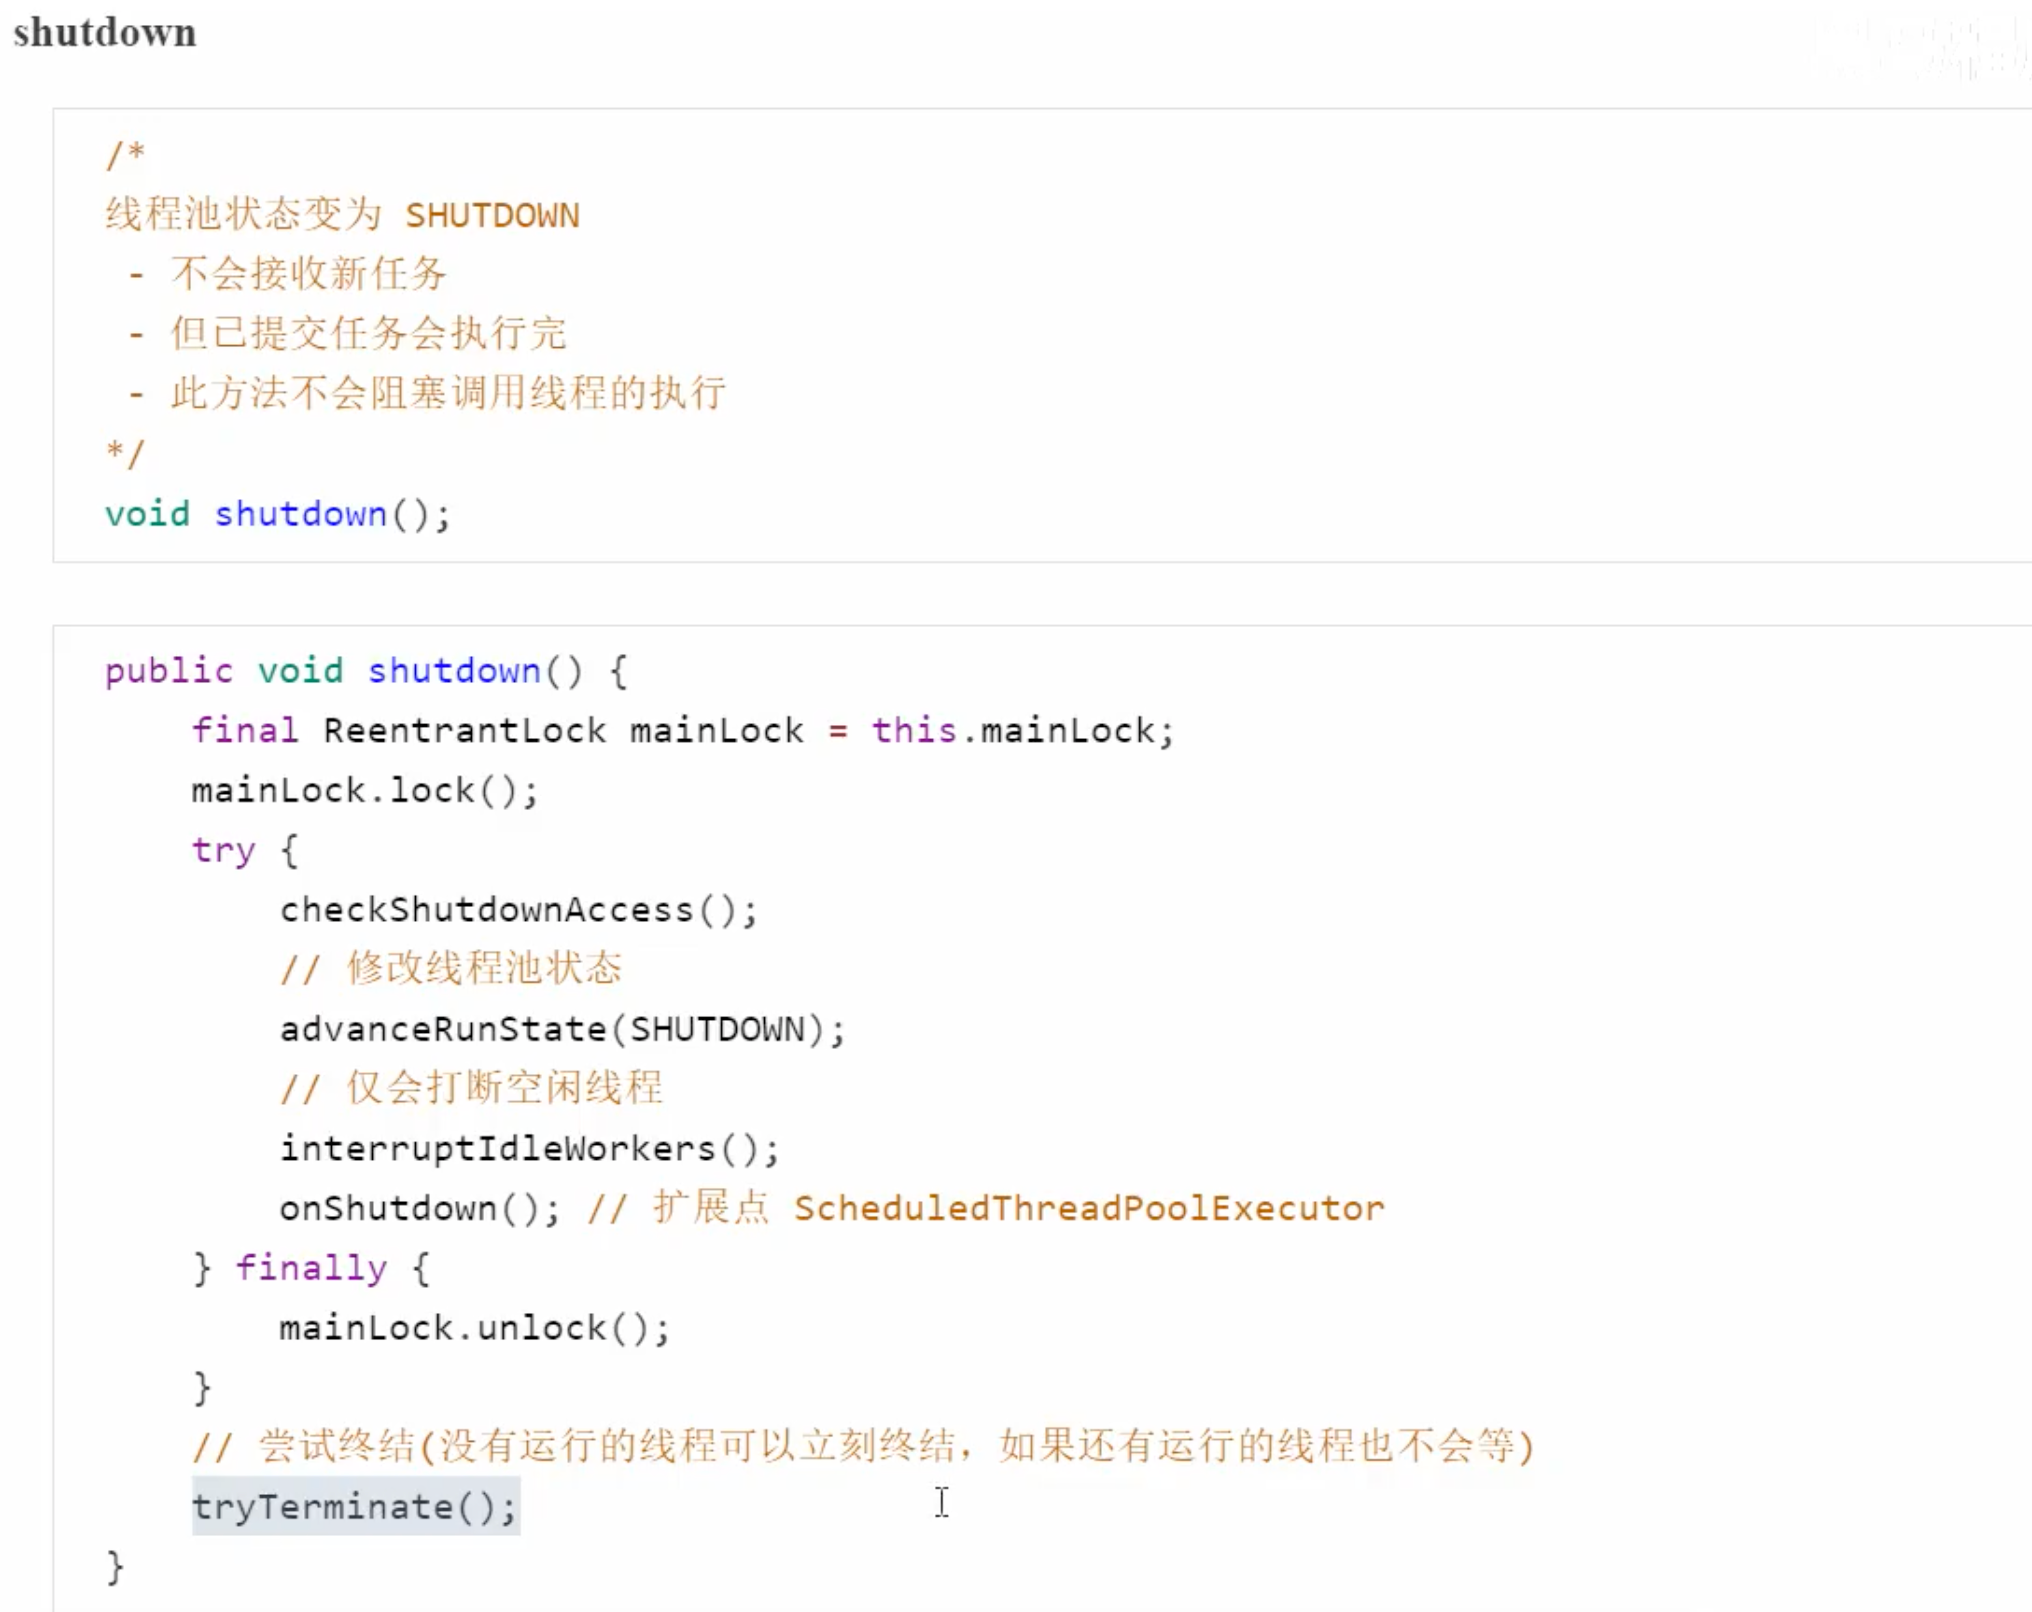
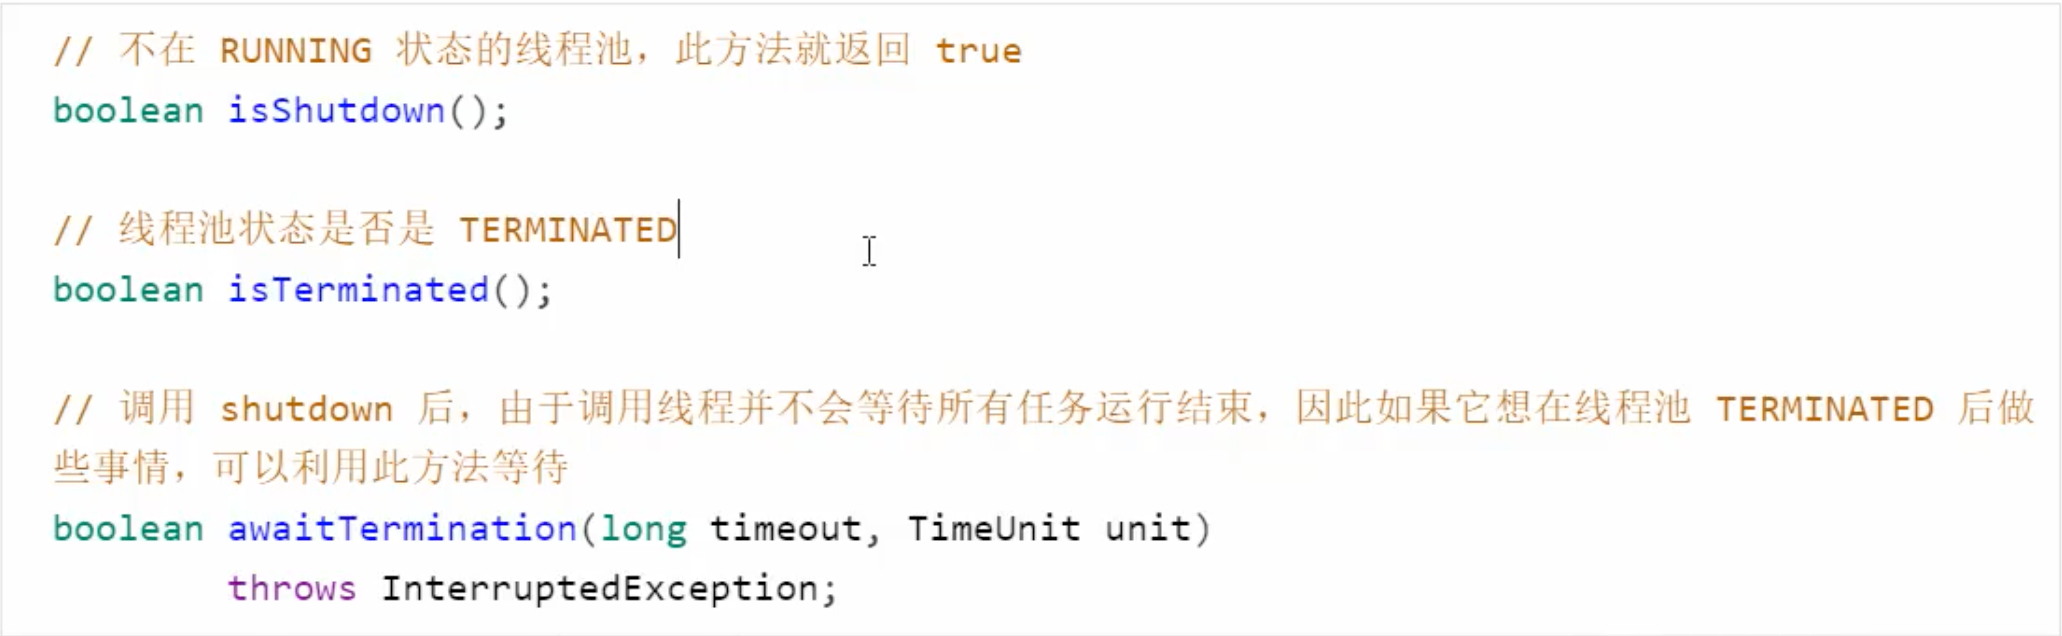
关闭线程池的方法

线程池的线程复用
线程复用思路
一个线程一般在执行完任务后就结束了,怎么再让他执行下一个任务呢?
线程重用的核心是,我们知道,Thread.start()只能调用一次,一旦这个调用结束,则该线程就到了stop状态,不能再次调用start。
则要达到复用的目的,则必须从Runnable接口的run()方法上入手,可以这样设计这个Runnable.run()方法(就叫外面的run()方法):
它本质上是个无限循环,跑的过程中不断检查我们是否有新加入的子Runnable对象(就叫内部的runnable:run()吧,它就是用来实现我们自己的任务),有就调一下我们的run(),其实就一个大run()把其它小run()#1,run()#2,...给串联起来了,基本原理就这么简单,不停地处理我们提交的Runnable任务。
public void run() {
    while(true) {
        if(tasks available) {
           Runnable task = taskqueue.dequeue();
           task.run();
        } else {
           // wait or whatever
        }
    }
}
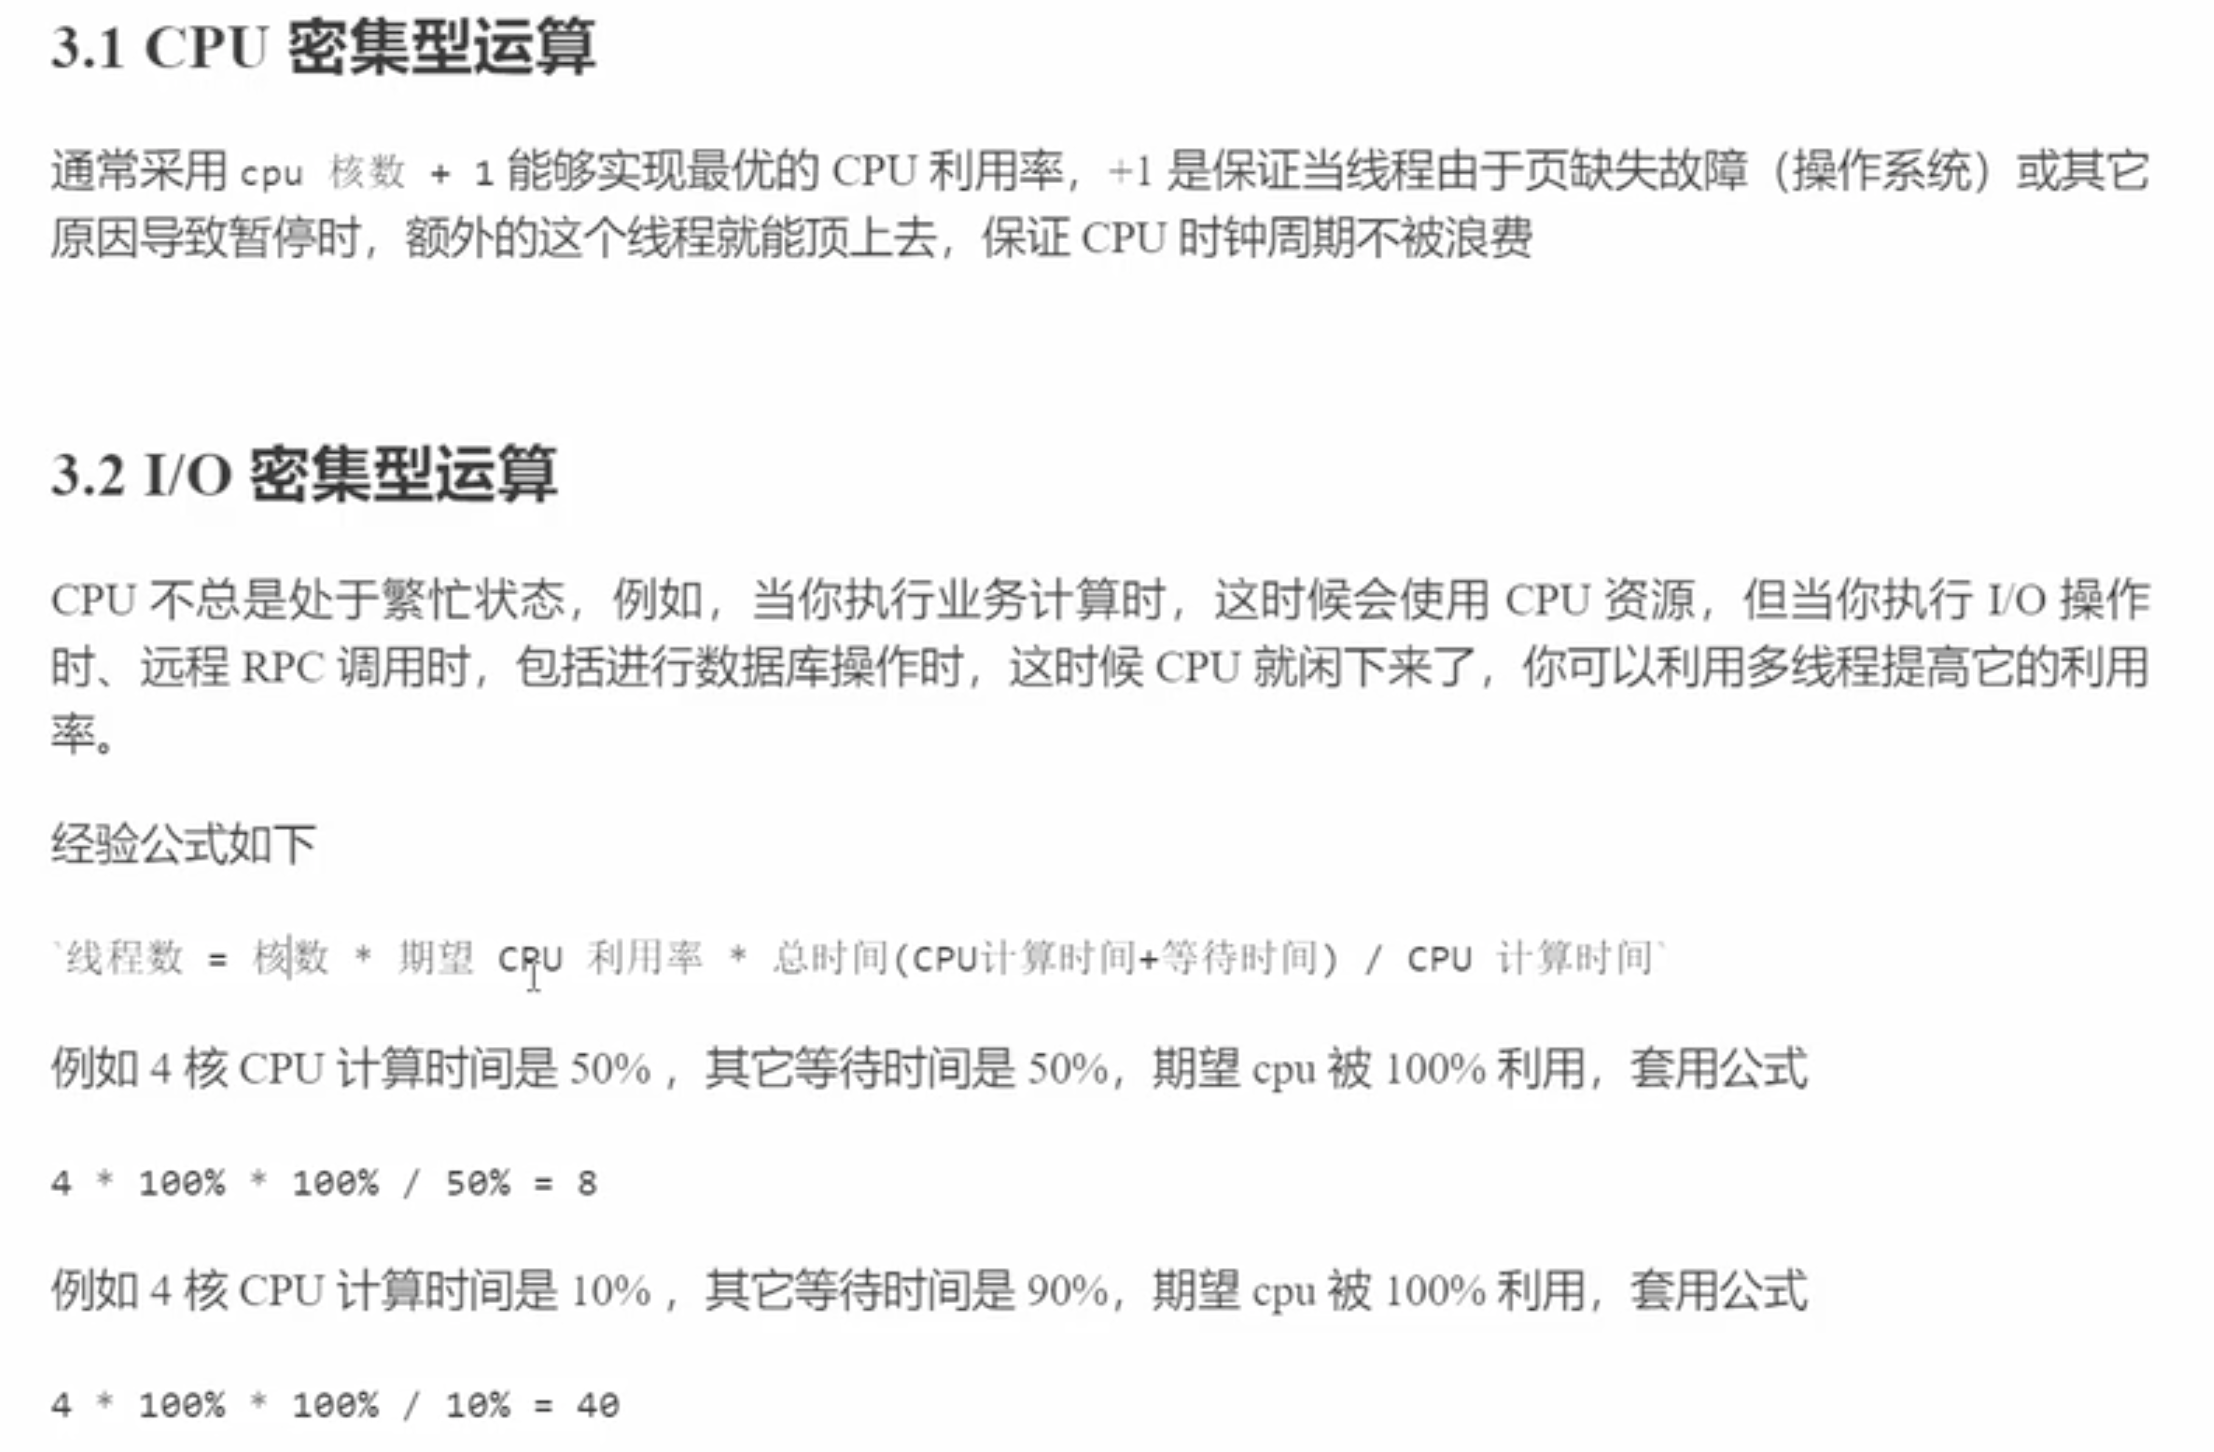
创建多少线程池合适
Java 获取CPU核心数
Runtime.getRuntime().availableProcessors()//获取逻辑核心数,如6核心12线程,那么返回的是12
Linux 获取CPU核心数
# 总核数 = 物理CPU个数 X 每颗物理CPU的核数
# 总逻辑CPU数 = 物理CPU个数 X 每颗物理CPU的核数 X 超线程数

# 查看物理CPU个数
cat /proc/cpuinfo| grep "physical id"| sort| uniq| wc -l

# 查看每个物理CPU中core的个数(即核数)
cat /proc/cpuinfo| grep "cpu cores"| uniq

# 查看逻辑CPU的个数
cat /proc/cpuinfo| grep "processor"| wc -l
JDK中实现
线程池的线程复用就是通过取 Worker 的 firstTask 或者通过 getTask 方法从 workQueue 中不停地取任务,并直接调用 Runnable 的 run 方法来执行任务,这样就保证了每个线程都始终在一个循环中,反复获取任务,然后执行任务,从而实现了线程的复用
ThreadPoolExecutor 扩展
ThreadPoolExecutor 的扩展主要是通过重写它的 beforeExecute() 和 afterExecute() 方法实现的,我们可以在扩展方法中添加日志或者实现数据统计,比如统计线程的执行时间,如下代码所示:
    public class ThreadPoolExtend {
        public static void main(String[] args) throws ExecutionException, InterruptedException {
            // 线程池扩展调用
            MyThreadPoolExecutor executor = new MyThreadPoolExecutor(2, 4, 10,TimeUnit.SECONDS, new LinkedBlockingQueue());
            for (int i = 0; i < 3; i++) {
                executor.execute(() -> {
                    Thread.currentThread().getName();
                });
            }
        }
           /**
             * 线程池扩展
             */
            static class MyThreadPoolExecutor extends ThreadPoolExecutor {
                // 保存线程执行开始时间
                private final ThreadLocal<Long> localTime = new ThreadLocal<>();
                public MyThreadPoolExecutor(int corePoolSize, int maximumPoolSize, long keepAliveTime,
                                    TimeUnit unit, BlockingQueue<Runnable> workQueue) {
                super(corePoolSize, maximumPoolSize, keepAliveTime, unit, workQueue);
            }

            /**
             * 开始执行之前
             * @param t 线程
             * @param r 任务
             */
            @Override
            protected void beforeExecute(Thread t, Runnable r) {
                Long sTime = System.nanoTime(); // 开始时间 (单位:纳秒)
                localTime.set(sTime);
                System.out.println(String.format("%s | before | time=%s",
                        t.getName(), sTime));
                super.beforeExecute(t, r);
            }

            /**
             * 执行完成之后
             * @param r 任务
             * @param t 抛出的异常
             */
            @Override
            protected void afterExecute(Runnable r, Throwable t) {
                Long eTime = System.nanoTime(); // 结束时间 (单位:纳秒)
                Long totalTime = eTime - localTime.get(); // 执行总时间
                System.out.println(String.format("%s | after | time=%s | 耗时:%s 毫秒",
                        Thread.currentThread().getName(), eTime, (totalTime / 1000000.0)));
                super.afterExecute(r, t);
            }
        }
    }
运行结果:
pool-1-thread-1 | before | time=386265591734314
pool-1-thread-2 | before | time=386265591748520
pool-1-thread-2 | after | time=386265609349531 | 耗时:17.601011 毫秒
pool-1-thread-1 | after | time=386265609340821 | 耗时:17.606507 毫秒
pool-1-thread-2 | before | time=386265611326245
pool-1-thread-2 | after | time=386265611417269 | 耗时:0.091024 毫秒
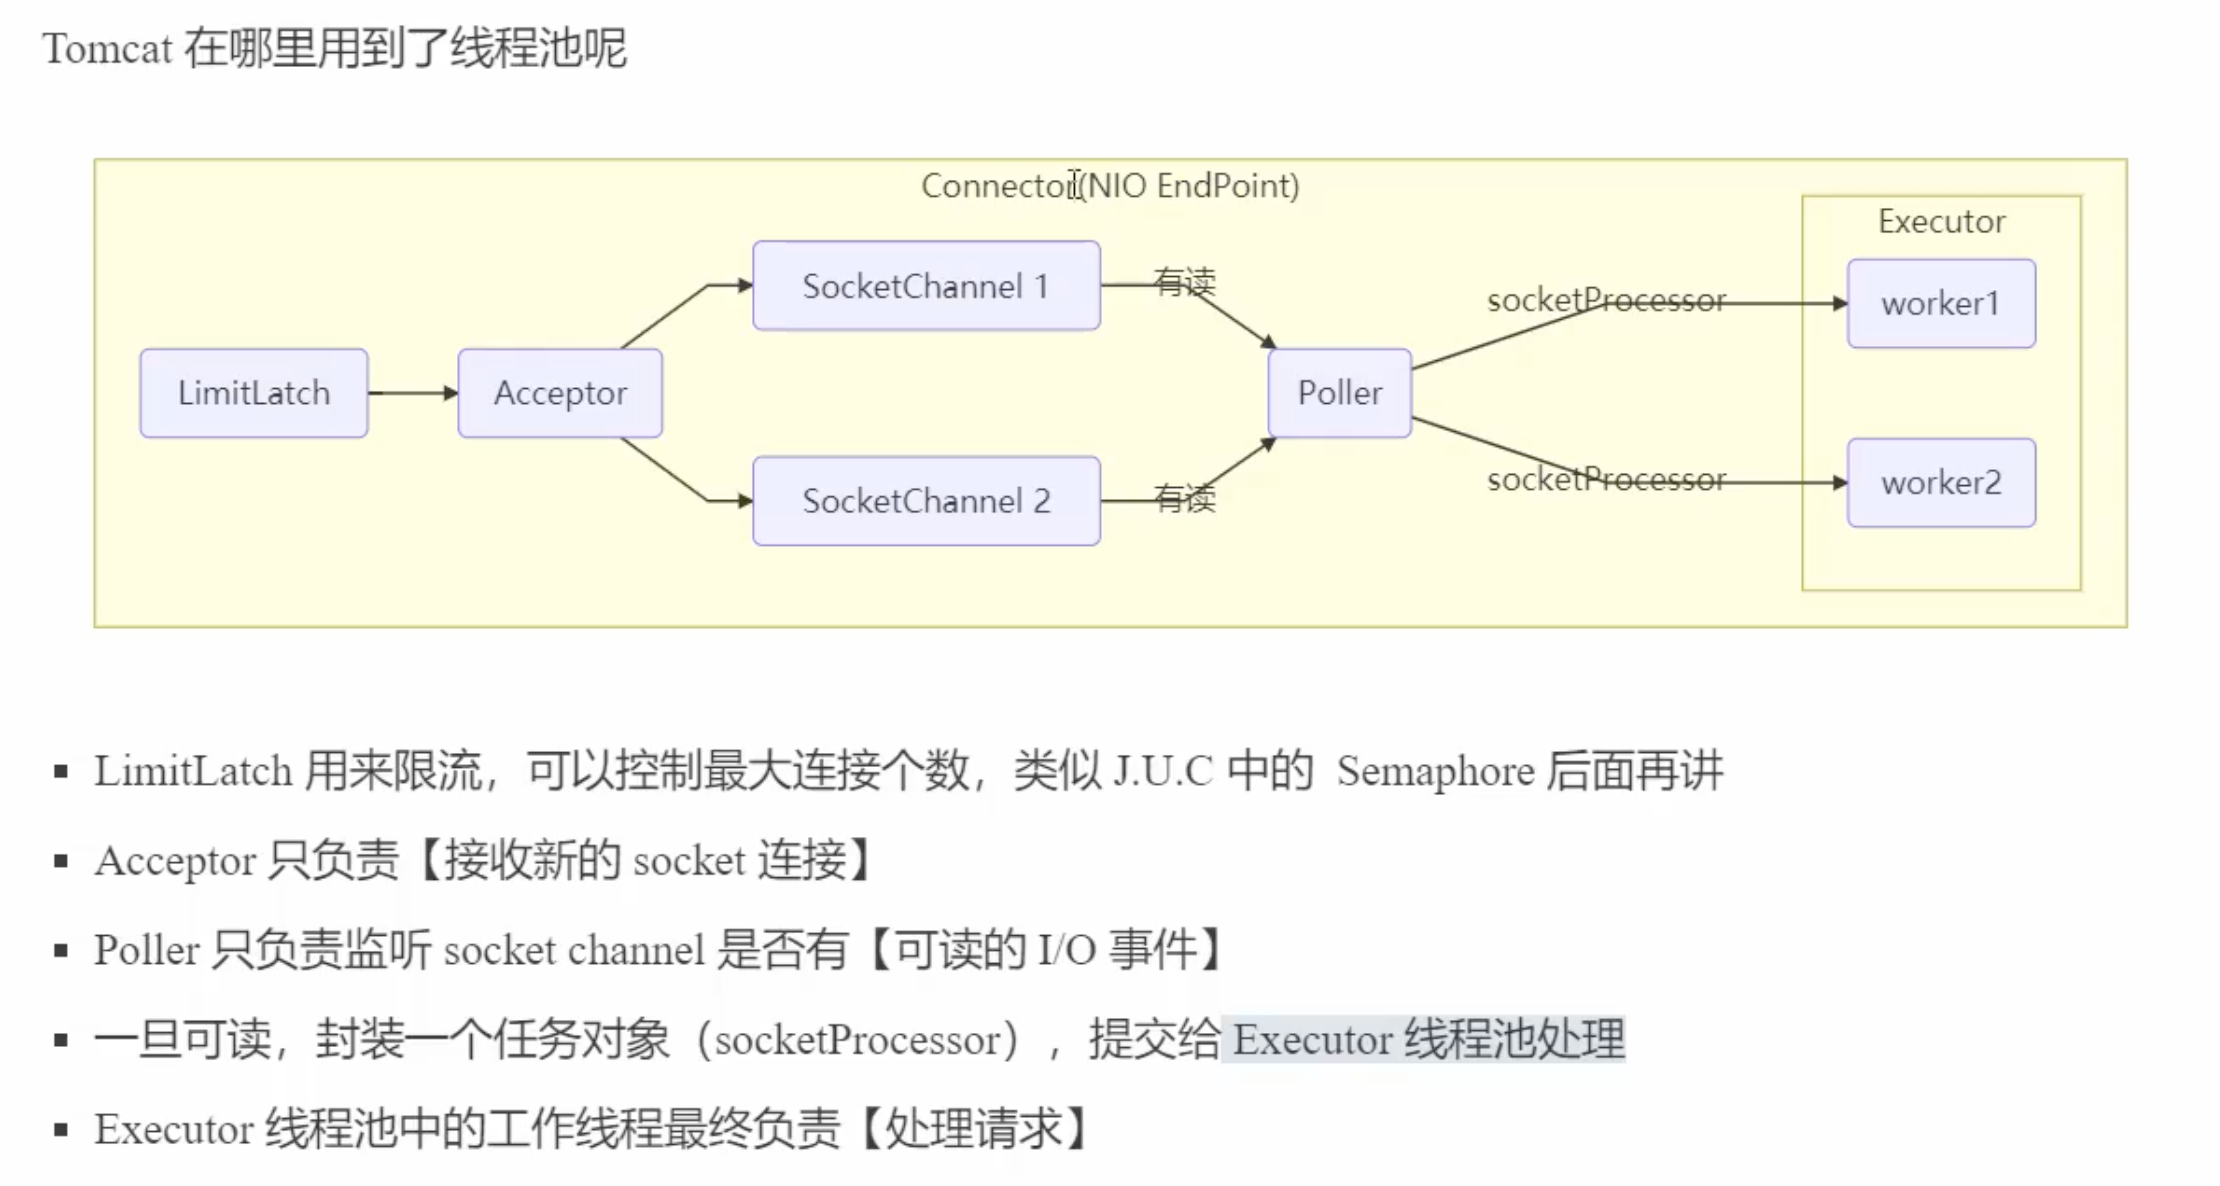
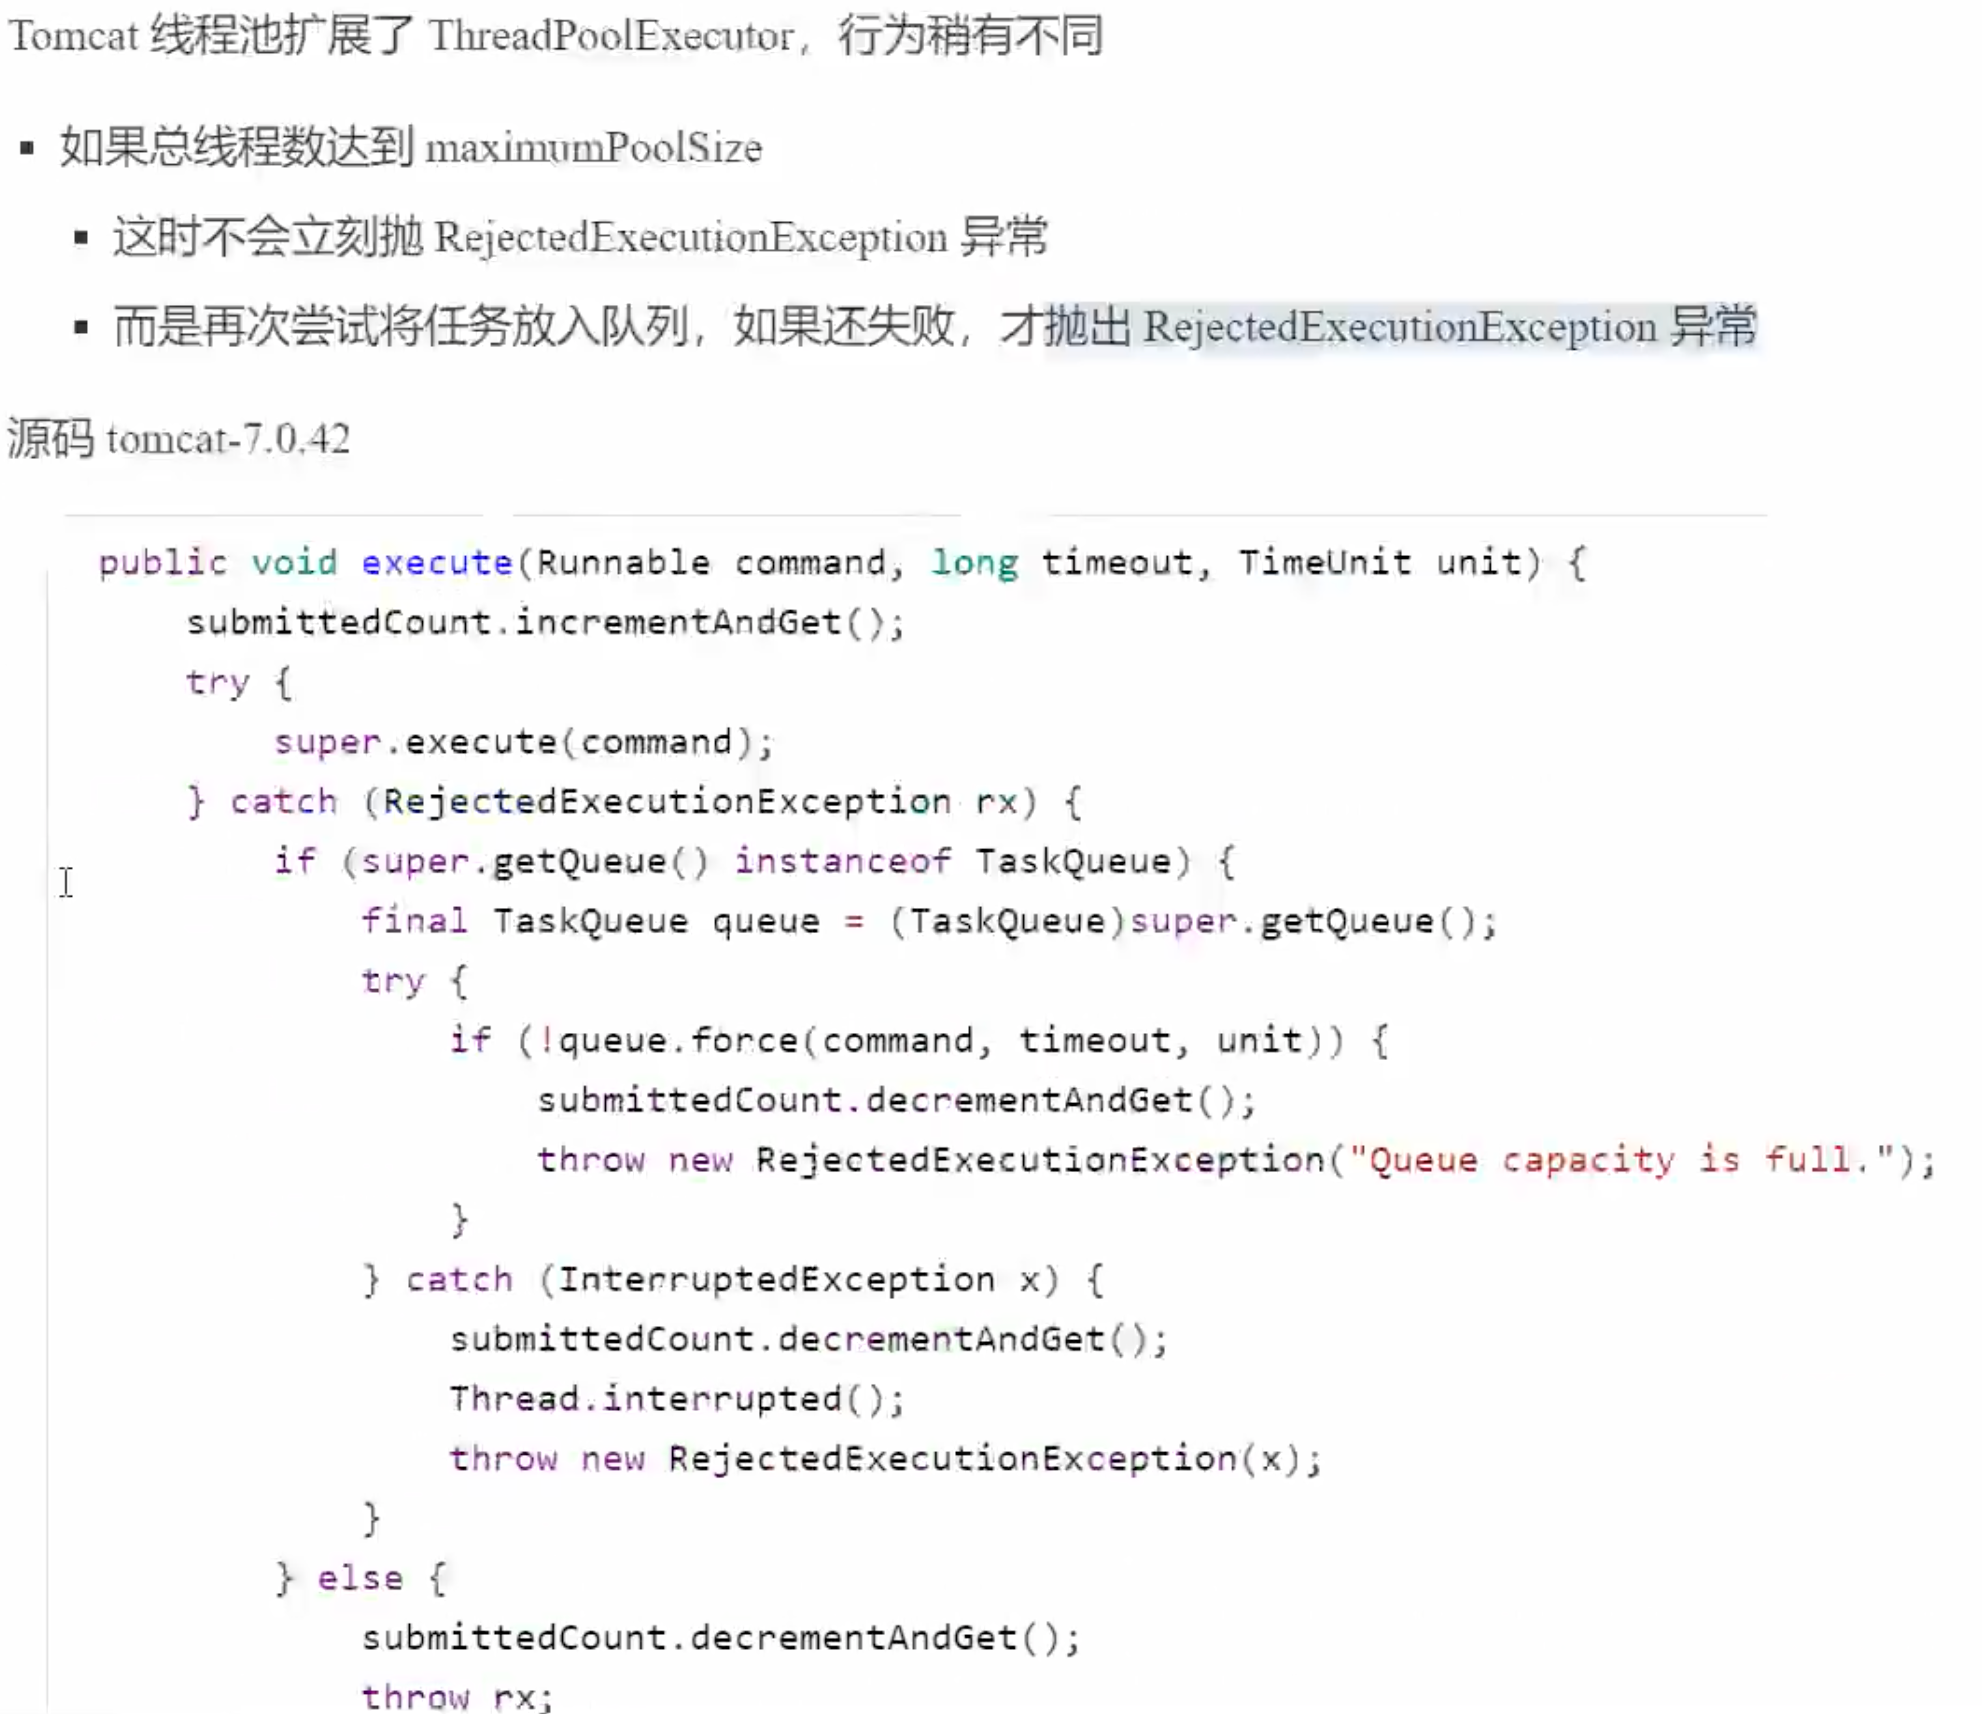
Tomcat中的线程池


利用Executors创建线程池的种类,区别和使用场景?
Executors 工厂类中默认的几个快捷线程池:
-
newFixedThreadPool:
FixedThreadPool 的最大最小线程数是相等的,其实设置成不等的也不会起什么作用。主要原因就是默认构造方法的 LinkedBlockingQueue 是一个 Integer.MAX_VALUE 长度的队列,可以认为是无界的,代码走不到判断最大线程池的逻辑。keepAliveTime 参数的设置,也没有意义,因为线程池回收的是corePoolSize和maximumPoolSize 之间的线程。
这个线程池的问题是,由于队列是无界的,在任务较多的情况下,会造成内存使用不可控,容器出现OOM,同时任务也会在队列里长时间等待。
⁃
底层:返回ThreadPoolExecutor实例,接收参数为所设定线程数量nThread,corePoolSize为nThread,maximumPoolSize为nThread;keepAliveTime为0L(不限时);unit为:TimeUnit.MILLISECONDS;WorkQueue为:new LinkedBlockingQueue() 无解阻塞队列
通俗:创建可容纳固定数量线程的池子,每隔线程的存活时间是无限的,当池子满了就不在添加线程了;如果池中的所有线程均在繁忙状态,对于新任务会进入阻塞队列中(无界的阻塞队列)
适用:执行长期的任务,性能好很多 -
newCachedThreadPool:
CachedThreadPool 是另外一个极端,它的最小线程数是 0,线程空闲 1 分钟的都会被回收。在提交任务时,使用了 SynchronousQueue,不缓存任何任务,直接创建新的线程。这种方式同样会有问题,因为它同样无法控制资源的使用,很容易造成内存溢出和过量的线程创建。
底层:返回ThreadPoolExecutor实例,corePoolSize为0;maximumPoolSize为Integer.MAX_VALUE;keepAliveTime为60L;unit为TimeUnit.SECONDS;workQueue为SynchronousQueue(同步队列)
通俗:当有新任务到来,则插入到SynchronousQueue中,由于SynchronousQueue是同步队列,因此会在池中寻找可用线程来执行,若有可以线程则执行,若没有可用线程则创建一个线程来执行该任务;若池中线程空闲时间超过指定大小,则该线程会被销毁。
适用:执行很多短期异步的小程序或者负载较轻的服务器
注意:一般在生产环境,这两种方式都不推荐,我们需要根据具体的需求,可以根据文中开头的方式,使用ThreadPoolExecutor 自行构建线程池
-
newSingleThreadExecutor:
底层:FinalizableDelegatedExecutorService包装的ThreadPoolExecutor实例,corePoolSize为1;maximumPoolSize为1;keepAliveTime为0L;unit为:TimeUnit.MILLISECONDS;workQueue为:new LinkedBlockingQueue() 无解阻塞队列
通俗:创建只有一个线程的线程池,且线程的存活时间是无限的;当该线程正繁忙时,对于新任务会进入阻塞队列中(无界的阻塞队列)
适用:一个任务一个任务执行的场景 -
newScheduledThreadPool:
底层:创建ScheduledThreadPoolExecutor实例,corePoolSize为传递来的参数,maximumPoolSize为Integer.MAX_VALUE;keepAliveTime为0;unit为:TimeUnit.NANOSECONDS;workQueue为:new DelayedWorkQueue() 一个按超时时间升序排序的队列
通俗:创建一个固定大小的线程池,线程池内线程存活时间无限制,线程池可以支持定时及周期性任务执行,如果所有线程均处于繁忙状态,对于新任务会进入DelayedWorkQueue队列中,这是一种按照超时时间排序的队列结构
适用:周期性执行任务的场景
线程池任务执行流程:
当线程池小于corePoolSize时,新提交任务将创建一个新线程执行任务,即使此时线程池中存在空闲线程。
当线程池达到corePoolSize时,新提交任务将被放入workQueue中,等待线程池中任务调度执行
当workQueue已满,且maximumPoolSize>corePoolSize时,新提交任务会创建新线程执行任务
当提交任务数超过maximumPoolSize时,新提交任务由RejectedExecutionHandler处理
当线程池中超过corePoolSize线程,空闲时间达到keepAliveTime时,关闭空闲线程
当设置allowCoreThreadTimeOut(true)时,线程池中corePoolSize线程空闲时间达到keepAliveTime也将关闭
备注:
一般如果线程池任务队列采用LinkedBlockingQueue队列的话,那么不会拒绝任何任务(因为队列大小没有限制),这种情况下,ThreadPoolExecutor最多仅会按照最小线程数来创建线程,也就是说线程池大小被忽略了。
如果线程池任务队列采用ArrayBlockingQueue队列的话,那么ThreadPoolExecutor将会采取一个非常负责的算法,比如假定线程池的最小线程数为4,最大为8所用的ArrayBlockingQueue最大为10。随着任务到达并被放到队列中,线程池中最多运行4个线程(即最小线程数)。即使队列完全填满,也就是说有10个处于等待状态的任务,ThreadPoolExecutor也只会利用4个线程。如果队列已满,而又有新任务进来,此时才会启动一个新线程,这里不会因为队列已满而拒接该任务,相反会启动一个新线程。新线程会运行队列中的第一个任务,为新来的任务腾出空间。
这个算法背后的理念是:该池大部分时间仅使用核心线程(4个),即使有适量的任务在队列中等待运行。这时线程池就可以用作节流阀。如果挤压的请求变得非常多,这时该池就会尝试运行更多的线程来清理;这时第二个节流阀—最大线程数就起作用了
线程中如何处理某个未处理异常?execute() VS submit()
execute() 和 submit() 都是用来执行线程池任务的,它们最主要的区别是,submit() 方法可以接收线程池执行的返回值,而 execute() 不能接收返回值。
捕捉异常有两种方法。
- 把线程的错误捕捉到,往上抛
- 通过线程池工厂,把异常捕捉到,uncaughtException往log4j写错误日志
示例代码:
public class TestThread implements Runnable {
     public void run() {
          throw new RuntimeException("throwing runtimeException.....");
     }
}
当线程代码抛出运行级别异常之后,线程会中断。主线程不受这个影响,不会处理这个,而且根本不能捕捉到这个异常,仍然继续执行自己的代码
- 方法1)代码示例:
  public class TestMain {
      public static void main(String[] args) {
          try {
               TestThread t = new TestThread();
               ExecutorService exec = Executors.newCachedThreadPool();
               Future future = exec.submit(t);
               exec.shutdown();
               future.get();//主要是这句话起了作用,调用get()方法,异常重抛出,包装在ExecutorException
          } catch (Exception e) {//这里可以把线程的异常继续抛出去
               System.out.println("Exception Throw:" + e.getMessage());
          }
     }
}
- 方法2)代码示例
public class HandlerThreadFactory implements ThreadFactory {
     public Thread newThread(Runnable runnable) {
          Thread t = new Thread(runnable);
          MyUncaughtExceptionHandler myUncaughtExceptionHandler = new MyUncaughtExceptionHandler();
          t.setUncaughtExceptionHandler(myUncaughtExceptionHandler);
          return t;
     }
}


public class MyUncaughtExceptionHandler implements Thread.UncaughtExceptionHandler  {
       public void uncaughtException(Thread t, Throwable e) {
          System.out.println("write logger here:" + e);
     }
}


public class TestMain {
    public static void main(String[] args) {
          try {
               TestThread t = new TestThread();
               ExecutorService exec = Executors.newCachedThreadPool(new HandlerThreadFactory());
               exec.execute(t);
          } catch (Exception e) {
               System.out.println("Exception Throw:" + e.getMessage());
          }
     }
}
以上,感谢阅读,end!!!